

Configure Node Labels
You can either use Ambari to configure node labels on a cluster, or make configuration changes on the YARN ResourceManager host if you are using a non-Ambari cluster.
Enable Node Labels on an Ambari Cluster
- Select YARN > Configs on the Ambari dashboard, then enable Node Labels under YARN Features.
- Click Save, then restart all cluster components that require a restart.
Enable Node Labels on a non-Ambari Cluster
To enable Node Labels on a non-Ambari cluster, make the following configuration changes on the YARN ResourceManager host.
- Create a Label Directory in HDFS
Use the following commands to create a "node-labels" directory in which to store the Node Labels in HDFS.
sudo su hdfs
hadoop fs -mkdir -p /yarn/node-labels
hadoop fs -chown -R yarn:yarn /yarn
hadoop fs -chmod -R 700 /yarn
-chmod -R 700specifies that only the yarn user can access the "node-labels" directory.You can then use the following command to confirm that the directory was created in HDFS.
hadoop fs -ls /yarn
The new node label directory should appear in the list returned by the following command. The owner should be
yarn, and the permission should bedrwx.Found 1 items drwx------ - yarn yarn 0 2014-11-24 13:09 /yarn/node-labels
Use the following commands to create a
/user/yarndirectory that is required by the distributed shell.hadoop fs -mkdir -p /user/yarn hadoop fs -chown -R yarn:yarn /user/yarn hadoop fs -chmod -R 700 /user/yarn
The preceding commands assume that the
yarnuser will be submitting jobs with the distributed shell. To run the distributed shell with a different user, create the user, then use/user/<user_name>in the file paths of the commands above to create a new user directory. - Configure YARN for Node Labels
Add the following properties to the
/etc/hadoop/conf/yarn-site.xmlfile on the ResourceManager host.Set the following property to enable Node Labels:
<property>
      <name>yarn.node-labels.enabled</name>
      <value>true</value>
</property>
Set the following property to reference the HDFS node label directory:
<property>
      <name>yarn.node-labels.fs-store.root-dir</name>
      <value>hdfs://<host>:<port>/<absolute_path_to_node_label_directory></value>
 </property>
For example:
<property> <name>yarn.node-labels.fs-store.root-dir</name> <value>hdfs://node-1.example.com:8020/yarn/node-labels/</value> </property> - Start or Restart the YARN ResourceManager
In order for the configuration changes in the
yarn-site.xmlfile to take effect, you must stop and restart the YARN ResourceManager if it is running, or start the ResourceManager if it is not running.Use the following command to stop the ResourceManager:
su -l yarn -c "/usr/hdp/current/hadoop-yarn-resourcemanager/sbin/yarn-daemon.sh stop resourcemanager"Use the following command to start the ResourceManager:
su -l yarn -c "/usr/hdp/current/hadoop-yarn-resourcemanager/sbin/yarn-daemon.sh start resourcemanager"
Add Node Labels
Use the following command format to add Node Labels. You should run these commands as
the yarn user. Node labels must be added before they can be assigned to
nodes and associated with queues.
sudo su yarn
yarn rmadmin -addToClusterNodeLabels "<label1>(exclusive=<true|false>),<label2>(exclusive=<true|false>)"
 | Note |
|---|---|
If |
For example, the following commands add the node label "x" as exclusive, and "y" as shareable (non-exclusive).
sudo su yarn
yarn rmadmin -addToClusterNodeLabels "x(exclusive=true),y(exclusive=false)"
You can use the yarn cluster --list-node-labels command to confirm that
Node Labels have been added:
[root@node-1 /]# yarn cluster --list-node-labels
15/07/11 13:55:43 INFO impl.TimelineClientImpl: Timeline service address: http://node-1.example.com:8188/ws/v1/timeline/
15/07/11 13:55:43 INFO client.RMProxy: Connecting to ResourceManager at node-1.example.com/240.0.0.10:8050
Node Labels: <x:exclusivity=true>,<y:exclusivity=false>
yarn rmadmin -removeFromClusterNodeLabels "<label1>,<label2>"
| Note |
|---|---|
You cannot remove a node label if it is associated with a queue. |
Assign Node Labels to Cluster Nodes
Use the following command format to add or replace node label assignments on cluster nodes:
yarn rmadmin -replaceLabelsOnNode "<node1>:<port>=<label1> <node2>:<port>=<label2>"
For example, the following commands assign node label "x" to "node-1.example.com", and node label "y" to "node-2.example.com".
sudo su yarn
yarn rmadmin -replaceLabelsOnNode "node-1.example.com=x node-2.example.com=y"
| Note |
|---|---|
You can only assign one node label to each node. Also, if you do not specify a port, the node label change will be applied to all NodeManagers on the host. |
To remove node label assignments from a node, use -replaceLabelsOnNode,
but do not specify any labels. For example, you would use the following commands to
remove the "x" label from node-1.example.com:
sudo su yarn
yarn rmadmin -replaceLabelsOnNode "node-1.example.com"
Associate Node Labels with Queues
Now that we have created Node Labels, we can associate them with queues in the
/etc/hadoop/conf/capacity-scheduler.xml file.
You must specify capacity on each node label of each queue, and also ensure that the sum of capacities of each node-label of direct children of a parent queue at every level is equal to 100%. Node labels that a queue can access (accessible Node Labels of a queue) must be the same as, or a subset of, the accessible Node Labels of its parent queue.
Example:
Assume that a cluster has a total of 8 nodes. The first 3 nodes (n1-n3) have node label=x, the next 3 nodes (n4-n6) have node label=y, and the final 2 nodes (n7, n8) do not have any Node Labels. Each node can run 10 containers.
The queue hierarchy is as follows:
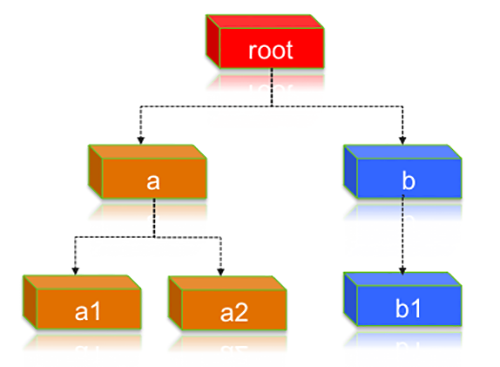
Assume that queue “a” can access Node Labels “x” and “y”, and queue “b” can only access node label “y”. By definition, nodes without labels can be accessed by all queues.
Consider the following example label configuration for the queues:
capacity(a) = 40, capacity(a, label=x) = 100, capacity(a, label=y) = 50; capacity(b) = 60, capacity(b, label=y) = 50
This means that:
-
Queue “a” can access 40% of the resources on nodes without any labels, 100% of the resources on nodes with label=x, and 50% of the resources on nodes with label=y.
-
Queue “b” can access 60% of the resources on nodes without any labels, and 50% of the resources on nodes with label=y.
You can also see that for this configuration:
capacity(a) + capacity(b) = 100 capacity(a, label=x) + capacity(b, label=x) (b cannot access label=x, it is 0) = 100 capacity(a, label=y) + capacity(b, label=y) = 100
For child queues under the same parent queue, the sum of the capacity for each label should equal 100%.
Similarly, we can set the capacities of the child queues a1, a2, and b1:
a1 and a2: capacity(a.a1) = 40, capacity(a.a1, label=x) =30, capacity(a.a1, label=y) =50 capacity(a.a2) = 60, capacity(a.a2, label=x) =70, capacity(a.a2, label=y) =50 b1: capacity(b.b1) = 100 capacity(b.b1, label=y) = 100
You can see that for the a1 and a2 configuration:
capacity(a.a1) + capacity(a.a2) = 100 capacity(a.a1, label=x) + capacity(a.a2, label=x) = 100 capacity(a.a1, label=y) + capacity(a.a2, label=y) = 100
How many resources can queue a1 access?
Resources on nodes without any labels: Resource = 20 (total containers that can be allocated on nodes without label, in this case n7, n8) * 40% (a.capacity) * 40% (a.a1.capacity) = 3.2 (containers)
Resources on nodes with label=x
Resource = 30 (total containers that can be allocated on nodes with label=x, in this case n1-n3) * 100% (a.label-x.capacity) * 30% = 9 (containers)
To implement this example configuration, you would add the following properties in the
/etc/hadoop/conf/capacity-scheduler.xml file.
 <property>
 <name>yarn.scheduler.capacity.root.queues</name>
 <value>a,b</value>
 </property>

 <property>
 <name>yarn.scheduler.capacity.root.accessible-node-labels.x.capacity</name>
 <value>100</value>
 </property>

 <property>
 <name>yarn.scheduler.capacity.root.accessible-node-labels.y.capacity</name>
 <value>100</value>
 </property>

 <!-- configuration of queue-a -->
 <property>
 <name>yarn.scheduler.capacity.root.a.accessible-node-labels</name>
 <value>x,y</value>
 </property>

 <property>
 <name>yarn.scheduler.capacity.root.a.capacity</name>
 <value>40</value>
 </property>

 <property>
 <name>yarn.scheduler.capacity.root.a.accessible-node-labels.x.capacity</name>
 <value>100</value>
 </property>

 <property>
 <name>yarn.scheduler.capacity.root.a.accessible-node-labels.y.capacity</name>
 <value>50</value>
 </property>

 <property>
 <name>yarn.scheduler.capacity.root.a.queues</name>
 <value>a1,a2</value>
 </property>

 <!-- configuration of queue-b -->
 <property>
 <name>yarn.scheduler.capacity.root.b.accessible-node-labels</name>
 <value>y</value>
 </property>

 <property>
 <name>yarn.scheduler.capacity.root.b.capacity</name>
 <value>60</value>
 </property>

 <property>
 <name>yarn.scheduler.capacity.root.b.accessible-node-labels.y.capacity</name>
 <value>50</value>
 </property>

 <property>
 <name>yarn.scheduler.capacity.root.b.queues</name>
 <value>b1</value>
 </property>

 <!-- configuration of queue-a.a1 -->
 <property>
 <name>yarn.scheduler.capacity.root.a.a1.accessible-node-labels</name>
 <value>x,y</value>
 </property>

 <property>
 <name>yarn.scheduler.capacity.root.a.a1.capacity</name>
 <value>40</value>
 </property>

 <property>
 <name>yarn.scheduler.capacity.root.a.a1.accessible-node-labels.x.capacity</name>
 <value>30</value>
 </property>

 <property>
 <name>yarn.scheduler.capacity.root.a.a1.accessible-node-labels.y.capacity</name>
 <value>50</value>
 </property>

 <!-- configuration of queue-a.a2 -->
 <property>
 <name>yarn.scheduler.capacity.root.a.a2.accessible-node-labels</name>
 <value>x,y</value>
 </property>

 <property>
 <name>yarn.scheduler.capacity.root.a.a2.capacity</name>
 <value>60</value>
 </property>

 <property>
 <name>yarn.scheduler.capacity.root.a.a2.accessible-node-labels.x.capacity</name>
 <value>70</value>
 </property>

 <property>
 <name>yarn.scheduler.capacity.root.a.a2.accessible-node-labels.y.capacity</name>
 <value>50</value>
 </property>

 <!-- configuration of queue-b.b1 -->
 <property>
 <name>yarn.scheduler.capacity.root.b.b1.accessible-node-labels</name>
 <value>y</value>
 </property>

 <property>
 <name>yarn.scheduler.capacity.root.b.b1.capacity</name>
 <value>100</value>
 </property>

 <property>
 <name>yarn.scheduler.capacity.root.b.b1.accessible-node-labels.y.capacity</name>
 <value>100</value>
 </property>
Refresh Queues
After adding or updating queue node label properties in the
capacity-scheduler.xml file, you must run the following commands to
refresh the queues:
sudo su yarn
yarn rmadmin -refreshQueues
Confirm Node Label Assignments
You can use the following commands to view information about node labels.
-
List all running nodes in the cluster:
yarn node -listExample:
[root@node-1 /]# yarn node -list
14/11/21 12:14:06 INFO impl.TimelineClientImpl: Timeline service address: http://node-1.example.com:8188/ws/v1/timeline/
14/11/21 12:14:07 INFO client.RMProxy: Connecting to ResourceManager at node-1.example.com/240.0.0.10:8050
Total Nodes:3
 Node-Id Node-State Node-Http-Address Number-of-Running-Containers
node-3.example.com:45454 RUNNING node-3.example.com:50060 0
node-1.example.com:45454 RUNNING node-1.example.com:50060 0
node-2.example.com:45454 RUNNING node-2.example.com:50060 0
-
List all node labels in the cluster:
yarn cluster
                     --list-node-labels
Example:
[root@node-1 /]# yarn cluster --list-node-labels
15/07/11 13:55:43 INFO impl.TimelineClientImpl: Timeline service address: http://node-1.example.com:8188/ws/v1/timeline/
15/07/11 13:55:43 INFO client.RMProxy: Connecting to ResourceManager at node-1.example.com/240.0.0.10:8050
Node Labels: <x:exclusivity=true>,<y:exclusivity=false>
-
List the status of a node (includes node labels):
yarn node -status
                     <Node_ID>
Example:
[root@node-1 /]# yarn node -status node-1.example.com:45454
14/11/21 06:32:35 INFO impl.TimelineClientImpl: Timeline service address: http://node-1.example.com:8188/ws/v1/timeline/
14/11/21 06:32:35 INFO client.RMProxy: Connecting to ResourceManager at node-1.example.com/240.0.0.10:8050
Node Report :
 Node-Id : node-1.example.com:45454
 Rack : /default-rack
 Node-State : RUNNING
 Node-Http-Address : node-1.example.com:50060
 Last-Health-Update : Fri 21/Nov/14 06:32:09:473PST
 Health-Report :
 Containers : 0
 Memory-Used : 0MB
 Memory-Capacity : 1408MB
 CPU-Used : 0 vcores
 CPU-Capacity : 8 vcores
 Node-Labels : x
Node labels are also displayed in the ResourceManager UI on the Nodes and Scheduler pages.
Specify a Child Queue with No Node Label
If no node label is specified for a child queue, it inherits the node label setting of its parent queue. To specify a child queue with no node label, use a blank space for the value of the node label.
For example:
 <property>
 <name>yarn.scheduler.capacity.root.b.b1.accessible-node-labels</name>
 <value> </value>
 </property>
Set a Default Queue Node Label Expression
You can set a default node label on a queue. The default node label will be used if no label is specified when the job is submitted.
For example, to set "x"as the default node label for queue "b1", you would add the
following property in the capacity-scheduler.xml file.
<property>
 <name>yarn.scheduler.capacity.root.b.b1.default-node-label-expression</name>
 <value>x</value>
</property>