
Chapter 12. Using Advanced Falcon Features
Locating and Managing Entities
There are two methods you can use to locate entities in Falcon. You can use the Falcon web UI search functionality to find feed, process, or mirror entities that are defined for the cluster. To display a list of cluster entities, you use the Cluster icon. After locating an entity, you can perform actions on them or view information about them.
Available data sources can only be viewed from the Datasource field on the Create New Feed page.
Steps
Type your query in the Search field, and press Enter.
![[Note]](../common/images/admon/note.png)
Note You can use Search to find feed, process, and mirror entities, but not cluster or data source entities. See Step 3 to locate cluster entities. Available data sources can only be viewed from the Datasource field on the Create New Feed page.
You can filter the entity search based on names, types, or tags. By default, the first argument in your query is the Name filter. Wildcards are supported, such as asterisk (*). The search is interactive so you can refine your search by adding and removing tags to tune your result set.
![[Tip]](../common/images/admon/tip.png)
Tip To see all feed, process, and mirror entities, search using an asterisk (*) for the entity name.
Filter
Description
Name
Can be entered as a subsequence of the entity name (feed, process, or mirror name). Not case sensitive. The characters entered must be in the same order as the original sequence in the entity name.
For example:
"sample1" matches the entity named "SampleFeed1-2"
"mhs" matches the entity named "New-My-Hourly-Summary"
Searching on the asterisk (*) character displays all feed, process, and mirror entities.
Tag
Keywords in metadata tags. Not case sensitive. Entities that are returned in search results have tags that match all of the tag keywords.
Type
Specifies the type of entity. Valid entity types are feed, process, and mirror. The Falcon search UI infers the filter type automatically. For example, to add a "process" filter type, enter process in the search field, and then choose type:process from the hints offered in the UI as shown in the previous screen capture.
In the search results, you can do the following:
Display the actions you can perform on the entity by selecting the checkbox next to the entity name.
You can schedule, resume, pause, edit, copy, delete, or download the entity definition XML for a feed, process, or mirror.
Display the instances and property details of the entity by clicking the entity name.
Click the Clusters icon to view a list of cluster entities.
In the search results, you can do the following:
Display the actions you can perform on the entity by selecting the check-box next to the cluster name.
You can delete a cluster entity or download the entity definition XML.
You can edit the cluster entity if your Falcon service is in safemode.
Display the properties of the cluster entity by clicking the cluster name.
Accessing File Properties from Ambari
You can set properties for files such as core-site.xml,
oozie-site.xml, hive-site.xml, and so
forth, from the Ambari UI.
You can access the properties by performing the following steps:
Log in to Ambari at http://[
cluster ip]:8080.Click Service and select the service that you want to modifiy.
A page with details about the service displays.
On the service details page, click Configs, then click Advanced, if available.
An Advanced page is not available for all services.
Click the section name for the Custom or Advanced properties to expand the section.
To add a property to the list, scroll to the bottom of properties and click .
The option is available only for some configuration files.
Enabling Transparent Data Encryption
Falcon provides transparent data encryption (TDE) for data at rest, such as databases. TDE encryption is supported in Falcon on HDFS, Hive, and snapshot mirroring jobs.
You can enable the TDE encryption property in the following ways:
Select the TDE Encryption option when creating a mirror in the Falcon web UI.
Add the property
tdeEncryptionEnabled=truedirectly to the properties file extensions in a<workflow>.xmlfile.Add
<arg>skipChecksum</arg>and<arg>true</arg>to a<properties>.jsonfile.
TDE encryption performs a checksum to determine if changes have been made to the data. If the checksum value is different, HDP performs a replication. The encryptions key can be different in the source and target clusters, which would result in a modified checksum value, so the checksum might indicate changes even if the data has not changed. If you skip the checksum, HDP compares individual blocks to see if replication is needed, which can increase the time to complete a mirror job.
Putting Falcon in Safe Mode
Safe mode (read-only mode) is useful when you want to prevent Falcon users from scheduling entities in the workflow engine, such as when upgrading Hadoop clusters or updating Falcon cluster entities. When in safe mode, users can only perform limited operations. For example, you cannot perform submit, schedule, edit, delete, or resume operations on entities. For further detail, see the Falcon Community Documentation.
You must be superuser or administrative (admin) user to set safe mode. A superuser is
the user who owns the Falcon process or belongs to a group specified in the Falcon
startup property falcon.security.authorization.superusergroup. An
admin user is the user listed under the Falcon startup property
falcon.security.authorization.admin.users, or they belong to a
group listed under the startup property
falcon.security.authorization.admin.groups.
If you want to modify a cluster entity, you must be in safe mode.
Put the Falcon server in safe mode:
/bin/falcon admin -setsafemode trueTake the Falcon server out of safe mode:
/bin/falcon admin -setsafemode false
Viewing Alerts in Falcon
Falcon provides alerting for a variety of events to let you monitor the health of your
data pipelines. All events are logged to the metric.log file, which
is installed by default in your $user/logs/ directory. You can view
the events from the log or capture them using a custom interface.
Each event logged provides the following information:
Date: UTC date of action.
Action: Event name.
Dimensions: List of name/value pairs of various attributes for a given action.
Status: Result of the action. Can be FAILED or SUCCEEDED (when applicable).
Time-taken: Time in nanoseconds for a given action to complete.
For example, a new process-definition alert would log the following information:
2012-05-04 12:23:34,026 {Action:submit, Dimensions:{entityType=process}, Status: SUCCEEDED, Time-taken:97087000 ns}Table 12.1. Available Falcon Event Alerts
| Entity Type | Action | Returns Success/Failure |
|---|---|---|
| Cluster | New cluster definitions submitted to Falcon | Yes |
| Cluster | Cluster update events | Yes |
| Cluster | Cluster remove events | Yes |
| Feed | New feed definition submitted to Falcon | Yes |
| Feed | Feed update events | Yes |
| Feed | Feed suspend events | Yes |
| Feed | Feed resume events | Yes |
| Feed | Feed remove events | Yes |
| Feed | Feed instance deletion event | No |
| Feed | Feed instance deletion failure event (no retries) | No |
| Feed | Feed instance replication event | No |
| Feed | Feed instance replication failure event | No |
| Feed | Feed instance replication auto-retry event | No |
| Feed | Feed instance replication retry exhaust event | No |
| Feed | Feed instance late arrival event | No |
| Feed | Feed instance post cut-off arrival event | No |
| Process | New process definition posted to Falcon | Yes |
| Process | Process update events | Yes |
| Process | Process suspend events | Yes |
| Process | Process resume events | Yes |
| Process | Process remove events | Yes |
| Process | Process instance kill events | Yes |
| Process | Process instance re-run events | Yes |
| Process | Process instance generation events | No |
| Process | Process instance failure events | No |
| Process | Process instance auto-retry events | No |
| Process | Process instance retry exhaust events | No |
| Process | Process re-run due to late feed event | No |
| N/A | Transaction rollback failed event | No |
Late Data Handling
Late data handling in Falcon defines how long data can be delayed and how that late
data is handled. For example, a late arrival cut-off of hours(6) in the
feed entity means that data for the specified hour can delay as much as 6 hours later.
The late data specification in the process entity defines how this late data is handled
and the late data policy in the process entity defines how frequently Falcon checks for
late data.
The supported policies for late data handling are:
backoff: Take the maximum late cut-off and check every specified time.
exp-backoff (default): Recommended. Take the maximum cut-off date and check on an exponentially determined time.
final:Take the maximum late cut-off and check once.
The policy, along with delay, defines the interval at which a late data check is done. The late input specification for each input defines the workflow that should run when late data is detected for that input.
To handle late data, you need to modify the feed and process entities.
Specify the cut-off time in your feed entity.
For example, to set a cut-off of 4 hours:
<late-arrival cut-off="hours(4)”/>
Specify a check for late data in all your process entities that reference that feed entity.
For example, to check each hour until the cut-off time with a specified policy of
backoffand a delay of 1 hour:<late-process policy="exp-backoff" delay="hours(1)”> <late-input input="input" workflow-path="/apps/clickstream/late" /> </late-process>
Setting a Retention Policy
You can set retention policies on a per-cluster basis. You must specify the amount of time to retain data before deletion. You set a retention policy in the feed entity.
Falcon kicks off the retention policy on the basis of the time value you specify:
Less than 24 hours: Falcon kicks off the retention policy every 6 hours.
More than 24 hours: Falcon kicks off the retention policy every 24 hours.
When a feed is scheduled: Falcon kicks off the retention policy immediately.
| Note |
|---|---|
When a feed is successfully scheduled, Falcon triggers the retention policy immediately regardless of the current timestamp or state of the cluster. |
To set a retention policy, add the following lines to your feed entity for each cluster that the feed belongs to:
<clusters>
        <cluster name="corp" type="source">
            <validity start="2012-01-30T00:00Z" end="2013-03-31T23:59Z"
                      timezone="UTC" />
            <retention limit="$unitOfTime($n)" action="delete" /> <!--Retention policy.  -->
        </cluster>
 </clusters>
Where limit can be minutes, hours, days, or months and then a specified
numeric value. Falcon then retains data spanning from the current moment back to the
time specified in the attribute. Any data beyond the limit (past or future) is
erased.
Setting a Retry Policy
You can set retry policies on a per-process basis. The policies determine how workflow failures are handled. Depending on the delay and number of attempts, the workflow is retried after specified intervals. The retry policy is set on the process entity.
To set a retry policy, add the following lines to your process entity:
<retry policy=[retry policy] delay=[retry delay]attempts=[attempts]/>
<retry policy="$policy" delay="minutes($n)" attempts="$n"/>
For example:
<process name ="[sample-process]">
...
     <retry policy="periodic" delay="minutes(10)" attempts="3"/>
...
</process>
In this example, the workflow is retried after 10 minutes, 20 minutes, and 30 minutes.
Enabling Email Notifications
You can enable email notifications in feed entities and process entities. When email notifications are enabled, an email is sent to the specified email address when the scheduled feed or process instance completes. Email notifications can be specified in feed or process entities.
You can set email notifications in feed and process entities from the web UI. This can be done when initially creating an entity, or you can edit an existing entity to add or modify email notifications.
Setting Email Notifications from the CLI
To set email notifications, add the following to the feed or process entity:
<process name="<process_name>
     ...
     <notification type="email" to="jdoe@example.com, sjones@company.com"/>
     ...
</process>
Where type specifies the type of notification. Currently, only the
email notification type is supported. The to attribute
specifies where the notification is to be sent. In the case of email notifications,
specify the email address where you want notifications sent for the to
attribute. Multiple recipients can be specified as a comma-separated list of email
addresses as shown in the previous example. The <notification> tag
must be placed before the <ACL> tag.
If you are using email notification in a Hive or HDFS disaster recovery configuration, you must add the following properties to the Falcon server-side extensions file:
jobNotificationType=email
jobNotificationReceivers=<address-of-email-receiver>
The email addresses are entered as a comma-separated list.
Falcon email notifications require SMTP server configurations to be defined in the
Falcon startup.properties file that is located in the
FALCON_HOME/conf directory. After setting the values, restart the
Falcon service.
Falcon does not check for multiple versions of properties in the properties file. If multiple versions of a property exist, Falcon uses the last one in the file.
Configure the following startup properties for email notifications:
Table 12.2. Email Notification Startup Properties
|
Property |
Description |
Default Values |
|---|---|---|
|
falcon.email.smtp.host |
Name of the host where the SMTP server can be found. |
|
|
falcon.email.smtp.port |
The SMTP server host port to connect to. |
|
|
falcon.email.from.address |
The "From:" address used for all notification emails. |
|
|
falcon.email.smtp.auth |
Indicates whether user sending the email is authenticated. Boolean value (true | false) |
|
|
falcon.email.smtp.user |
If authentication is enabled, this property specifies the username that is used to log in. |
none |
|
falcon.email.smtp.password |
If authentication is enabled, the username's password that is used to authenticate the user. |
none |
|
monitoring.plugins |
Ensure that the email notification plugin is listed for this property to enable email notifications. For example: org.apache.falcon.plugin.EmailNotificationPlugin,
org.apache.falcon.plugin.DefaultMonitoringPlugin
|
none |
Understanding Dependencies in Falcon
Cross-entity dependencies in Falcon are important because a dependency cannot be removed until all the dependents are first removed. For example, if Falcon manages two clusters, one in Oregon and one in Virginia, and the Oregon cluster is going to be taken down, you must first resolve the Virginia cluster dependencies as one Dataset (Dataset 3) has a cross-entity dependency and depends on Email Ingest (Process 1).
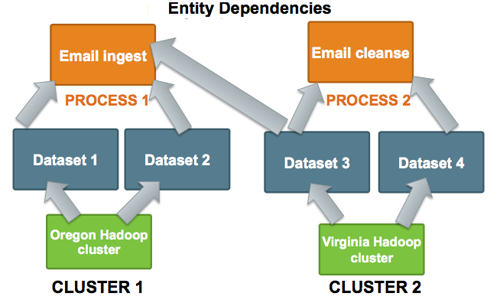
To remove the Oregon cluster, you must resolve this dependency. Before you can remove the Oregon Hadoop cluster, you must remove not only Process 1, Datasets 1 and 2 but also modify the Dataset 3 entity to remove its dependence on Process 1.
As Falcon manages more clusters, viewing these dependencies becomes more crucial. For further information about dependencies and cross-entity validations, see the Falcon Community Documentation
Viewing Dependencies
The Falcon web UI provides dependency viewing for clusters, datasets, and processes that shows lineage in a graphical format. You can view the relationships between dependencies as a graph to determine requirements for removal.
You can access the dependencies graph from the entity lists.
To view cluster dependencies:
Click the Clusters icon.
In the list that displays, click on the name of a cluster.
To view feed or process entities, or mirror jobs:
Enter a term in the Search field.
In the search results, click on the name of an entity or mirror job.
