
HDP Security Administration tools support access control and auditing for Hive repositories in Hadoop clusters.
Before installing the agent on the HiveServer2 host set up a repository in the Policy Manager.
![[Important]](../common/images/admon/important.png) | Important |
|---|---|
For Hive connection information, see HiveServer2 Clients, JDBC. |
To create a Hive Repository:
Sign in to the HDP Security Administrator Web UI as an administrator.
Click .
The Manage Repository page displays.

Next to Hive, click the green plus symbol.
The Create Repository page displays.
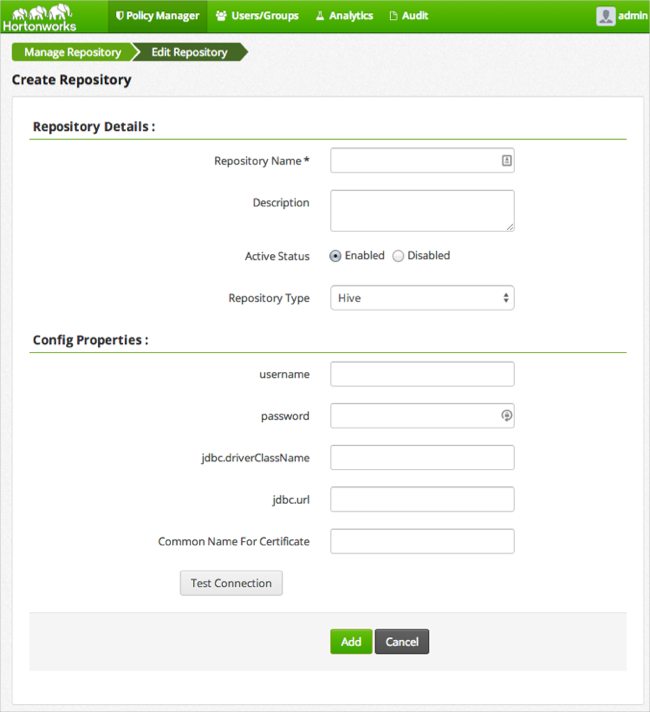
Complete the required settings with the following information:
Table 4.4. Hive Repository Details
Label Value Description Repository Name $nameSpecify a unique name for the repository, you will need to specify the repository name in the agent installation properties. For example, clustername_hive.Description $description-of-repoEnter a description up to 150 characters. Active Status EnabledorDisabledEnable or disable policy enforcement for the repository. Repository type HDFS,Hive, orHBaseSelect the type of repository, Hive. User name $userSpecify a user name on the remote system with permission to establish the connection with the hive, for example hive.Password $passwordSpecify the password of the user account for connection. jdbc.driverClassName $classnameSpecify the full classname of the driver used for Hive connections. The default HiveServer2 classname is org.apache.hive.jdbc.HiveDriver.$jdbc:hive2://hiveserver-host:port/dbSpecify the complete connection URL, including port (default port is 10000) and database name. For example on sandbox, jdbc:hive2://sandbox:10000/.Click .
If the server can establish a connection with HiveServer using the information you provided a success message displays.
After the connection is successful, click .
After creating the Hive Repository in the Policy Manager, install the agent on the HiveServer2 host.
![[Note]](../common/images/admon/note.png) | Note |
|---|---|
If you are using Beeswax on Hue to run Hive queries, you must also install the Hive agent on the Hue server host. |
Perform the following steps on the HiveServer2 host.
Log on to the host as
root.Create a temporary directory, such as
/tmp/xasecure:mkdir /tmp/xasecure
Move the package into the temporary directory along with the MySQL Connector Jar.
Extract the contents:
tar xvf $xasecureinstallation.tar
Go to the directory where you extracted the installation files:
cd /tmp/xasecure/xasecure-$name-$build-version
Open the
install.propertiesfile for editing.Change the following parameters for your environment:
Table 4.5. Hive Agent Install Parameters
Parameter Value Description POLICY_MGR_URL$urlSpecify the full URL to access the Policy Manager Web UI. For example, http://pm-host:6080.MYSQL_CONNECTOR_JAR$path-to-mysql-connectorAbsolute path on the local host to the JDBC driver for mysql including filename.[a] For example, /tmp/xasecure/REPOSITORY_NAME$Policy-Manager-Repo-NameName of the HDFS Repository in the Policy Manager that this agent connects to after installation. XAAUDIT.DB.HOSTNAME$XAsecure-db-hostSpecify the host name of the MySQL database. XAAUDIT.DB.DATABASE_NAME$auditdbSpecify the audit database name that matches the audit_db_namespecified during installation.XAAUDIT.DB.USER_NAME$auditdbuserSpecify the audit database name that matches the audit_db_userspecified during installationXAAUDIT.DB.PASSWORD$auditdbupwSpecify the audit database name that matches the audit_db_passwordspecified during installationSave the
install.propertiesfile.
| Note |
|---|---|
If your environment is configured to use SSL, modify the properties following the instructions in Set Up SSL for Hive Security Agent. |
After configuring the install.properties file, install the
agent as root:
Log on to the Linux system as root and go to the directory where you extracted the installation files:
cd /tmp/xasecure/xasecure-$name-$build-version
Run the agent installation script:
# ./install.sh
After installing the agent in an environment that does NOT have Ambari, manually restart the Hive services as follows:
Stop Hive. Execute this command on the Hive Metastore and Hive Server2 host machine.
ps aux | awk '{print $1,$2}' | grep hive | awk '{print $2}' | xargs kill >/dev/null 2>&1Start Hive Metastore. On the Hive Metastore host machine, execute the following command:
su - hive -c "env HADOOP_HOME=/usr JAVA_HOME=/usr/jdk64/jdk1.6.0_31 /tmp/startMetastore.sh /var/log/hive/hive.out /var/log/hive/hive.log /var/run/hive/hive.pid /etc/hive/conf.server"
where,
$HIVE_LOG_DIRis the directory where Hive server logs are stored. For example,/var/logs/hive.Start HiveServer2. On the Hive Server2 host machine, execute the following command:
su - hive -c "env JAVA_HOME=/usr/jdk64/jdk1.6.0_31 /tmp/startHiveserver2.sh /var/log/hive/hive-server2.out /var/log/hive/hive-server2.log /var/run/hive/hive-server.pid /etc/hive/conf.server"
where
$HIVE_LOG_DIRis the directory where Hive server logs are stored. For example,/var/logs/hive.
Follow the configuration steps in environments where Hive is managed by the Ambari Server:
Remove the HiveServer configuration string from the Ambari Hive startup script.
| Note |
|---|---|
Ambari starts and stops the HiveServer2 using a built in script. In order to start and stop HiveServer2 with the integrated Security Agent, you must comment out the HiveServer configuration string. |
Log into the Ambari Server Linux host using the Ambari account.
Open the Ambari Hive startup script for editing:
cd /var/lib/ambari-server/resources/stacks/HDP/2.0.6/services/HIVE/package/templates
vi startHiveserver2.sh.j2
Comment out the following line by prepending a # at the beginning of the line as follows:
# HIVE_SERVER2_OPTS="${HIVE_SERVER2_OPTS} –hiveconf hive.security.authenticator.manager=org.apache.hadoop.hive.ql.security.SessionStateUserAuthenticator -hiveconf hive.security.authorization.manager=org.apache.hadoop.hive.ql.security.authorization.plugin.sqlstd.SQLStdHiveAuthorizerFactory"Restart the Ambari Server from the command line as follows:
su -l ambari -c "/etc/init.d/ambari-server stop"
su -l ambari -c "/etc/init.d/ambari-server start"
On each node in the cluster, restart the Ambari Agents:
su -l ambari -c "/etc/init.d/ambari-agent stop"
su -l ambari -c "/etc/init.d/ambari-agent start"
After the Ambari Server and Agents finish rebooting, update the Hive Configuration with the required settings.
After changing the Ambari Hive startup script and restarting the Ambari Server from the command line, perform the following steps to configure Hive server for agent integration.
Log into the Ambari Web UI, and click > .
Note To find a property, type the name in the Filter field and press enter; if the parameter exists, it is returned under the common or advanced list. Click the arrow key to expand the lists to see the settings.
Update the following properties as follows:
Property name:
hive.security.authorization.managerNew Value:
com.xasecure.authorization.hive.authorizer.XaSecureAuthorizerProperty name:
hive.security.authorization.enabledNew Value:
true
Filter for the
hive.exec.pre.hooksproperty.Add the HDP Security hook after the existing value by inserting a comma followed by
com.xasecure.authorization.hive.hooks.XaSecureHivePreExecuteRunHook.For example, if the existing value is
org.apache.hadoop.hive.ql.hooks.ATSHookthe new value with the HDP Security hook is:org.apache.hadoop.hive.ql.hooks.ATSHook,com.xasecure.authorization.hive.hooks.XaSecureHivePreExecuteRunHook
Search for the
hive.exec.post.hooksproperty.Add the HDP Security hook after the existing value by inserting a comma followed by
com.xasecure.authorization.hive.hooks.XaSecureHivePostExecuteRunHook.For example if the existing value is
org.apache.hadoop.hive.ql.hooks.ATSHookthe new value with the HDP Security hook is:org.apache.hadoop.hive.ql.hooks.ATSHook,com.xasecure.authorization.hive.hooks.XaSecureHivePostExecuteRunHook
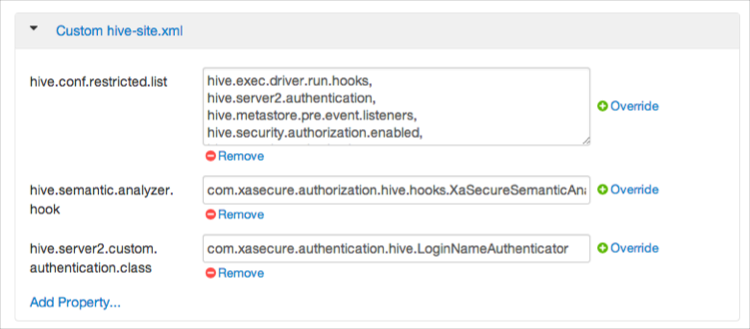
Expand , and add the following properties:
Table 4.6. Custom hive-site.xml Properties
Key Value hive.semantic.analyzer.hook com.xasecure.authorization.hive.hooks.XaSecureSemanticAnalyzerHook hive.server2.custom.authentication.class com.xasecure.authentication.hive.LoginNameAuthenticator hive.conf.restricted.list hive.exec.driver.run.hooks, hive.server2.authentication, hive.metastore.pre.event.listeners, hive.security.authorization.enabled,hive.security.authorization.manager, hive.semantic.analyzer.hook, hive.exec.post.hooks Note For each property, click , enter Key and Value shown in the table above, then click .
After all the properties have been updated and added, scroll to the bottom and click .
The settings display under .
When properties change, the affected services must be restarted. A Restart option displays.
Click > .
Connected Agents display in the HDP Security Administration Web UI.
| Note |
|---|---|
Agents may not appear in the list until after the first event occurs in the repository. |
To verify that the agent is connected to the server:
Log in to the interface using the admin account.
Click > .
