

Install Ranger KMS using Ambari (Kerberized Cluster)
To install Ranger KMS on a Kerberized cluster, complete the following steps.
Go to the Ambari Web UI,
http://<gateway-URL>:8080.From the Ambari dashboard, go to the Actions menu. Choose Add Service.
On the next screen, check the box next to Ranger KMS:
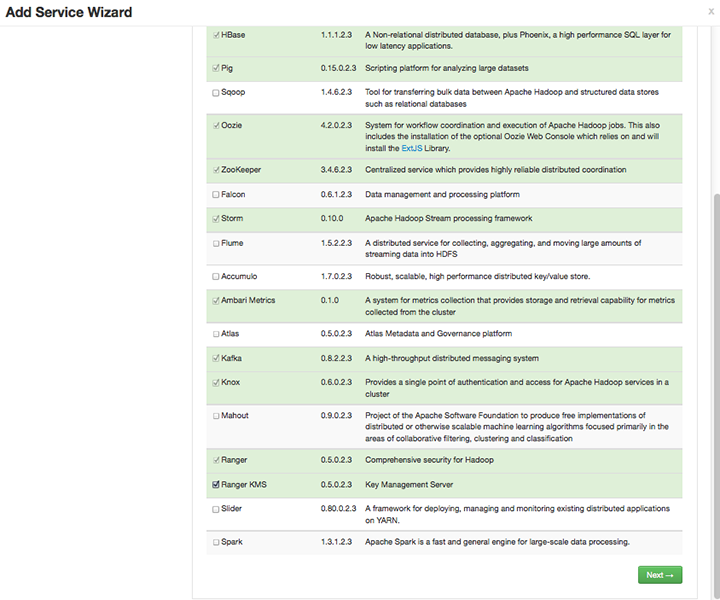
Then, choose Next.
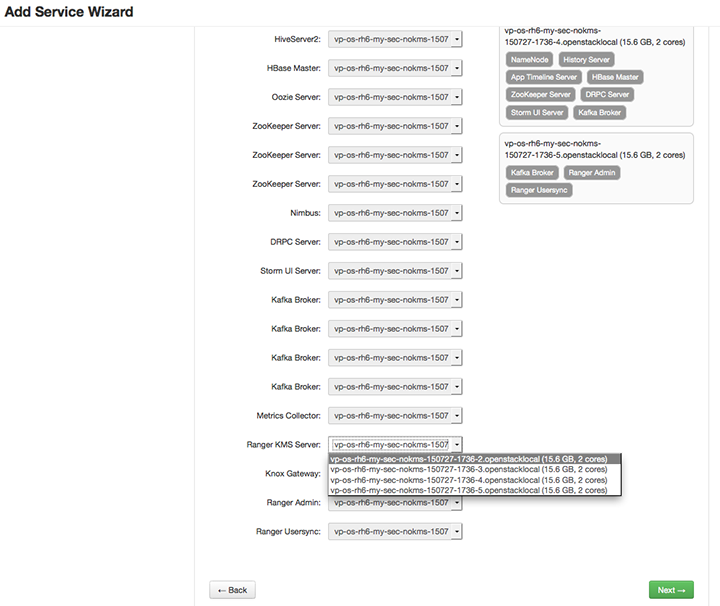
(Optional) In Assign Masters, if you wish to override the default host setting, specify the Ranger KMS host address. For example:
In Customize Services, set required values (marked in red). Review other configuration settings, and determine whether you'd like to change any of the default values. (For more information about these properties, see Ranger KMS Properties.
Set the following required settings, marked in red in the "Advanced kms-properties" section:
KMS_MASTER_KEY_PASSWDdb_passworddb_root_password
![[Note]](../common/images/admon/note.png)
Note If do not wish to provide system Database Administrator (DBA) account details to the Ambari Ranger installer, you can use the
dba_script.pyPython script to create Ranger DB database users without exposing DBA account information to the Ambari Ranger installer. For more information, see Setting up Database Users Without Sharing DBA Credentials.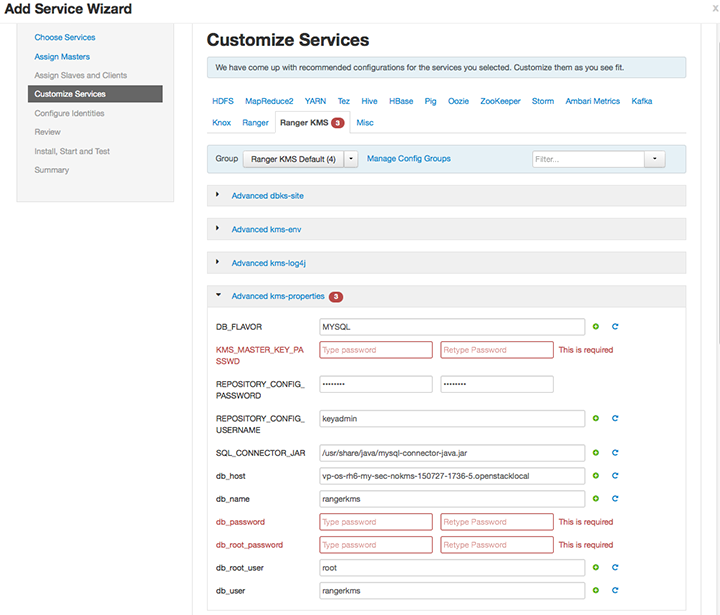
Also specify the username for REPOSITORY_CONFIG_USERNAME, so that Ranger will be able to connect to the Ranger KMS Server and look up keys for creating access policies. This user will need to be set to proxy into Ranger KMS in a Kerberos mode (steps included below).
Add values for the following properties in the "Custom kms-site" section. These properties allow the specified system users (
hive,oozie, and others) to proxy on behalf of other users when communicating with Ranger KMS. This helps individual services (such as Hive) use their own keytabs, but retain the ability to access Ranger KMS as the end user (use access policies associated with the end user).hadoop.kms.proxyuser.hive.usershadoop.kms.proxyuser.oozie.usershadoop.kms.proxyuser.HTTP.usershadoop.kms.proxyuser.ambari.usershadoop.kms.proxyuser.yarn.usershadoop.kms.proxyuser.hive.hostshadoop.kms.proxyuser.oozie.hostshadoop.kms.proxyuser.HTTP.hostshadoop.kms.proxyuser.ambari.hostshadoop.kms.proxyuser.yarn.hosts
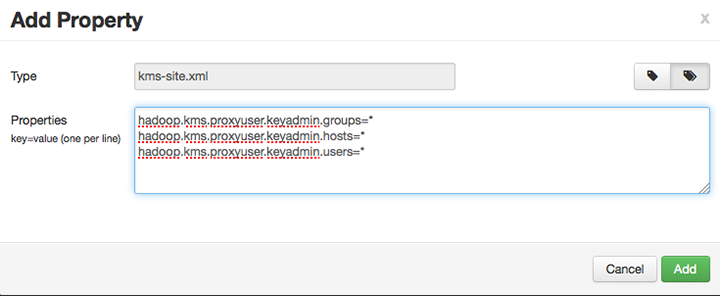
Add the following properties to the Custom KMS-site section of the configuration. These properties use the REPOSITORY_CONFIG_USERNAME specified in the first step in this section.
If you are using an account other than
keyadminto access Ranger KMS, replace “keyadmin” with the configured user for the Ranger KMS repository in Ranger admin:hadoop.kms.proxyuser.keyadmin.groups=*hadoop.kms.proxyuser.keyadmin.hosts=*hadoop.kms.proxyuser.keyadmin.users=*
Confirm settings of the following values in the "advanced kms-site" group:
hadoop.kms.authentication.type=kerberoshadoop.kms.authentication.kerberos.keytab=/etc/security/keytabs/spnego.service.keytabhadoop.kms.authentication.kerberos.principal=*
Then, choose Next.
Review the default values on the Configure Identities screen. Determine whether you'd like to change any of the default values. Then, choose Next.
In Review, make sure the configuration values are correct. Ranger KMS will be listed under Services.
Then, choose Deploy.
Monitor the progress of installing, starting, and testing the service. When the service installs and starts successfully, choose Next.
The Summary screen displays the results. Choose Complete.
Restart the Ranger and Ranger KMS services.