

Uploading Tables
To access the Upload Table functionality, click the + symbol or the button.
![[Tip]](../common/images/admon/tip.png) | Tip |
|---|---|
With Hive View 2.0, you can change more properties of an existing table while performing the Upload Table operation. Earlier versions of Hive View only let you change column names and data types while uploading a table. |
In the Upload Table window, you can upload files which contain the rows of an Apache Hive table. The Upload Table command supports various input file formats. On uploading, it creates a new Hive table with the data.
Input File Formats:
CSV, XML, and JSON files are supported for input.
CSV
Supported types are:
CSV with custom field delimiter (default is comma ,)
Quote character (default is double quote “) Escape character (default is backslash \ )
The row delimiter must be \n or \r or \r\n. If Is first row header? option is selected, then first row of the file is treated as column names. During preview this can be changed by clearing this field but other delimiters should not be changed during the preview. The number of columns in the table and their order is defined by the first line of the file, irrespective of whether it represents column names or not. If there are extra columns in line 2 onwards, they are ignored. If there are lesser columns in line 2 onwards, then the rest of the columns are treated as null values.
XML
The format of the contents in the XML file should be as shown below: 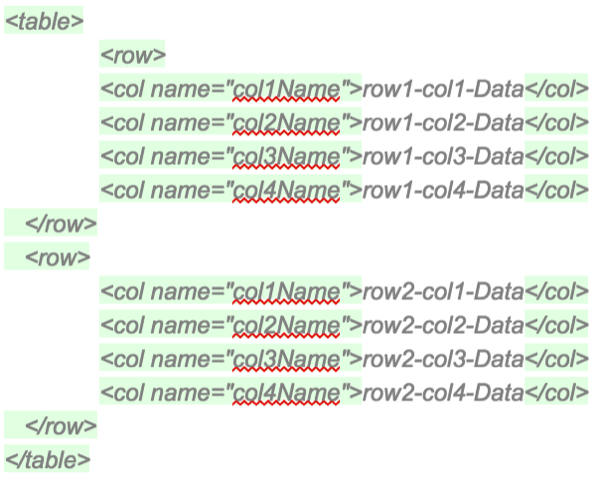
The root tag must be <table>. Inside <table> there can be any number of <row> tags representing one row of the table. Inside each <row> tag there can be any number of <col> tags representing columns of the row. Each <col> tag must have a “name” attribute, which will be treated as the name of column. Column values should be within the <col> tag. The names, number and order of columns are decided by the first <row> entry. The names of column and datatypes can be changed during the Preview.
JSON
The following json format is supported: [ { "col1Name" : "value-1-1", "col2Name" : "value-1-2"}, { "col1Name" : "value-2-1", "col2Name" : "value-2-2"}]
The file should contain a valid json array containing any number of json objects. Each json object should contain column names as property and column values as property values. The names, number and order of columns in the table are decided from the first object of the json file. The names and datatype of column can be edited during the preview step. If some json objects have extra properties then they are ignored. If they do not have some of the properties then null values are assumed. Note that extension of files cannot be ".json"
To import a file into Hive View:
Steps
Select the input file format file type by specifying CSV, XML, or JSON.
If the File Type is CSV, you can select the Field Delimiter, the Escape Character, and the Quote Character values in the drop-down menus. Also, you can click the Is first row header? box if you want to enable this feature.
If Stored as is TEXTFILE, then a gear next to it is enabled and you can click it to select Fields Terminated By, and Escape By to be used in creation of the Hive table.
If Stored as is NOT TEXTFILE, another option Contains endlines? is enabled. If the column values in your file contain endline characters, (“\n” newline, ASCII 10 or “\r” carriage return, ASCII 13) then you must check this field for proper handling otherwise unexpected results might occur. Endline characters are not supported in TEXTFILE format.
Expand the Select File Source section to pick the table to upload. Click Upload from HDFS or Upload from Local.
If you clicked Upload from Local, you can choose the file from your local machine. Otherwise, enter the full HDFS path and click Preview. The file is partially read from client’s browser or HDFS and the preview is generated with a suggested table name, column names, column data types and 10 rows from the data file.
(Optional) Change the suggested table name, column names, column data types, and many other table DDL and properties in the Columns, Advanced, and Table Properties subtabs.
Click the Create table. The actual table and temporary table (stored as TEXTFILE) are created. After this the data rows from the file are inserted into the temporary table followed by insertion from temporary table to actual table.
On success the temporary table is deleted and workflow completes.
In case of failure, an error is reported and the temporary table and actual tables are deleted. You can see the error message by clicking the message icon at the top right. Clicking again on the message icon brings back the Upload Table page. You can perform any changes required and click Upload again to upload the same file or restart the process by selecting a different file.