
Installing, Configuring, and Deploying a HDP Cluster with HCP
Use the Ambari Install wizard running in your browser to install, configure, and deploy your cluster.
Open Ambari Web using a web browser.
Point your browser to
http://<your.ambari.server>:8080, where<your.ambari.server>is the name of your ambari server host. For example, a default Ambari server host is located athttp://c6401.ambari.apache.org:8080.Log in to the Ambari Server using the default user name/password:
admin/admin. You can change these credentials later.For a new cluster, the Ambari install wizard displays a Welcome page from which you launch the Ambari Install wizard.
For an existing cluster, choose Choose Services from the Actions/Add Service Wizard menu and skip to Step 7.
From the Ambari Welcome page, choose Launch Install Wizard.
In Name your cluster, type a name for the cluster you want to create, and then choose Next.
Use no white spaces or special characters in the name.
Select the HDP stack you want to run.
HCP supports HDP 2.5.
Enter the set up information for which the install wizard prompts you.
You need to supply the FQDN of each of your hosts. The wizard also needs to access the private key file you created in Set Up Password-less SSH. Using the host names and key file information, the wizard can locate, access, and interact securely with all hosts in the cluster.
Use the Target Hosts text box to enter your list of host names, one per line.
You can use ranges inside brackets to indicate larger sets of hosts. For example, for host01.domain through host10.domain use host[01-10].domain
![[Note]](../common/images/admon/note.png)
Note If you are deploying on EC2, use the internal Private DNS host names.
If you want to let Ambari automatically install the Ambari Agent on all your hosts using SSH, select Provide your SSH Private Key and either use the Choose File button in the Host Registration Information section to find the private key file that matches the public key you installed earlier on all your hosts or cut and paste the key into the text box manually.
Note If you are using IE 9, the
Choose Filebutton may not appear. Use the text box to cut and paste your private key manually.Fill in the user name for the SSH key you have selected. If you do not want to use root , you must provide the user name for an account that can execute sudo without entering a password.
Choose Register and Confirm to continue.
Ambari displays the Choose Services dialog box that lists the hosts that Ambari has located for your cluster.
Check the hosts listed in the Choose Services dialog box to make sure they are the correct hosts and that they have the correct directories, packages, and processes required to continue the install.
If any hosts were selected in error, you can remove them by selecting the appropriate check boxes and clicking the grey Remove Selected button. To remove a single host, click the small white Remove button in the Action column.
At the bottom of the screen, you might notice a yellow box that indicates some warnings were encountered during the check process. For example, your host might already have a copy of
wgetorcurl. Choose Click here to see a list of what was checked and what caused the warning. The warnings page also provides access to a python script that can help you clear any issues you may encounter and let you run Rerun Checks.Choose the services to install into the cluster, and then click Next.
HCP requires the following services:
HDFS
HBase
ZooKeeper
Storm
Kafka
Flume
Ambari Metric Service
Metron
Elasticsearch (Can be installed either manually or by Ambari. Hortonworks recommends installing Elasticsearch by Ambari.)
Kibana (Can be installed either manually or by Ambari. Hortonworks recommends installing Kibana by Ambari.
Zeppelin Notebook
Spark
Hive
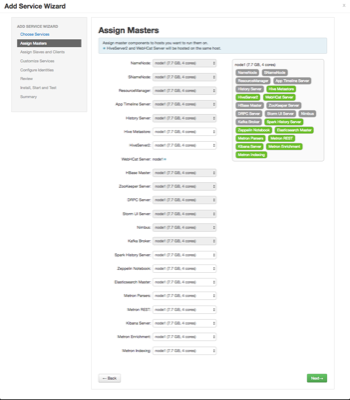
Ambari displays the Assign Masters window.
Verify that the Ambari install wizard has assigned the master components for selected services to appropriate hosts in your cluster.
If Ambari detects any errors in your master component assignments, it will indicate the error in red.
To change the host assignment for a service, select a host name from the drop-down menu for that service.
To remove a ZooKeeper instance, click the green minus icon next to the host address you want to remove.
When you are satisfied with the assignments, click Next.
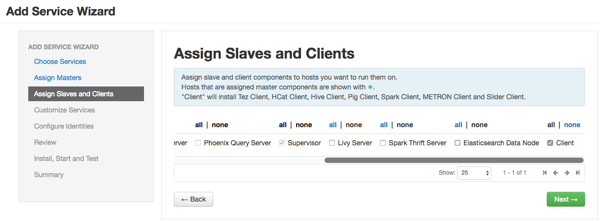
Verify that the Ambari install wizard has assigned the slave components (DataNodes, NodeManagers, and RegionServers) to appropriate hosts in your cluster.
Use all or none to select all of the hosts in the column or none of the hosts, respectively.
If a host has an asterisk next to it, that host is also running one or more master components. Hover your mouse over the asterisk to see which master components are on that host.
Select a minimum of one Elasticsearch data node. The data node cannot be on same host as the master.
Fine-tune your selections by using the check boxes next to specific hosts.
Check the Client checkbox for any components that have the Supervisor checkbox checked.
When you are satisfied with your assignments, click Next.
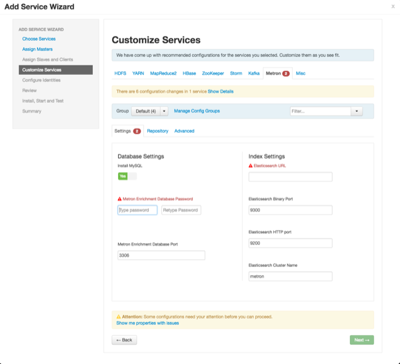
Review each service tab in the Customize Services dialog box and modify your HDP cluster setup if appropriate.
Browse through each service tab. By hovering your cursor over each of the properties, you can see a brief description of what the property does.
The number of service tabs shown depends on the services you decided to install in your cluster. Any tab that requires input displays a red badge with the number of properties that need attention. Select each service tab that displays a red badge number and enter the appropriate information.
- Directories
The choice of directories where HDP will store information is critical. Ambari will attempt to choose reasonable defaults based on the mount points available in your environment but you are strongly encouraged to review the default directory settings recommended by Ambari. In particular, confirm directories such as /tmp and /var are not being used for HDFS NameNode directories and DataNode directories under the HDFS tab.
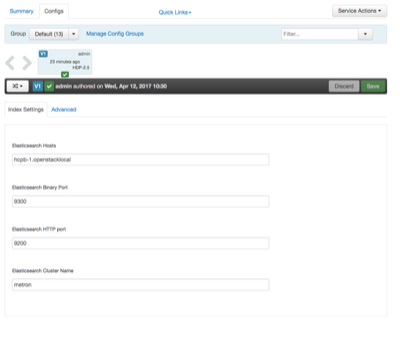
- Elasticsearch zen_discovery_ping_unicast_hosts
A comma separated list of Elasticsearch data nodes that you identified in Step 10.
- kibana_es_url
Set to the fully-qualified url for the Elasticsearch master: http://es-master-host:9200.
- Metron
The Metron tab contains a few tabs that contain information that is critical to HCP set up.
- Customize Services
This tab allows you to choose your repository location.
![[Important]](../common/images/admon/important.png)
Important This tab is pre-populated and you should not modify its contents unless you are going to use a local repository.
- Advanced Tab (Metron)
Most of the fields in the Advanced tab are auto populated and should not be modified. You can modify the following field with caution:
- Service Account Users and Groups
The service account users and groups are available under the Misc tab. These are the operating system accounts the service components will run as. If these users do not exist on your hosts, Ambari will automatically create the users and groups locally on the hosts. If these users already exist, Ambari will use those accounts.
Depending on how your environment is configured, you might not allow groupmod or usermod operations. If this is the case, you must be sure all users and groups are already created and be sure to select the Skip group modifications option on the Misc tab. This tells Ambari to not modify group membership for the service users.
Check the assignments displayed by Ambari to ensure that everything is correct, and then click Deploy.
If you need to make changes, use the left navigation bar to return to the appropriate screen.
The progress of the install displays on the screen. Ambari installs, starts, and runs a simple test on each component. Overall status of the process displays in a progress bar at the top of the screen and host-by-host status displays in the main section. Do not refresh your browser during this process. Refreshing the browser might interrupt the progress indicators.
To see specific information on what tasks have been completed per host, click the link in the Message column for the appropriate host. In the Tasks pop-up, click the individual task to see the related log files. You can select filter conditions by using the Show drop-down list. To see a larger version of the log contents, click the Open icon or, to copy the contents to the clipboard, use the Copy icon.
When
Successfully installed and started the servicesappears, click Next.