
Encryption over the HTTP can be implemented with support for SSL across your Hadoop cluster.
This section explains how to set up HTTPS encryption for the Web interfaces.
You can use either a certificate from a Certificate Authority or a Self-Signed Certificate. Using a self-signed certificate requires some additional configuration on each host. Follow the instructions in the appropriate section to install a certificate.
To set up SSL for Hadoop HDFS operations:
Create HTTPS certificates and keystore/truststore files.
For each host in the cluster, create a directory for storing the keystore and truststore. For example, SERVER_KEY_LOCATION. Also create a directory to store public certificate, for example, CLIENT_KEY_LOCATION.
mkdir -p $SERVER_KEY_LOCATION ; mkdir -p $CLIENT_KEY_LOCATION
For example:
ssh host1.hwx.com “mkdir -p /etc/security/serverKeys ; mkdir -p /etc/security/clientKeys ; ”
For each host, create a keystore file.
cd $SERVER_KEY_LOCATION ; keytool -genkey -alias $hostname -keyalg RSA -keysize 1024 -dname \"CN=$hostname,OU=hw,O=hw,L=paloalto,ST=ca,C=us\" -keypass $SERVER_KEYPASS_PASSWORD -keystore $KEYSTORE_FILE -storepass $SERVER_STOREPASS_PASSWORD\”
For each host, export the certificate public key to a certificate file.
cd $SERVER_KEY_LOCATION ; keytool -export -alias $hostname -keystore $KEYSTORE_FILE -rfc -file $CERTIFICATE_NAME -storepass $SERVER_STOREPASS_PASSWORD\”
For each host, import the certificate into truststore file.
cd $SERVER_KEY_LOCATION ; keytool -import -noprompt -alias $hostname -file $CERTIFICATE_NAME -keystore $TRUSTSTORE_FILE -storepass $SERVER_TRUSTSTORE_PASSWORD
Create a single truststore file containing the public key from all certificates. Login to host1 and import the truststore file for host1.
keytool -import -noprompt -alias $host -file $CERTIFICATE_NAME -keystore $ALL_JKS -storepass $CLIENT_TRUSTSTORE_PASSWORD
Copy $ALL_JKS from host1 to other hosts, and repeat the above command. For example, for a 2-node cluster with host1 and host2:
Create $ALL_JKS on host1.
keytool -import -noprompt -alias $host -file $CERTIFICATE_NAME -keystore $ALL_JKS -storepass $CLIENT_TRUSTSTORE_PASSWORD
Copy over $ALL_JKS from host1 to host2. $ALL_JKS already has the certificate entry of host1.
Import certificate entry of host2 to $ALL_JKS using same command as before:
keytool -import -noprompt -alias $host -file $CERTIFICATE_NAME -keystore $ALL_JKS -storepass $CLIENT_TRUSTSTORE_PASSWORD
Copy over the updated $ALL_JKS from host2 to host1.
![[Note]](../common/images/admon/note.png)
Note Repeat these steps each time for each node in the cluster. When you are finished, the $ALL_JKS file on host1 will have the certificates of all nodes.
Copy over the $ALL_JKS file from host1 to all the nodes.
Validate the common truststore file on all hosts.
keytool -list -v -keystore $ALL_JKS -storepass $CLIENT_TRUSTSTORE_PASSWORD
Set permissions and ownership on the keys:
chgrp -R $YARN_USER:hadoop $SERVER_KEY_LOCATION
chgrp -R $YARN_USER:hadoop $CLIENT_KEY_LOCATION
chown 755 $SERVER_KEY_LOCATION
chown 755 $CLIENT_KEY_LOCATION
chown 440 $KEYSTORE_FILE
chown 440 $TRUSTSTORE_FILE
chown 440 $CERTIFICATE_NAME
chown 444 $ALL_JKS
Note The complete path of the
$SEVER_KEY_LOCATIONand theCLIENT_KEY_LOCATIONfrom the root directory /etc must be owned by the $YARN_USER user and the hadoop group.
Run the following command to create a self-signing rootCA and import the rootCA into client truststore:
openssl genrsa -out $clusterCA.key 2048
openssl req -x509 -new -key $clusterCA.key -days 300 -out $clusterCA.pem
keytool -importcert -alias $clusterCA -file $clusterCA.pem -keystore $clustertruststore -storepass $clustertruststorekey
Note Ensure that the ssl-client.xml on every host configure to use this ‘$clustertrust’ store.
On each host, run the following command to create a certifcate and a keystore for each server:
keytool -genkeypair -alias `hostname -s` -keyalg RSA -keysize 1024 -dname "CN=`hostname -f`,OU=foo,O=corp” -keypass $hostkey -keystore $hostkeystore -storepass $hoststorekey -validity 300
On each host, run the following command to export a certreq file from the host’s keystore:
keytool -keystore keystore -alias `hostname -s` -certreq -file $host.cert -storepass $hoststorekey -keypass $hostkey
On each host, sign certreq file with the rootCA:
openssl x509 -req -CA $clusterCA.pem -CAkey $clusterCA.key -in $host.cert -out $host.signed -days 300 -CAcreateserial
On each host, import both rootCA and the signed cert back in:
keytool -keystore $hostkeystore -storepass $hoststorekey -alias $clusterCA -import -file cluseter1CA.pem
keytool -keystore $hostkeystore -storepass $hoststorekey -alias `hostname -s` -import -file $host.signed -keypass $hostkey
To enable WebHDFS to listen for HTTP over SSL, configure SSL on the
NameNode and all DataNodes by setting
dfs.https.enable=true in the
hdfs-site.xml file.
You can set up SSL in the following modes:
One-way SSL: Authenticates the server only. This mode requires the keystore on the NameNode and each DataNode only as specified in the table below. The parameters are set in the
ssl-server.xmlfile on the NameNode and each of the DataNodes.Mutual authentication (2WAY SSL): Requires authentication of both the server and the client. To use mutual SSL, you must also set
dfs.client.https.need-auth=truein thehdfs-site.xmlfile on the NameNode and each DataNode. 2WAY SSL can cause performance delays and is difficult to set up and maintain.
The truststore configuration is only needed when using a self-signed certificate or a certificate that is not in the JVM's truststore.
The following configuration properties need to be specified in ssl-server.xml and ssl-client.xml.
| Property | Default Value | Description |
|---|---|---|
| ssl.server.keystore.type | JKS | The type of the keystore, JKS = Java Keystore, the de-facto standard in Java |
| ssl.server.keystore.location | None | The location of the keystore file |
| ssl.server.keystore.password | None | The password to open the keystore file |
| ssl.server truststore.type | JKS | The type of the trust store |
| ssl.server.truststore.location | None | The location of the truststore file |
| ssl server.truststore.password | None | The password to open the trustsore |
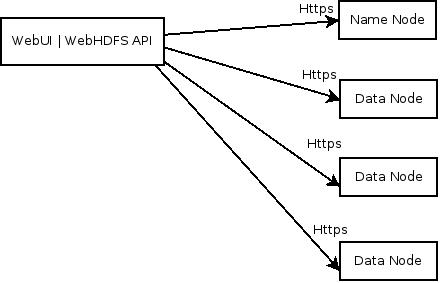
The following diagram shows an HTTP or REST client's interaction with the NameNode and the DataNodes over HTTPS.
Enable HTTPS by setting the following properties.
Set the following properties in
core-site.xml.hadoop.ssl.require.client.cert=false hadoop.ssl.hostname.verifier=DEFAULT hadoop.ssl.keystores.factory.class=org.apache.hadoop.security.ssl.FileBasedKeyStoresFactory hadoop.ssl.server.conf=ssl-server.xml hadoop.ssl.client.conf=ssl-client.xml
Set the following properties in
ssl-server.xml.ssl.server.truststore.location=/etc/security/serverKeys/truststore.jks ssl.server.truststore.password=serverTrustStorePassword ssl.server.truststore.type=jks ssl.server.keystore.location=/etc/security/serverKeys/keystore.jks ssl.server.keystore.password=serverStorePassPassword ssl.server.keystore.type=jks ssl.server.keystore.keypassword=serverKeyPassPassword
Set the following properties in
ssl-client.xml.ssl.client.truststore.location=/etc/security/clientKeys/all.jks ssl.client.truststore.password=clientTrustStorePassword ssl.client.truststore.type=jks
Set the following properties in
hdfs-site.xml.dfs.http.policy=$Policy dfs.datanode.https.address=$DataNode-host:50475 dfs.namenode.https-address=$NAMENODE-host:50470
where $
Policyis either:HTTP_ONLY: Service is provided only on HTTPHTTPS_ONLY: Service is provided only on HTTPSHTTP_AND_HTTPS: Service is provided both on HTTP and HTTPS
Set the following properties in
mapred-site.xml:mapreduce.jobhistory.http.policy=HTTPS_ONLY mapreduce.jobhistory.webapp.https.address=<JHS>:<JHS_HTTPS_PORT>
Set the following properties in
yarn-site.xml:yarn.http.policy=HTTPS_ONLY yarn.log.server.url=https://<JHS>:<JHS_HTTPS_PORT>/jobhistory/logs yarn.resourcemanager.webapp.https.address=<RM>:<RM_HTTPS_PORT> yarn.nodemanager.webapp.https.address=0.0.0.0:<NM_HTTPS_PORT>
Data securely loaded into HDFS is processed by Mappers and Reducers to derive meaningful business intelligence. Hadoop code moves data between Mappers and Reducers over the HTTP protocol in a step called the shuffle. In SSL parlance, the Reducer is the SSL client that initiates the connection to the Mapper to ask for data. Enabling HTTPS for encrypting shuffle traffic involves the following steps.
Enable Encrypted Shuffle by setting the follwing properties in
mapred-site.xml:<property> <name>hadoop.ssl.enabled</name> <value>true</value> </property> <property> <name>hadoop.ssl.require.client.cert</name> <value>false</value> <final>true</final> </property> <property> <name>hadoop.ssl.hostname.verifier</name> <value>DEFAULT</value> <final>true</final> </property> <property> <name>hadoop.ssl.keystores.factory.class</name> <value>org.apache.hadoop.security.ssl.FileBasedKeyStoresFactory</value> <final>true</final> </property> <property> <name>hadoop.ssl.server.conf</name> <value>ssl-server.xml</value> <final>true</final> </property> <property> <name>hadoop.ssl.client.conf</name> <value>ssl-client.xml</value> <final>true</final> </property>(The default buffer size is 65536. )
The default SSL configuration makes all Oozie URLs use HTTPS except for the JobTracker callback URLs. This simplifies the configuration because no changes are required outside of Oozie. Oozie inherently does not trust the callbacks, they are used as hints.
| Note |
|---|---|
The related environment variables are explained at Environment Setup . |
You can use either a certificate from a Certificate Authority or a Self-Signed Certificate. Using a self-signed certificate requires some additional configuration on each Oozie client machine.
Follow the instructions in the appropriate section to install a certificate.
There are many ways to create a Self-Signed Certificate, this is just one
way. We will be using the keytool program, which is included with your JRE.
If its not on your path, you should be able to find it in
$JAVA_HOME/bin.
As the Oozie user, run the following command:
keytool -genkey -alias tomcat -keyalg RSA
An interactive prompt displays, answer the questions as follows:
For What is your first and last name? (i.e. "CN") enter the hostname of the machine where the Oozie Server is running.
For the keystore password and key password, enter the same password; by default, the Oozie keystore password is set to
password.
A keystore file is created named
.keystoreand is located in the Oozie user's home directory.Change the OOZIE_HTTPS_KEYSTORE_PASS environment variable to match the keystore password of the self-signed certificate.
As the Oozie user, run the following command to export a certificate file from the keystore file:
keytool -exportcert -alias tomcat -file path/to/where/I/want/my/certificate.cert
Consult a Certificate Authority to obtain a certicate. Use the certificate from the CA to set up Oozie with HTTPS.
As the Oozie user, run the following command to create a keystore file from your certificate:
keytool -import -alias tomcat -file path/to/certificate.cert
A keystore file is created named .keystore and is
located in the Oozie user's home directory.
This describes how to configure Oozie to use HTTPS instead of HTTP.
If Oozie server is running, stop Oozie.
As the Oozie user, run the following command to configure Oozie to use HTTPS:
oozie-setup.sh prepare-war -secure
Start the Oozie server.
| Note |
|---|---|
To revert back to HTTP, as the Oozie user run the following command: oozie-setup.sh prepare-war |
On every Oozie client system, follow the instructions for the type of certificate used in your environment.
When using a self-signed certificate, you must first install the certificate before the Oozie client can connect to the server.
Install the certificate in the keychain:
Copy or download the .cert file onto the client machine.
Run the following command (as root) to import the certificate into the JRE's keystore:
sudo keytool -import -alias tomcat -file path/to/certificate.cert -keystore $JRE_cacerts
Where
$JRE_cacertsis the path to the JRE's certs file. It's location may differ depending on the Operating System, but its typically called cacerts and located at$JAVA_HOME/lib/security/cacerts. It can be under a different directory in$JAVA_HOME. The default password ischangeit.Java programs, including the Oozie client, can now connect to the Oozie Server using the self-signed certificate.
In the connection strings change HTTP to HTTPS, for example, replace
http://oozie.server.hostname:11000/ooziewithhttps://oozie.server.hostname:11443/oozie.Java does not automatically redirect HTTP addresses to HTTPS.
Use https://oozie.server.hostname:11443/oozie though most
browsers should automatically redirect you if you use
http://oozie.server.hostname:11000/oozie.
When using a Self-Signed Certificate, your browser warns you that it can't verify the certificate. Add the certificate as an exception.
Integrate Oozie Hcatalog by adding following property to oozie-hcatalog job.properties. For example if you are using Ambari, set the properties as:
hadoop.rpc.protection=privacy
| Note |
|---|---|
This property is in addition to any properties you must set for secure clusters. |
Perform the following task to enable SSL with the HBase REST API.
Execute the following statement from the command line of the HBase Master server to create a keystore for HBase:
keytool -genkey -alias hbase -keyalg RSA -keysize 1024 -keystore hbase.jks
Add the following properties to the
hbase-site.xmlconfiguration file on each node in your HBase cluster:<property> <name>hbase.rest.ssl.enabled</name> <value>true</value> </property> <property> <name>hbase.rest.ssl.keystore.store</name> <value>/path/to/keystore</value> </property> <property> <name>hbase.rest.ssl.keystore.password</name> <value>keystore password</value> </property> <property> <name>hbase.rest.ssl.keystore.keypassword</name> <value>key password</value> </property>Restart all HBase nodes in the cluster.
| Note |
|---|---|
When using a self-signed certificate, administrators must manually add the certificate to the JVM truststore on all HBase clients. |
On the HBase Master, create keystore for Hbase:
keytool -genkey -alias hbase -keyalg RSA -keysize 1024 -keystore hbase.jks
Add the following properties to
hbase-site.xml:<property> <name>hadoop.ssl.enabled</name> <value>true</value> </property> <property> <name>hbase.rest.ssl.enabled</name> <value>true</value> </property> <property> <name>hbase.rest.ssl.keystore.store</name> <value>/path/to/hbase.jks</value> </property> <property> <name>hbase.rest.ssl.keystore.password</name> <value> keystore password</value> </property> <property> <name>hbase.rest.ssl.keystore.keypassword</name> <value> key password</value> </property>
Restart HBase.
When using a self-signed certificate, you must add the certificate to JMV truststore on the HBase clients.
When using HiveServer2 without Kerberos authentication, you can set up HTTP and JDBC to use an SSL certificate to secure communications.
Perform the followin steps on the HiveServer2:
Run the following command to create a keystore for hiveserver2::
keytool -genkey -alias hbase -keyalg RSA -keysize 1024 -keystore hbase.jks
Edit the
hive-site.xml, set the following properties to enable SSL:<property> <name>hive.server2.enable.SSL</name> <value>true</value> <description></description> </property> <property> <name>hive.server2.keystore.path</name> <value>$keystore-file-path</value> <description></description> </property> <property> <name>hive.server2.keystore.password</name> <value>$keystore-file-password</value> <description></description> </property>
On the client-side, specify SSL settings for Beeline or JDBC client as follows:
jdbc:hive2://$host:$port/$database;ssl=true;sslTrustStore=$path-to-truststore;sslTrustStorePassword=$password
