Using the Design Component
The following information steps you through some of the functionality available in the Workflow Manager design component.
Design Component Functionality
Open recently viewed workflows by clicking Recent and double-clicking on a workflow name.
The design workspace opens with the selected workflow displayed.
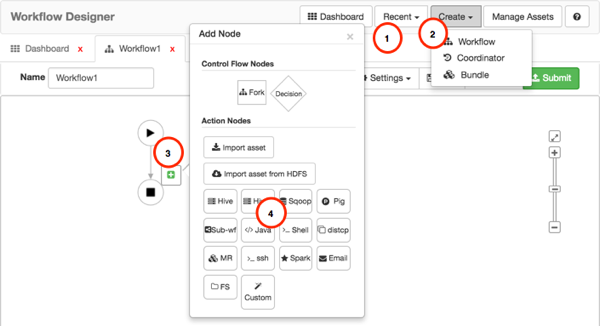
Create a new workflow, coordinator, or bundle from the Create menu.
Access the list of Action or Control Nodes to add to the workflow by clicking the connecting arrow on the workflow, then clicking the green + icon.
Add a node or import an existing asset by clicking one of the items in the Add Node popup.
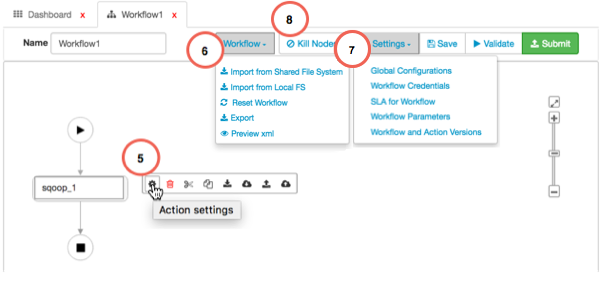
Perform various actions on the node you added by clicking any of the icons on the Node Action Bar. Configure the Action Node or Decision Node by clicking on the Action Settings icon to open the configuration dialog box.
If you rename the node, note that spaces are not allowed in node names.
You can perform various actions on a workflow by clicking Workflow and selecting one of the following items from the menu: Import from Shared Files System, Import from Local FS, Reset Workflow, Export, or Preview XML.
Reset Workflow discards any changes made to the workflow that have not been saved.
![[Important]](../common/images/admon/important.png)
Important If you import an existing workflow XML file, any comments in the file will be lost.
You can configure various settings that you can apply to workflows by clicking Settings and selecting one of the following items from the menu: Global Configurations, Workflow Credentials, SLA for Workflow, Workflow Parameters, Workflow and Action Versions.
Configure or modify stopping points for workflows by clicking Kill Nodes and selecting Create Kill Node or Manage Kill Nodes.
Once configured, you select a kill node from the Action Settings for a node.
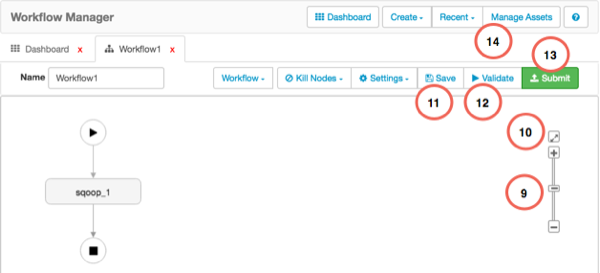
Resize the workflow within the workspace by dragging the slider on the scaler bar.
Reposition the workflow to the center of the workspace by clicking the
 (Reposition) icon.
Save a nonvalidated draft or a validated version of the workflow by clicking Save.
You can save the workflow to any location in HDFS for which you have write permissions.
Verify that the XML code in your workflow is correct by clicking Validate.
Validation only confirms that the XML is properly structured. It does not verify if the workflow will succeed when run.
Pass the valid workflow to the job engine in preparation for running the job by clicking Submit.
When submitting, you can choose whether or not to start the job. If you do not start the job when you submit it, you can start the job from the dashboard. Submitting a workflow results in the workflow displaying in the dashboard.
View or delete assets you created by clicking Manage Assets.
Only the user who created an asset can view or delete the asset in Asset Manager.