

Add Action Nodes
Steps
Click on the connector between the start and end nodes.
The + (Add Node) icon displays.

Click the green + icon.
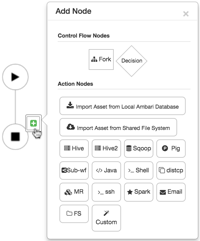
The Add Node dialog box displays.
![[Tip]](../common/images/admon/tip.png)
Tip If using a Custom Action Node, ensure that the JAR containing the Java code and the XML schema definition (XSD) for the custom action have been deployed. The XSD must also be specified in the Oozie configuration.
Click any node type in the Action Nodes section to add the node to the workflow.
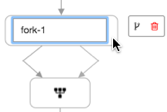
Optional: Double-click on the node and type an identifying name for the node.
Each node in the flow must have a unique name. Spaces are not allowed in the node name.
Click on the Action Settings icon and enter the appropriate parameters for the node type.
The Fork control node does not have action settings.
Enter the settings for the selected action.
Tip When entering commands in the action settings, do not enter the component command name. For example, if you were importing data using Sqoop, you would only enter import --connect <path> in the Command field, excluding sqoop.


More Information
Apache MapReduce, Pig, File System (FS), SSH, Sub-Workflow, and Java Actions