

Chapter 1. MiNiFi Java Agent Quick Start
This guide is intended to help you install and start using MiNiFi Java Agent quickly. For additional details, see the Administration Guide.
Overview
Apache NiFi, MiNiFi is an Apache NiFi project, designed to collect data at its source. MiNiFi was developed with the following objectives in mind:
Small and lightweight footprint
Central agent management
Data provenance generation
NiFi integration for follow-on dataflow management and chain of custody information
Before You Begin
MiNiFi is supported on the following operating systems:
Red Hat Enterprise Linux / CentOS 6 (64-bit)
Red Hat Enterprise Linux / CentOS 7 (64-bit)
Ubuntu Trusty (14.04) (64-bit)
Debian 7
SUSE Linux Enterprise Server (SLES) 11 SP3 (64-bit)
Windows
You can find download links for the following MiNiFi software in the HDF Release Notes.
MiNiFi Java Agent
MiNiFi C++
MiNiFi Toolkit
Installing and Starting MiNiFi
You have several options for installing and starting MiNiFi.
Installing MiNiFi on Linux
To install MiNiFi on RHEL/CentOS, Ubuntu, Debian, SLES, complete the following steps:
Download MiNiFi.
Extract the file to the location from which you want to run the application.
Installing MiNiFi as a Service on Linux
You can also install MiNiFi as a service:
Navigate to the MiNiFi installation directory.
Enter:
bin/minifi.sh install
You can also specify a custom name for your MiNiFi installation, by specifying that name during your install command. For example, to install MiNiFi as a service and named dataflow, enter:
bin/minifi.sh install dataflow
Starting MiNiFi on Linux
Once you have downloaded and installed MiNiFi, you need to start MiNiFi
You can start MiNiFi in the foreground, background, or as a service on Linux.
Launching MiNiFi in the foreground:
From a terminal window, navigate to the MiNiFi installation directory.
Enter:
bin/minifi.sh run
Launching MiNiFi in the background:
From a terminal window, navigate to the MiNiFi installation directory.
Enter:
bin/minifi.sh start
Launching MiNiFi as a service:
From a terminal window, enter:
sudo service minifi start
Installing MiNiFi on Windows
Prerequisites
Before you begin your MiNiFi installation, be sure you meet the following requirements:
Install JDK 8.0 64 bit.
Install Java to
C:/javainstead ofC:/Program Files.Recent Windows versions mark everything in
C:\Program Filesas read only.Set the JAVA_HOME environment variable using the 8.3 style name conventions.
For example:
C:\Program\jdk1.8.0.Ensure
JAVA_HOMEis pointing to a 64-bit JRE/JDK.Ensure the Domain user has administrator privilege.
Ensure your system meets the minimum memory requirement for Windows which is 4GB.
You can install MiNiFi using windows MSI:
Extract the MiNiFi MSI files in the repo location at
http://public-repo-1.hortonworks.com/HDF/windows/3.x/updates/3.1.1.0/minifi-3.1.1.0-35.msito the location from which you want to run the application.Execute the MSI.
Configuring the MiNiFi MSI
The MSI adds the Windows service for MiNiFi. The service is configured to be executed by either a local user in the computer, or a domain user in ActiveDirectory.
Using a Local User for MiNiFi Windows Service
There is no prerequisite to use a Local user for the Windows service. The installer automatically sets up the user.
If the computer is a part of a domain, then Local User checkbox appears in the HDF NiFi setup window. Check the Local User checkbox to specify that Local user is used to execute the installed service.
If a user specified at MiNiFi service username does not exist, the installer creates one with the specified MiNiFi service password. If the user already exists, the installer updates its password with the specified password.
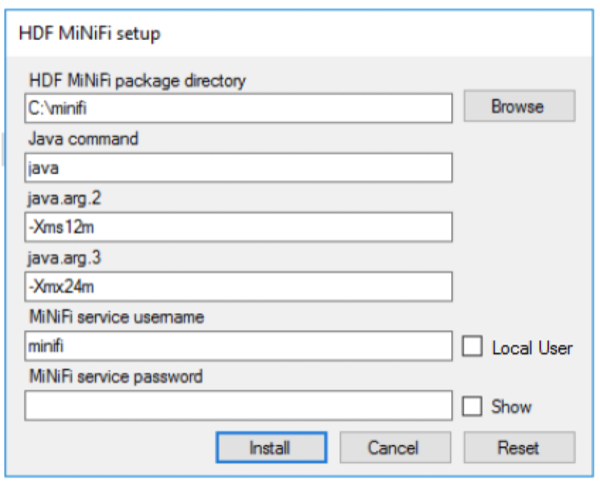
The installer also grants the following privileges to the specified user:
SeCreateSymbolicLinkPrivilege
SeServiceLogonRight
Using a Domain User for MiNiFi Windows Service
Prerequisites
The computer must be part of the domain.
The specified user must exist in the domain, and a correct password must be provided.
ActiveDirectory PowerShell module must be available.
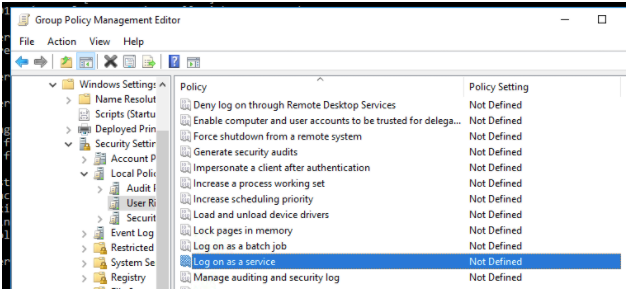
In the Group Policy Management Editor, set permission to ‘Log on as a service.’
Navigate to a machine on which MiNiFi is installed and enter the following command:
gpupdate
The gpupdate command is a machine-wide command and can be executed from any directory on the MiNiFi machine.
Install the ActiveDirectory PowerShell module by entering the following in the PowerShell console:
Add-WindowsFeature RSAT-AD-PowerShell
In the HDF NiFi setup window, uncheck ‘Local User’ checkbox then click Install.
After installation, you can update Java options at nifi-install-dir\conf\bootstrap.conf file. Repository locations are at nifi-install-dir\conf\nifi.properties file.
Starting MiNiFi on Windows
Once you have downloaded and installed MiNiFi, you can start MiNiFi in the foreground or as a service on Windows.
Launching MiNiFi in the foreground:
From a command prompt window, navigate to the MiNiFi installation directory.
Enter:
bin\run-minifi.bat
Launching MiNiFi as a service:
You can start or stop the installed MiNiFi service from the Windows Service Manager.
Working with Dataflows
When you are working with a MiNiFi dataflow, you should design it, add any additional configuration your environment or use case requires, and then deploy your dataflow. MiNiFi is not designed to accommodate substantial mid-dataflow configuration.
Setting up Your Dataflow
Before you begin, you should be aware that the following NiFi components are not supported in MiNiFi dataflows:
Funnels
Multiple source relationships for a single connection
Process groups
Additionally, each processor requires a distinct name.
You can use the MiNiFi Toolkit, located in your MiNiFi installation directory, and any NiFi instance to set up the dataflow you want MiNiFi to run:
Launch NiFi
Create a dataflow.
Convert your dataflow into a template.
Download your template as an
.xmlfile.For more information on working with templates, see the Templates section in the User Guide.
From the MiNiFi Toolkit, run the following command to turn your
.xmlfile into a.ymlfile:config.sh transform input_file output_file
Move your new
.ymlfile tominifi/conf.Rename your
.ymlfileconfig.yml.
![[Note]](../common/images/admon/note.png) | Note |
|---|---|
You can use one template at a time, per MiNiFi instance. |
Result: Once you have your
config.yml file in the minifi/conf directory,
launch that instance of MiNiFi and your dataflow begins automatically.
Using Processors Not Packaged with MiNiFi
MiNiFi is able to use the following processors out of the box:
UpdateAttribute
AttributesToJSON
Base64EncodeContent
CompressContent
ControlRate
ConvertCharacterSet
ConvertJSONToSQL
DetectDuplicate
DistributeLoad
DuplicateFlowFile
EncryptContent
EvaluateJsonPath
EvaluateRegularExpression
EvaluateXPath
EvaluateXQuery
ExecuteProcess
ExecuteSQL
ExecuteStreamCommand
ExtractText
FetchDistributedMapCache
FetchFile
FetchSFTP
GenerateFlowFile
GetFTP
GetFile
GetHTTP
GetJMSQueue
GetJMSTopic
GetSFTP
HandleHttpRequest
HandleHttpResponse
HashAttribute
HashContent
IdentifyMimeType
InvokeHTTP
ListFile
ListSFTP
ListenHTTP
ListenRELP
ListenSyslog
ListenTCP
ListenUDP
LogAttribute
MergeContent
ModifyBytes
MonitorActivity
ParseSyslog
PostHTTP
PutDistributedMapCache
PutEmail
PutFTP
PutFile
PutJMS
PutSFTP
PutSQL
PutSyslog
QueryDatabaseTable
ReplaceText
ReplaceTextWithMapping
RouteOnAttribute
RouteOnContent
RouteText
ScanAttribute
ScanContent
SegmentContent
SplitContent
SplitJson
SplitText
SplitXml
TailFile
TransformXml
UnpackContent
ValidateXml
If you want to create a dataflow with a processor not shipped with MiNiFi, you can do so.
Set up your dataflow as described above.
Copy the desired NAR file into the MiNiFi lib directory.
Restart your MiNiFi instance.
| Note |
|---|---|
Currently only the StandardSSLContextService is supported as a controller service. It is created automatically if the "Security Properties" section is set and can be referenced in the processor configuration using the ID "SSL-Context-Service". |
Securing your Dataflow
You can secure your MiNiFi dataflow using keystore or trust store SSL protocols, however, this information is not automatically generated. You will need to generate your security configuration information yourself.
To run a MiNiFi dataflow securely, modify the Security Properties section of
your config.yml file.
Create your dataflow template as discussed above.
Move it to minifi.conf and rename config.yml.
Manually modify the Security Properties section of
config.yml.
Security Properties:
keystore:
keystore type:
keystore password:
key password:
truststore:
truststore type:
truststore password:
ssl protocol: TLS
Sensitive Props:
key:
algorithm: PBEWITHMD5AND256BITAES-CBC-OPENSSL
provider: BC
Managing MiNiFi
You can also perform some management tasks using MiNiFi
Monitoring Status
You can use the minifi.sh flowStatus option to monitor a range of
aspects of your MiNiFi operational and dataflow status. You can use the flowStatus option to
get information dataflow component health and functionality, a MiNiFi instance, or system
diagnostics.
FlowStatus accepts the following flags and options:
processors
health
bulletins
status
connections
health
stats
remoteProcessGroups
health
bulletins
status
authorizationIssues
inputPorts
controllerServices
health
bulletins
provenancereporting
health
bulletins
instance
health
bulletins
status
systemdiagnostics
heap
processorstats
contentrepositoryusage
flowfilerepositoryusage
garbagecollection
For example, this query gets the health, stats, and bulletins for the TailFile processors
minifi.sh flowStatus processor:TailFile:health,stats,bulletins
| Note |
|---|---|
Currently the script only accepts one high level option at a time. Any connections, remote process groups or processors names that contain ":", ";" or "," will cause parsing errors when querying. |
For details on the flowStatus option, see the FlowStatus Query Option section of the Administration Guide.
Loading a New Dataflow
You can load a new dataflow for a MiNiFi instance to run:
Create a new
config.ymlfile with the new dataflow.Replace the existing
config.ymlin minifi/conf with the new file.Restart MiNiFi.
Stopping MiNiFi
You can stop MiNiFi at any time.
Stopping MiNiFi:
From a terminal window, navigate to the MiNiFi installation directory.
Enter:
bin/minifi.sh stop
Stopping MiNiFi as a service:
From a terminal window, enter:
sudo service minifi stop