To configure and use the HDFS NFS gateway, complete the following steps:
Configure settings for HDFS NFS gateway:
NFS gateway uses the same configurations as used by the NameNode and DataNode. Configure the following properties based on your application's requirements:
Edit the
hdfs-default.xmlfile on your NFS gateway machine and modify the following property:<property> <name>dfs.namenode.accesstime.precision</name> <value>3600000</value> <description>The access time for HDFS file is precise up to this value. The default value is 1 hour. Setting a value of 0 disables access times for HDFS. </description> </property>![[Note]](../common/images/admon/note.png)
Note If the export is mounted with access time update allowed, make sure this property is not disabled in the configuration file. Only NameNode needs to restart after this property is changed. If you have disabled access time update by mounting with "noatime" you do NOT have to change this property nor restart your NameNode.
Add the following property to
hdfs-site.xml:<property> <name>dfs.nfs3.dump.dir</name> <value>/tmp/.hdfs-nfs</value> </property>Update the following property to
hdfs-site.xml:<property> <name>dfs.nfs.exports.allowed.hosts</name> <value>* rw</value> </property>Note By default, the export can be mounted by any client. You must update this property to control access. The value string contains the machine name and access privilege, separated by whitespace characters. The machine name can be in single host, wildcard, or IPv4 network format. The access privilege uses
rworroto specifyreadwriteorreadonlyaccess to exports. If you do not specifiy an access privilege, the default machine access to exports isreadonly. Separate machine dentries by;. For example,192.168.0.0/22 rw ; host*.example.com ; host1.test.org ro;.Restart the NFS gateway after this property is updated.
Optional - Customize log settings.
Edit the
log4j.propertyfile to add the following:To change trace level, add the following:
log4j.logger.org.apache.hadoop.hdfs.nfs=DEBUG
To get more details of ONCRPC requests, add the following:
log4j.logger.org.apache.hadoop.oncrpc=DEBUG
Start the NFS gateway service.
Three daemons are required to provide NFS service:
rpcbind(orportmap),mountdandnfsd. The NFS gateway process has bothnfsdandmountd. It shares the HDFS root "/" as the only export. We recommend using theportmapincluded in NFS gateway package as shown below:Stop
nfs/rpcbind/portmapservices provided by the platform:service nfs stop service rpcbind stop
Start the included
portmappackage (needs root privileges):hadoop portmap
OR
hadoop-daemon.sh start portmap
Start
mountdandnfsd.No root privileges are required for this command. However, verify that the user starting the Hadoop cluster and the user starting the NFS gateway are same.
hadoop nfs3
OR
hadoop-daemon.sh start nfs3
Note If the
hadoop-daemon.shscript starts the NFS gateway, its log can be found in the hadoop log folder.Stop NFS gateway services.
hadoop-daemon.sh stop nfs3
hadoop-daemon.sh stop portmap
Verify validity of NFS-related services.
Execute the following command to verify that all the services are up and running:
rpcinfo -p $nfs_server_ip
You should see output similar to the following:
   program vers proto   port

    100005    1   tcp   4242  mountd

    100005    2   udp   4242  mountd

    100005    2   tcp   4242  mountd

    100000    2   tcp    111  portmapper

    100000    2   udp    111  portmapper

    100005    3   udp   4242  mountd

    100005    1   udp   4242  mountd

    100003    3   tcp   2049  nfs

    100005    3   tcp   4242  mountd
Verify that the HDFS namespace is exported and can be mounted.
showmount -e $nfs_server_ip
You should see output similar to the following:
Exports list on $nfs_server_ip :
/ (everyone)
Mount the export “/”.
Currently NFS v3 is supported and uses TCP as the transportation protocol is TCP. The users can mount the HDFS namespace as shown below:
mount -t nfs -o vers=3,proto=tcp,nolock $server:/ $mount_point
Then the users can access HDFS as part of the local file system except that hard/symbolic link and random write are not supported in this release.
Note Because NLM is not supported, the mount option
nolockis needed.User authentication and mapping:
NFS gateway in this release uses
AUTH_UNIXstyle authentication which means that the the login user on the client is the same user that NFS passes to the HDFS. For example, if the NFS client has current user asadmin, when the user accesses the mounted directory, NFS gateway will access HDFS as useradmin. To access HDFS ashdfsuser, you must first switch the current user tohdfson the client system before accessing the mounted directory.Set up client machine users to interact with HDFS through NFS.
NFS gateway converts the UID to user name and HDFS uses username for checking permissions.
The system administrator must ensure that the user on NFS client machine has the same name and UID as that on the NFS gateway machine. This is usually not a problem if you use the same user management system such as LDAP/NIS to create and deploy users to HDP nodes and to client node.
If the user is created manually, you might need to modify the UID on either the client or NFS gateway host in order to make them the same:
usermod -u 123 $myusername
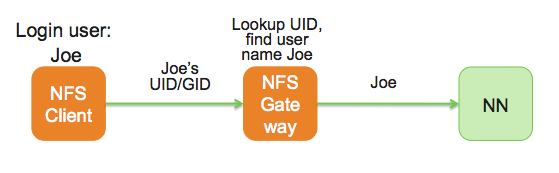
The following illustrates how the UID and name are communicated between the NFS client, NFS gateway, and NameNode.