Ambari User's Guide
Overview
Hadoop is a large-scale, distributed data storage and processing infrastructure using
clusters of commodity hosts networked together. Monitoring and managing such complex
distributed systems is a non-trivial task. To help you manage the complexity, Apache
Ambari collects a wide range of information from the cluster's nodes and services
and presents it to you in an easy-to-read and use, centralized web interface, Ambari
Web.
Ambari Web displays information such as service-specific summaries, graphs, and alerts.
You use Ambari Web to create and manage your HDP cluster and to perform basic operational
tasks such as starting and stopping services, adding hosts to your cluster, and updating
service configurations. You also use Ambari Web to perform administrative tasks for
your cluster, such as managing users and groups and deploying Ambari Views.
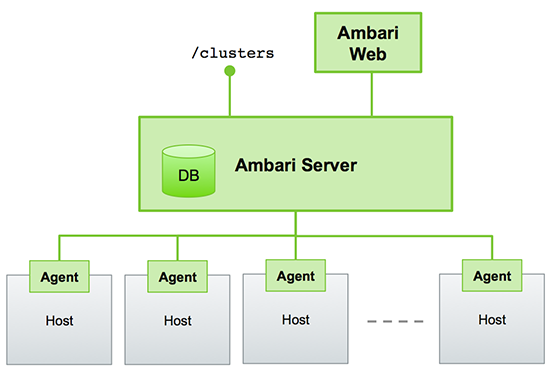
Architecture
The Ambari Server serves as the collection point for data from across your cluster.
Each host has a copy of the Ambari Agent - either installed automatically by the Install
wizard or manually - which allows the Ambari Server to control each host. In addition,
each host has a copy of Ganglia Monitor (gmond), which collects metric information that is passed to the Ganglia Connector, and
then on to the Ambari Server.
Figure - Ambari Server Architecture
Sessions
Ambari Web is a client-side JavaScript application, which calls the Ambari REST API (accessible from the Ambari Server) to access cluster information and perform cluster operations. After authenticating to Ambari Web, the application authenticates to the Ambari Server. Communication between the browser and server occurs asynchronously via the REST API.
Ambari Web sessions do not time out. The Ambari Server application constantly accesses the Ambari REST API, which resets the session timeout. During any period of Ambari Web inactivity, the Ambari Web user interface (UI) refreshes automatically. You must explicitly sign out of the Ambari Web UI to destroy the Ambari session with the server.

Accessing Ambari Web
Typically, you start the Ambari Server and Ambari Web as part of the installation process. If Ambari Server is stopped, you can start it using a command line editor on the Ambari Server host machine. Enter the following command:
ambari-server start
To access Ambari Web, open a supported browser and enter the Ambari Web URL:
http://<your.ambari.server>:8080
Enter your user name and password. If this is the first time Ambari Web is accessed,
use the default values, admin/admin.
These values can be changed, and new users provisioned, using the Manage Ambari option.
For more information about managing users and other administrative tasks, see Administering Ambari.
Monitoring and Managing your HDP Cluster with Ambari
This topic describes how to use Ambari Web features to monitor and manage your HDP cluster. To navigate, select one of the following feature tabs located at the top of the Ambari main window. The selected tab appears white.

Viewing Metrics on the Dashboard
Ambari Web displays the Dashboard page as the home page. Use the Dashboard to view the operating status of your cluster in the following three ways:
Scanning System Metrics
View Metrics that indicate the operating status of your cluster on the Ambari Dashboard. Each metrics widget displays status information for a single service in your HDP cluster. The Ambari Dashboard displays all metrics for the HDFS, YARN, HBase, and Storm services, and cluster-wide metrics by default.
You can add and remove individual widgets, and rearrange the dashboard by dragging and dropping each widget to a new location in the dashboard.
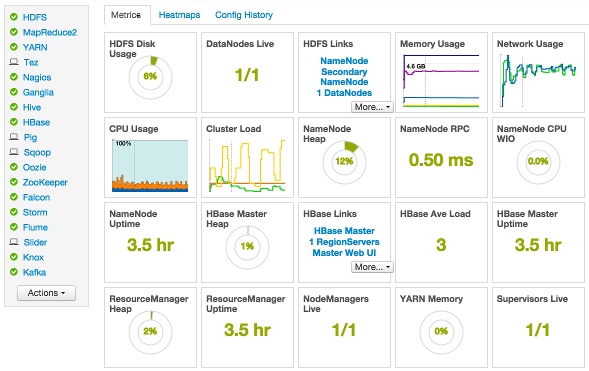
Status information appears as simple pie and bar charts, more complex charts showing usage and load, sets of links to additional data sources, and values for operating parameters such as uptime and average RPC queue wait times. Most widgets display a single fact by default. For example, HDFS Disk Usage displays a load chart and a percentage figure. The Ambari Dashboard includes metrics for the following services:
Ambari Service Metrics and Descriptions
|
Metric: |
Description: |
|---|---|
|
HDFS |
|
|
HDFS Disk Usage |
The Percentage of DFS used, which is a combination of DFS and non-DFS used. |
|
Data Nodes Live |
The number of DataNodes live, as reported from the NameNode. |
|
NameNode Heap |
The percentage of NameNode JVM Heap used. |
|
NameNode RPC |
The average RPC queue latency. |
|
NameNode CPU WIO |
The percentage of CPU Wait I/O. |
|
NameNode Uptime |
The NameNode uptime calculation. |
|
YARNHDP 2.0 and 2.1 Stacks |
|
|
ResourceManager Heap |
The percentage of ResourceManager JVM Heap used. |
|
ResourceManager Uptime |
The ResourceManager uptime calculation. |
|
NodeManagers Live |
The number of DataNodes live, as reported from the ResourceManager. |
|
YARN Memory |
The percentage of available YARN memory (used vs. total available). |
|
HBase |
|
|
HBase Master Heap |
The percentage of NameNode JVM Heap used. |
|
HBase Ave Load |
The average load on the HBase server. |
|
HBase Master Uptime |
The HBase Master uptime calculation. |
|
Region in Transition |
The number of HBase regions in transition. |
|
StormHDP 2.1 Stack |
|
|
Supervisors Live |
The number of Supervisors live, as reported from the Nimbus server. |
|
MapReduceHDP 1.3 Stack |
|
|
JobTracker Heap |
The percentage of JobTracker JVM Heap used. |
|
TaskTrackers Live |
The number of TaskTrackers live, as reported from the JobTracker. |
Drilling Into Metrics for a Service
-
To see more detailed information about a service, hover your cursor over a Metrics widget.
More detailed information about the service displays, as shown in the following example:
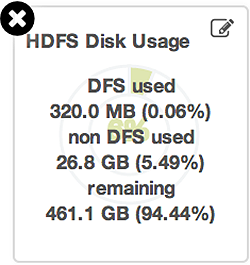
-
To remove a widget from the mashup, click the white X.
-
To edit the display of information in a widget, click the pencil icon. For more information about editing a widget, see Customizing Metrics Display.
Viewing Cluster-Wide Metrics
Cluster-wide metrics display information that represents your whole cluster. The Ambari Dashboard shows the following cluster-wide metrics:
Ambari Cluster-Wide Metrics and Descriptions
|
Metric: |
Description: |
|---|---|
|
Memory Usage |
The cluster-wide memory utilization, including memory cached, swapped, used, shared. |
|
Network Usage |
The cluster-wide network utilization, including in-and-out. |
|
CPU Usage |
Cluster-wide CPU information, including system, user and wait IO. |
|
Cluster Load |
Cluster-wide Load information, including total number of nodes. total number of CPUs, number of running processes and 1-min Load. |
-
To remove a widget from the dashboard, click the white X.
-
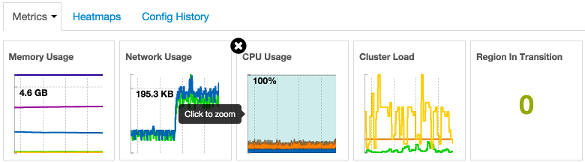
Hover your cursor over each cluster-wide metric to magnify the chart or itemize the widget display.
-
To remove or add metric items from each cluster-wide metric widget, select the item on the widget legend.
-
To see a larger view of the chart, select the magnifying glass icon.
Ambari displays a larger version of the widget in a pop-out window, as shown in the following example:
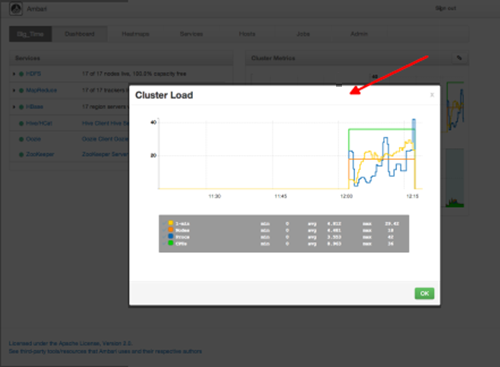
Use the pop-up window in the same ways that you use cluster-wide metric widgets on the dashboard.
To close the widget pop-up window, choose OK.
Adding a Widget to the Dashboard
To replace a widget that has been removed from the dashboard:
-
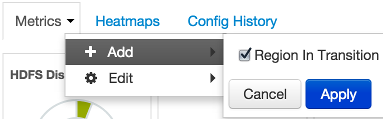
Select the Metrics drop-down, as shown in the following example:
-
Choose Add.
-
Select a metric, such as Region in Transition.
-
Choose Apply.
Resetting the Dashboard
To reset all widgets on the dashboard to display default settings:
-
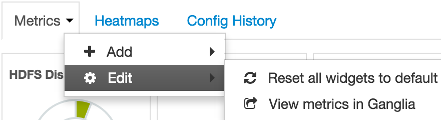
Select the Metrics drop-down, as shown in the following example:
-
Choose Edit.
-
Choose Reset all widgets to default.
Viewing Metrics in Ganglia
To view metrics for your cluster using the Ganglia UI:
-
Select the Metrics drop-down:
-
Choose Edit.
-
Choose View Metrics in Ganglia.
Customizing Metrics Display
To customize the way a service widget displays metrics information:
-
Hover your cursor over a service widget.
-
Select the pencil-shaped, edit icon that appears in the upper-right corner.
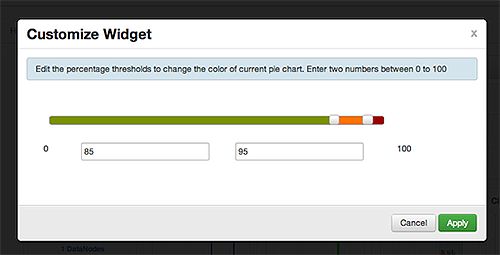
The Customize Widget pop-up window displays properties that you can edit, as shown in the following example.
-
Follow the instructions in the Customize Widget pop-up to customize widget appearance.
In this example, you can adjust the thresholds at which the HDFS Capacity bar chart changes color, from green to orange to red.
-
To save your changes and close the editor, choose
Apply. -
To close the editor without saving any changes, choose
Cancel.
Viewing More Metrics for your HDP Stack
The HDFS Links and HBase Links widgets list HDP components for which links to more metrics information, such as thread stacks, logs and native component UIs are available. For example, you can link to NameNode, Secondary NameNode, and DataNode components for HDFS, using the links shown in the following example:
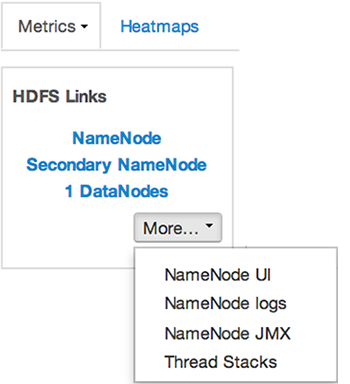
Choose the More drop-down to select from the list of links available for each service. The Ambari
Dashboard includes additional links to metrics for the following services:
Links to More Metrics for HDP Services
|
Service: |
Metric: |
Description: |
|---|---|---|
|
HDFS |
||
|
NameNode UI |
Links to the NameNode UI. |
|
|
NameNode Logs |
Links to the NameNode logs. |
|
|
NameNode JMX |
Links to the NameNode JMX servlet. |
|
|
Thread Stacks |
Links to the NameNode thread stack traces. |
|
|
HBase |
||
|
HBase Master UI |
Links to the HBase Master UI. |
|
|
HBase Logs |
Links to the HBase logs. |
|
|
ZooKeeper Info |
Links to ZooKeeper information. |
|
|
HBase Master JPX |
Links to the HBase Master JMX servlet. |
|
|
Debug Dump |
Links to debug information. |
|
|
Thread Stacks |
Links to the HBase Master thread stack traces. |
Viewing Heatmaps
Heatmaps provides a graphical representation of your overall cluster utilization using simple color coding.
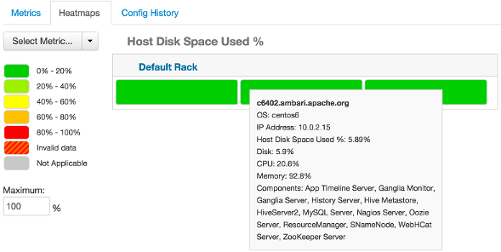
A colored block represents each host in your cluster. To see more information about a specific host, hover over the block representing the host in which you are interested. A pop-up window displays metrics about HDP components installed on that host. Colors displayed in the block represent usage in a unit appropriate for the selected set of metrics. If any data necessary to determine state is not available, the block displays "Invalid Data". Changing the default maximum values for the heatmap lets you fine tune the representation. Use the Select Metric drop-down to select the metric type.

Heatmaps supports the following metrics:
|
Metric |
Uses |
|---|---|
|
Host/Disk Space Used % |
disk.disk_free and disk.disk_total |
|
Host/Memory Used % |
memory.mem_free and memory.mem_total |
|
Host/CPU Wait I/O % |
cpu.cpu_wio |
|
HDFS/Bytes Read |
dfs.datanode.bytes_read |
|
HDFS/Bytes Written |
dfs.datanode.bytes_written |
|
HDFS/Garbage Collection Time |
jvm.gcTimeMillis |
|
HDFS/JVM Heap MemoryUsed |
jvm.memHeapUsedM |
|
YARN/Garbage Collection Time |
jvm.gcTimeMillis |
|
YARN / JVM Heap Memory Used |
jvm.memHeapUsedM |
|
YARN / Memory used % |
UsedMemoryMB and AvailableMemoryMB |
|
HBase/RegionServer read request count |
hbase.regionserver.readRequestsCount |
|
HBase/RegionServer write request count |
hbase.regionserver.writeRequestsCount |
|
HBase/RegionServer compaction queue size |
hbase.regionserver.compactionQueueSize |
|
HBase/RegionServer regions |
hbase.regionserver.regions |
|
HBase/RegionServer memstore sizes |
hbase.regionserver.memstoreSizeMB |
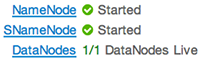
Scanning Status
Notice the color of the dot appearing next to each component name in a list of components, services or hosts. The dot color and blinking action indicates operating status of each component, service, or host. For example, in the Summary View, notice green dot next to each service name. The following colors and actions indicate service status:
Status Indicators
|
Color |
Status |
|---|---|
|
Solid Green |
All masters are running |
|
Blinking Green |
Starting up |
|
Solid Red |
At least one master is down |
|
Blinking Red |
Stopping |
Click the service name to open the Services screen, where you can see more detailed information on each service.
Managing Hosts
Use Ambari Hosts to manage multiple HDP components such as DataNodes, NameNodes, TaskTrackers and RegionServers, running on hosts throughout your cluster. For example, you can restart all DataNode components, optionally controlling that task with rolling restarts. Ambari Hosts supports filtering your selection of host components, based on operating status, host health, and defined host groupings.
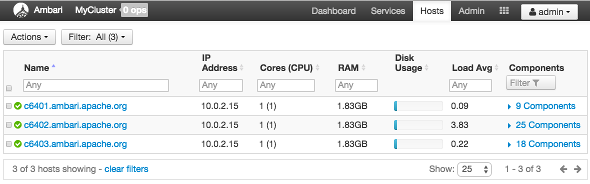
Working with Hosts
Use Hosts to view hosts in your cluster on which Hadoop services run. Use options on Actions to perform actions on one or more hosts in your cluster.
View individual hosts, listed by fully-qualified domain name, on the Hosts landing page.
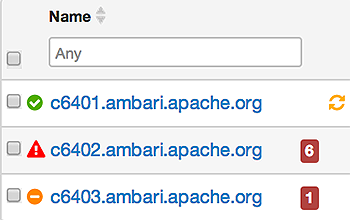
Determining Host Status
A colored dot beside each host name indicates operating status of each host, as follows:
-
Red - At least one master component on that host is down. Hover to see a tooltip that lists affected components.
-
Orange - At least one slave component on that host is down. Hover to see a tooltip that lists affected components.
-
Yellow - Ambari Server has not received a heartbeat from that host for more than 3 minutes.
-
Green - Normal running state.
A red condition flag overrides an orange condition flag, which overrides a yellow condition flag. In other words, a host having a master component down may also have other issues. The following example shows three hosts, one having a master component down, one having a slave component down, and one healthy. Warning indicators appear next to hosts having a component down.
Filtering the Hosts List
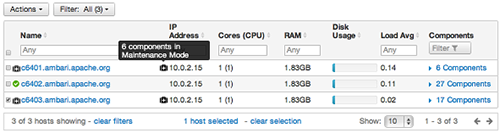
Use Filters to limit listed hosts to only those having a specific operating status. The number of hosts in your cluster having a listed operating status appears after each status name, in parenthesis. For example, the following cluster has one host having healthy status and three hosts having Maintenance Mode turned on.
For example, to limit the list of hosts appearing on Hosts home to only those with Healthy status, select Filters, then choose the Healthy option. In this case, one host name appears on Hosts home. Alternatively, to limit the list of hosts appearing on Hosts home to only those having Maintenance Mode on, select Filters, then choose the Maintenance Mode option. In this case, three host names appear on Hosts home.
Use the general filter tool to apply specific search and sort criteria that limits the list of hosts appearing on the Hosts page.
Performing Host-Level Actions
Use Actions to act on one, or multiple hosts in your cluster. Actions performed on multiple hosts are also known as bulk operations.
Actions comprises three menus that list the following options types:
-
Hosts - lists selected, filtered or all hosts options, based on your selections made using Hosts home and Filters.
-
Objects - lists component objects that match your host selection criteria.
-
Operations - lists all operations available for the component objects you selected.
For example, to restart DataNodes on one host:
-
In Hosts, select a host running at least one DataNode.
-
In Actions, choose
Selected Hosts > DataNodes > Restart, as shown in the following image.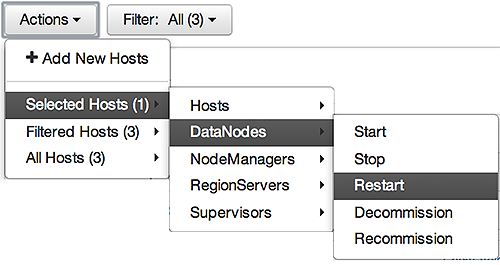
-
Choose OK to confirm starting the selected operation.
-
Optionally, use Monitoring Background Operations to follow, diagnose or troubleshoot the restart operation.
Viewing Components on a Host
To manage components running on a specific host, choose a FQDN on the Hosts page. For example, choose c6403.ambari.apache.org in the default example shown. Summary-Components lists all components installed on that host.
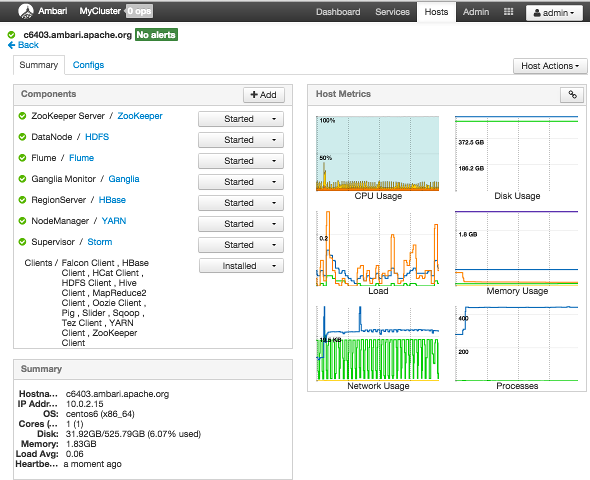
Choose options in Host Actions, to start, stop, restart, delete, or turn on maintenance mode for all components
installed on the selected host.
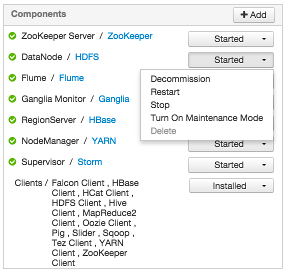
Alternatively, choose action options from the drop-down menu next to an individual component on a host. The drop-down menu shows current operation status for each component, For example, you can decommission, restart, or stop the DataNode component (started) for HDFS, by selecting one of the options shown in the following example:
Decommissioning Masters and Slaves
Decommissioning is a process that supports removing a component from the cluster. You must decommission a master or slave running on a host before removing the component or host from service. Decommissioning helps prevent potential loss of data or service disruption. Decommissioning is available for the following component types:
-
DataNodes
-
NodeManagers
-
TaskTrackers
-
RegionServers
Decommissioning executes the following tasks:
-
For DataNodes, safely replicates the HDFS data to other DataNodes in the cluster.
-
For NodeManagers and TaskTrackers, stops accepting new job requests from the masters and stops the component.
-
For RegionServers, turns on drain mode and stops the component.
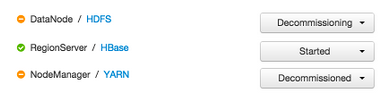
How to Decommission a Component
To decommission a component using Ambari Web, browse Hosts to find the host FQDN on which the component resides.
Using Actions, select HostsComponent Type, then choose Decommission.
For example:

The UI shows "Decommissioning" status while steps process, then "Decommissioned" when complete.
How to Delete a Component
To delete a component using Ambari Web, on Hosts choose the host FQDN on which the component resides.
-
In
Components, find a decommissioned component. -
Stop the component, if necessary.
-
For a decommissioned component, choose Delete from the component drop-down menu.
-
Restart the Ganglia and Nagios services.
Deleting a slave component, such as a DataNode does not automatically inform a master component, such as a NameNode to remove the slave component from its exclusion list. Adding a deleted slave component back into the cluster presents the following issue; the added slave remains decommissioned from the master's perspective. Restart the master component, as a work-around.
Deleting a Host from a Cluster
Deleting a host removes the host from the cluster. Before deleting a host, you must complete the following prerequisites:
-
Stop all components running on the host.
-
Decommission any DataNodes running on the host.
-
Move from the host any master components, such as NameNode or ResourceManager, running on the host.
-
Turn Off Maintenance Mode, if necessary, for the host.
How to Delete a Host from a Cluster
-
In Hosts, click on a host name.
-
On the Host-Details page, select Host Actions drop-down menu.
-
Choose Delete.
If you have not completed prerequisite steps, a warning message similar to the following one appears:
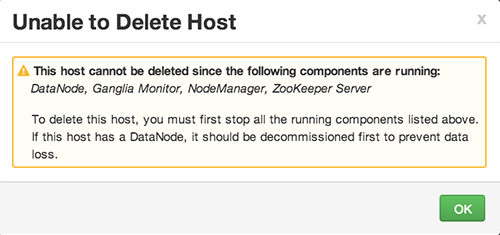
Setting Maintenance Mode
Maintenance Mode supports suppressing alerts and skipping bulk operations for specific services, components and hosts in an Ambari-managed cluster. You typically turn on Maintenance Mode when performing hardware or software maintenance, changing configuration settings, troubleshooting, decommissioning, or removing cluster nodes. You may place a service, component, or host object in Maintenance Mode before you perform necessary maintenance or troubleshooting tasks.
Maintenance Mode affects a service, component, or host object in the following two ways:
-
Maintenance Mode suppresses alerts, warnings and status change indicators generated for the object
-
Maintenance Mode exempts an object from host-level or service-level bulk operations
Explicitly turning on Maintenance Mode for a service implicitly turns on Maintenance Mode for components and hosts that run the service. While Maintenance Mode On prevents bulk operations being performed on the service, component, or host, you may explicitly start and stop a service, component, or host having Maintenance Mode On.
Setting Maintenance Mode for Services, Components, and Hosts
For example, examine using Maintenance Mode in a 3-node, Ambari-managed cluster installed using default options. This cluster has one data node, on host c6403. This example describes how to explicitly turn on Maintenance Mode for the HDFS service, alternative procedures for explicitly turning on Maintenance Mode for a host, and the implicit effects of turning on Maintenance Mode for a service, a component and a host.
How to Turn On Maintenance Mode for a Service
-
Using Services, select
HDFS. -
Select Service Actions, then choose
Turn On Maintenance Mode. -
Choose OK to confirm.
Notice, on Services Summary that Maintenance Mode turns on for the NameNode and SNameNode components.
How to Turn On Maintenance Mode for a Host
-
Using Hosts, select c6401.ambari.apache.org.
-
Select
Host Actions, then chooseTurn On Maintenance Mode. -
Choose OK to confirm.
Notice on Components, that Maintenance Mode turns on for all components.
How to Turn On Maintenance Mode for a Host (alternative using filtering for hosts)
-
Using Hosts, select c6403.ambari.apache.org.
-
In
Actions > Selected Hosts > HostschooseTurn On Maintenance Mode. -
Choose
OKto confirm.Notice that Maintenance Mode turns on for host c6403.ambari.apache.org.
Your list of Hosts now shows Maintenance Mode On for hosts c6401 and c6403.
-
Hover your cursor over each Maintenance Mode icon appearing in the Hosts list.
-
Notice that hosts c6401 and c6403 have Maintenance Mode On.
-
Notice that on host c6401; Ganglia Monitor, HbaseMaster, HDFS client, NameNode, and Zookeeper Server have Maintenance Mode turned On.
-
Notice on host c6402, that HDFS client and Secondary NameNode have Maintenance Mode On.
-
Notice on host c6403, that 15 components have Maintenance Mode On.
-
-
The following behavior also results:
-
Alerts are suppressed for the DataNode.
-
DataNode is skipped from HDFS Start/Stop/Restart All, Rolling Restart.
-
DataNode is skipped from all Bulk Operations except Turn Maintenance Mode ON/OFF.
-
DataNode is skipped from Start All and / Stop All components.
-
DataNode is skipped from a host-level restart/restart all/stop all/start.
-
Maintenance Mode Use Cases
Four common Maintenance Mode Use Cases follow:
-
You want to perform hardware, firmware, or OS maintenance on a host.
You want to:
-
Prevent alerts generated by all components on this host.
-
Be able to stop, start, and restart each component on the host.
-
Prevent host-level or service-level bulk operations from starting, stopping, or restarting components on this host.
To achieve these goals, turn On Maintenance Mode explicitly for the host. Putting a host in Maintenance Mode implicitly puts all components on that host in Maintenance Mode.
-
-
You want to test a service configuration change. You will stop, start, and restart the service using a rolling restart to test whether restarting picks up the change.
You want:
-
No alerts generated by any components in this service.
-
To prevent host-level or service-level bulk operations from starting, stopping, or restarting components in this service.
To achieve these goals, turn on Maintenance Mode explicitly for the service. Putting a service in Maintenance Mode implicitly turns on Maintenance Mode for all components in the service.
-
-
You turn off a service completely.
You want:
-
The service to generate no warnings.
-
To ensure that no components start, stop, or restart due to host-level actions or bulk operations.
To achieve these goals, turn On Maintenance Mode explicitly for the service. Putting a service in Maintenance Mode implicitly turns on Maintenance Mode for all components in the service.
-
-
A host component is generating alerts.
You want to:
-
Check the component.
-
Assess warnings and alerts generated for the component.
-
Prevent alerts generated by the component while you check its condition.
-
To achieve these goals, turn on Maintenance Mode explicitly for the host component. Putting a host component in Maintenance Mode prevents host-level and service-level bulk operations from starting or restarting the component. You can restart the component explicitly while Maintenance Mode is on.
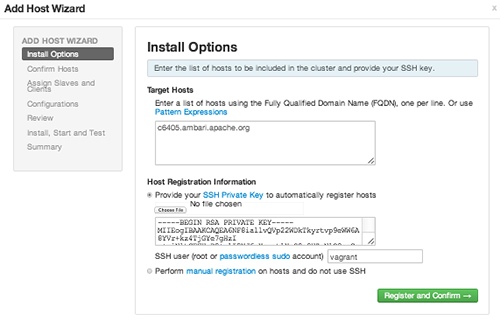
Adding Hosts to a Cluster
To add new hosts to your cluster, browse to the Hosts page and select Actions > +Add New Hosts. The Add Host Wizard provides a sequence of prompts similar to those in the Ambari Install Wizard. Follow
the prompts, providing information similar to that provided to define the first set
of hosts in your cluster.
Managing Services
Use Services to monitor and manage selected services running in your Hadoop cluster.
All services installed in your cluster are listed in the leftmost Services panel.
Services supports the following tasks:
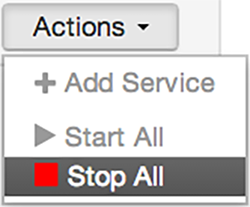
Starting and Stopping All Services
To start or stop all listed services at once, select Actions, then choose Start All or Stop All, as shown in the following example:
Selecting a Service
Selecting a service name from the list shows current summary, alert, and health information for the selected service. To refresh the monitoring panels and show information about a different service, select a different service name from the list.
Notice the colored dot next to each service name, indicating service operating status and a small, red, numbered rectangle indicating any alerts generated for the service.
Adding a Service
The Ambari install wizard installs all available Hadoop services by default. You may
choose to deploy only some services initially, then add other services at later times.
For example, many customers deploy only core Hadoop services initially. Add Service supports deploying additional services without interrupting operations in your Hadoop
cluster. When you have deployed all available services, Add Service displays disabled.
For example, if you are using HDP 2.2 Stack and did not install Falcon or Storm, you
can use the Add Service capability to add those services to your cluster.
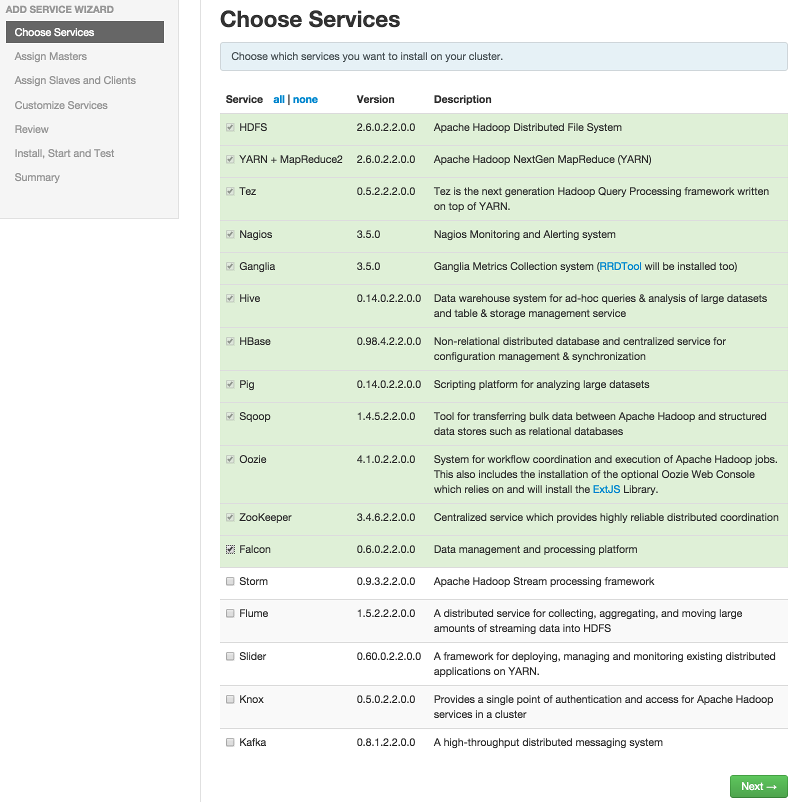
To add a service, select Actions > Add Service, then complete the following procedure using the Add Service Wizard.
Adding a Service to your Hadoop cluster
This example shows the Falcon service selected for addition.
-
Choose
Services.Choose an available service. Alternatively, choose all to add all available services to your cluster. Then, choose Next. The Add Service wizard displays installed services highlighted green and check-marked, not available for selection.
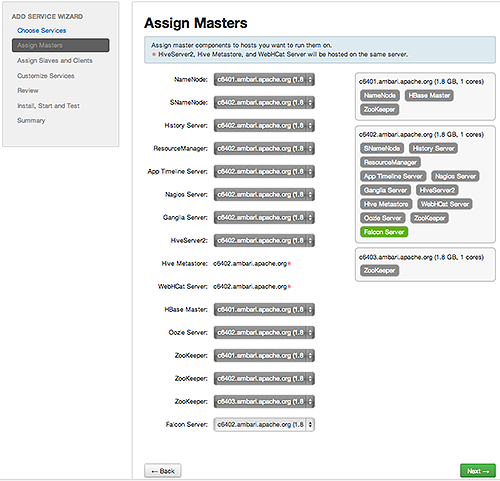
-
In
Assign Masters, confirm the default host assignment. Alternatively, choose a different host machine to which master components for your selected service will be added. Then, choose Next.The Add Services Wizard indicates hosts on which the master components for a chosen service will be installed. A service chosen for addition shows a grey check mark.
Using the drop-down, choose an alternate host name, if necessary.-
A green label located on the host to which its master components will be added, or
-
An active drop-down list on which available host names appear.
-
-
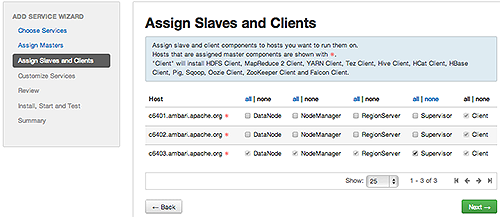
In
Assign Slaves and Clients, accept the default assignment of slave and client components to hosts. Then, choose Next.Alternatively, select hosts on which you want to install slave and client components. You must select at least one host for the slave of each service being added.
Host Roles Required for Added Services
Service Added
Host Role Required
MapReduce
TaskTracker
YARN
NodeManager
HBase
RegionServer
The Add Service Wizard skips and disables the Assign Slaves and Clients step for a service requiring no slave nor client assignment.
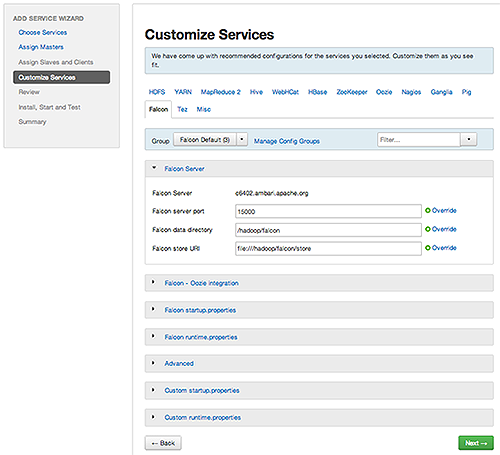
-
In
Customize Services, accept the default configuration properties.Alternatively, edit the default values for configuration properties, if necessary. Choose Override to create a configuration group for this service. Then, choose Next.
-
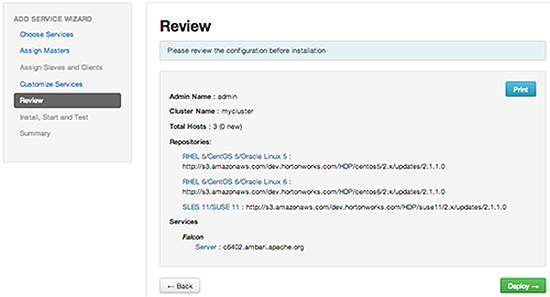
In Review, make sure the configuration settings match your intentions. Then, choose Deploy.
-
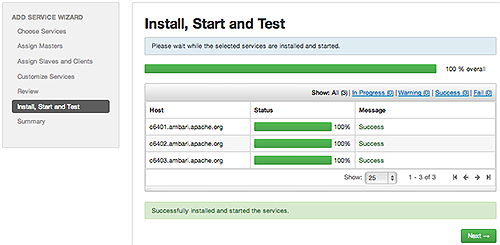
Monitor the progress of installing, starting, and testing the service. When the service installs and starts successfully, choose Next.
-
Summary displays the results of installing the service. Choose Complete.
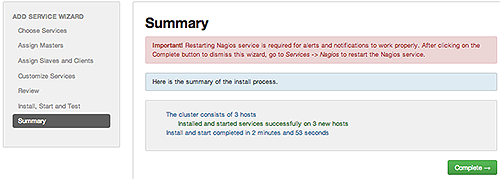
-
Restart the Nagios service and any other components having stale configurations.
If you do not restart Nagios service after completing the Add Service Wizard, alerts and notifications may not work properly.
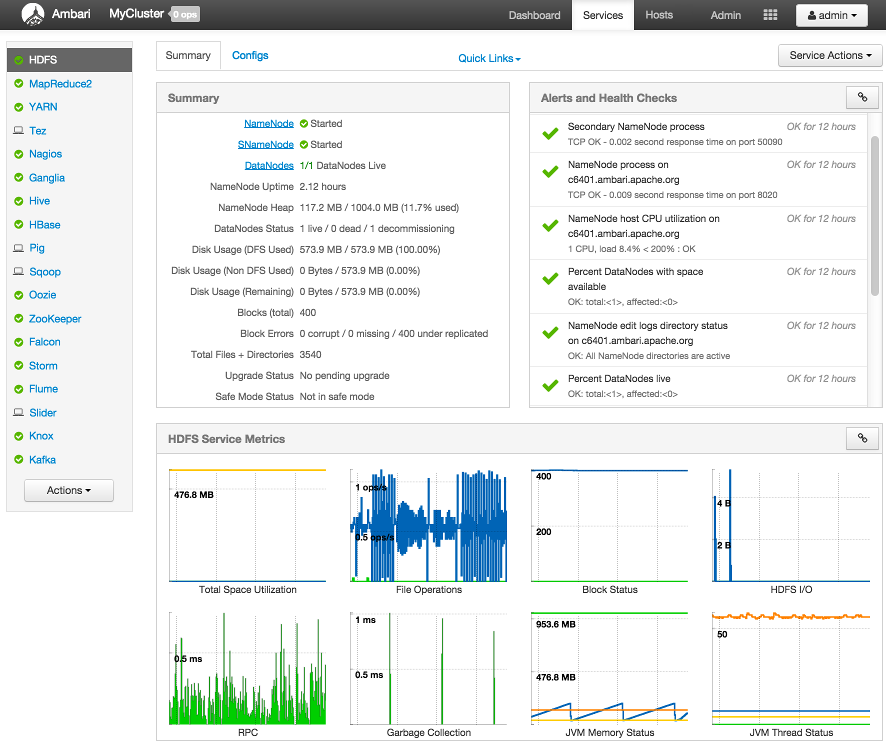
Viewing Summary, Alert, and Health Information
After you select a service, the Summary tab displays basic information about the selected service.
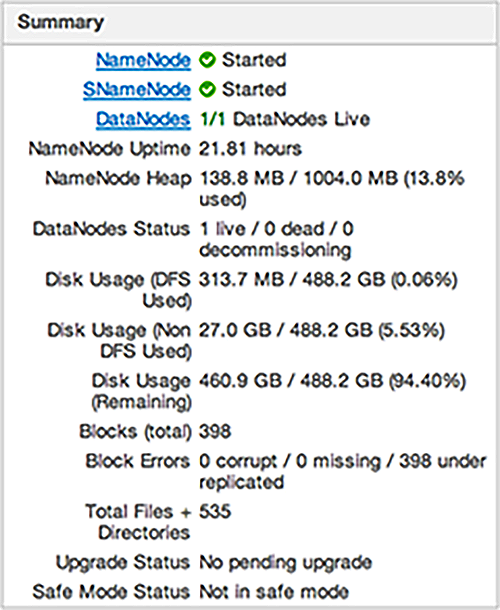
Select one of the View Host links, as shown in the following example, to view components and the host on which
the selected service is running.
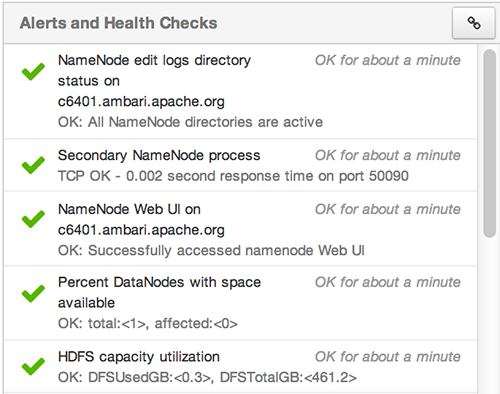
Alerts and Health Checks
View results of the health checks performed on your cluster by Nagios in Alerts and Health Checks. Alerts and Health Checks displays a list of each issue and its rating, sorted first
by descending severity, then by descending time. To access more detailed information,
select the native Nagios GUI link located at the upper right corner of the panel.
Use the Nagios credentials you set up during installation to log in to Nagios.
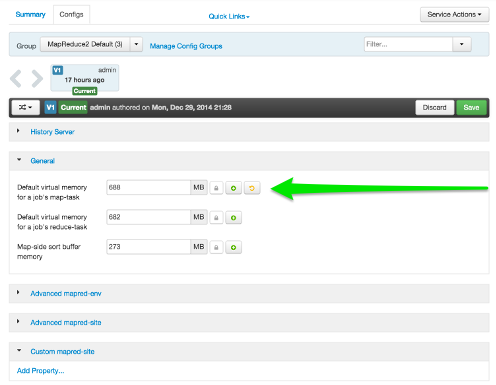
Editing Service Config Properties
Select a service, then select Configs to view and update configuration properties for the selected service. For example,
select MapReduce2, then select Configs. Expand a config category to view configurable
service properties. For example, select General to configure Default virtual memory
for a job's map task.
Performing Service Actions
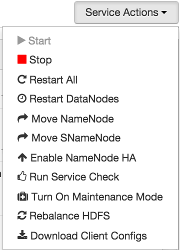
Manage a selected service on your cluster by performing service actions. In Services, select the Service Actions drop-down menu, then choose an option. Available options depend on the service you
have selected. For example, HDFS service action options include:
Optionally, choose Turn On Maintenance Mode to suppress alerts generated by a service before performing a service action. Maintenance
Mode suppresses alerts and status indicator changes generated by the service, while
allowing you to start, stop, restart, move, or perform maintenance tasks on the service.
For more information about how Maintenance Mode affects bulk operations for host components,
see Maintenance Mode.
Rolling Restarts
When you restart multiple services, components, or hosts, use rolling restarts to distribute the task; minimizing cluster downtime and service disruption. A rolling restart stops, then starts multiple, running slave components such as DataNodes, TaskTrackers, NodeManagers, RegionServers, or Supervisors, using a batch sequence. You set rolling restart parameter values to control the number of, time between, tolerance for failures, and limits for restarts of many components across large clusters.
To run a rolling restart:
-
Select a Service, then link to a list of specific components or hosts that Require Restart.
-
Select Restart, then choose a slave component option.
-
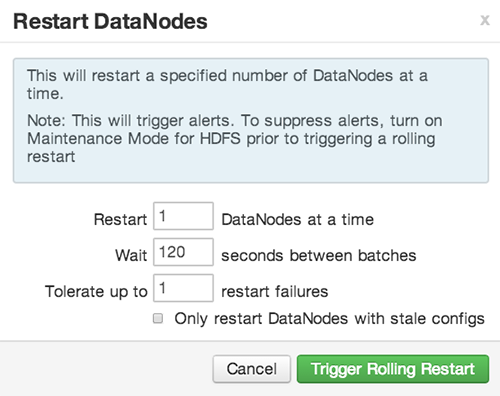
Review and set values for Rolling Restart Parameters.
-
Optionally, reset the flag to only restart components with changed configurations.
-
Choose Trigger Restart.
Use Monitor Background Operations to monitor progress of rolling restarts.
Setting Rolling Restart Parameters
When you choose to restart slave components, use parameters to control how restarts of components roll. Parameter values based on ten percent of the total number of components in your cluster are set as default values. For example, default settings for a rolling restart of components in a 3-node cluster restarts one component at a time, waits two minutes between restarts, will proceed if only one failure occurs, and restarts all existing components that run this service.
If you trigger a rolling restart of components, Restart components with stale configs defaults to true. If you trigger a rolling restart of services, Restart services with stale configs defaults to false.
Rolling restart parameter values must satisfy the following criteria:
Validation Rules for Rolling Restart Parameters
|
Parameter |
Required |
Value |
Description |
|---|---|---|---|
|
Batch Size |
Yes |
Must be an integer > 0 |
Number of components to include in each restart batch. |
|
Wait Time |
Yes |
Must be an integer > = 0 |
Time (in seconds) to wait between queuing each batch of components. |
|
Tolerate up to x failures |
Yes |
Must be an integer > = 0 |
Total number of restart failures to tolerate, across all batches, before halting the restarts and not queuing batches. |
Aborting a Rolling Restart
To abort future restart operations in the batch, choose Abort Rolling Restart.

Enabling NameNode High Availability
To ensure that a NameNode in your cluster is always available if the primary NameNode
host fails, enable and set up NameNode High Availability on your cluster using Ambari
Web.
In Ambari Web, browse to Services > HDFS > Summary, select Service Actions and then choose Enable NameNode HA. Follow the steps in the Enable NameNode HA Wizard.
For more information about using the Enable NameNode HA Wizard to set up NameNode
High Availability, see Configuring NameNode High Availability.
Enabling Resource Manager High Availability
To ensure that a ResourceManager in your cluster is always available if the primary
ResourceManager host fails, enable and set up ResourceManager High Availability on
your cluster using Ambari Web.
In Ambari Web, browse to Services > YARN > Summary, select Service Actions and then choose Enable ResourceManager HA. Follow the steps
in the Enable ResourceManager HA Wizard.
For more information about using the Enable ResourceManager HA Wizard to set up ResourceManager
High Availability, see Configuring ResourceManager High Availability.
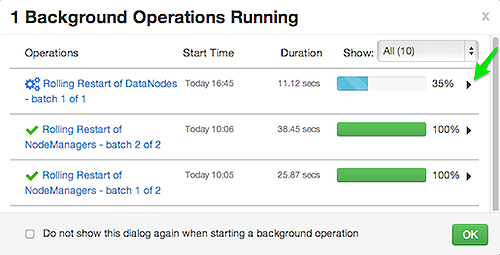
Monitoring Background Operations
Optionally, use Background Operations to monitor progress and completion of bulk operations such as rolling restarts.
Background Operations opens by default when you run a job that executes bulk operations.
-
Select the right-arrow for each operation to show restart operation progress on each host.
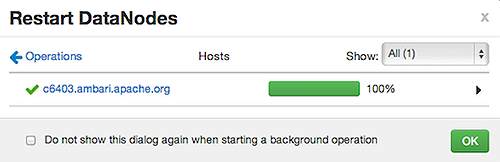
-
After restarts complete, Select the right-arrow, or a host name, to view log files and any error messages generated on the selected host.
-
Select links at the upper-right to copy or open text files containing log and error information.
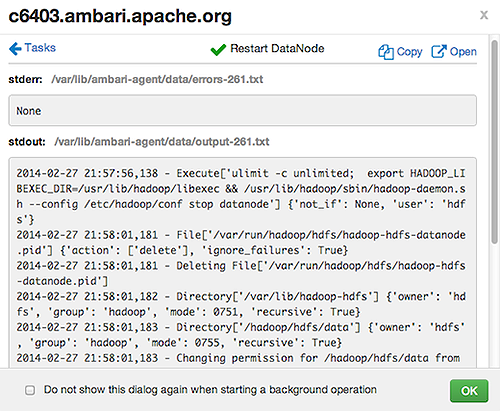
Optionally, select the option to not show the bulk operations dialog.
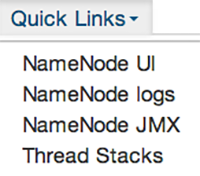
Using Quick Links
Select Quick Links options to access additional sources of information about a selected service. For
example, HDFS Quick Links options include the native NameNode GUI, NameNode logs,
the NameNode JMX output, and thread stacks for the HDFS service. Quick Links are not
available for every service.
Analyzing Service Metrics
Review visualizations in Metrics that chart common metrics for a selected service. Services > Summary displays metrics widgets for HDFS, HBase, Storm services. For more information about
using metrics widgets, see Scanning System Metrics. To see more metrics information, select the link located at the upper right of the
Metrics panel that opens the native Ganglia GUI.
Managing Configurations
Use Ambari Web to manage your HDP component configurations. Select any of the following topics:
Configuring Services
Select a service, then select Configs to view and update configuration properties for the selected service. For example,
select MapReduce2, then select Configs. Expand a config category to view configurable
service properties.
Updating Service Properties
-
Expand a configuration category.
-
Edit values for one or more properties that have the Override option.
Edited values, also called stale configs, show an Undo option.
-
Choose Save.
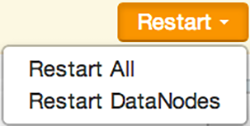
Restarting components
After editing and saving a service configuration, Restart indicates components that
you must restart.
Select the Components or Hosts links to view details about components or hosts requiring
a restart.
Then, choose an option appearing in Restart. For example, options to restart YARN
components include:
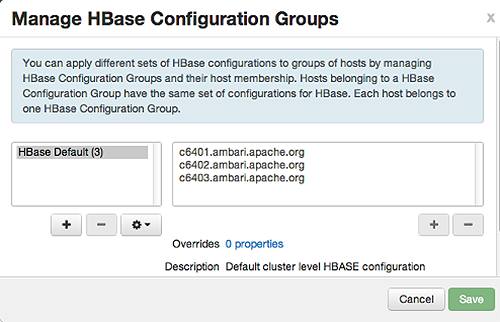
Using Host Config Groups
Ambari initially assigns all hosts in your cluster to one, default configuration group
for each service you install. For example, after deploying a three-node cluster with
default configuration settings, each host belongs to one configuration group that
has default configuration settings for the HDFS service. In Configs, select Manage Config Groups, to create new groups, re-assign hosts, and override default settings for host components
you assign to each group.
To create a Configuration Group:
-
Choose
Add New Configuration Group. -
Name and describe the group, then choose Save.
-
Select a Config Group, then choose Add Hosts to Config Group.
-
Select Components and choose from available Hosts to add hosts to the new group.
Select Configuration Group Hosts enforces host membership in each group, based on installed components for the selected service.
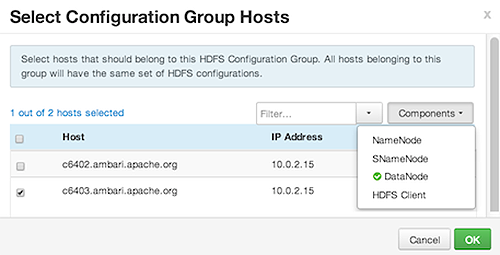
-
Choose OK.
-
In Manage Configuration Groups, choose Save.
To edit settings for a configuration group:
-
In Configs, choose a Group.
-
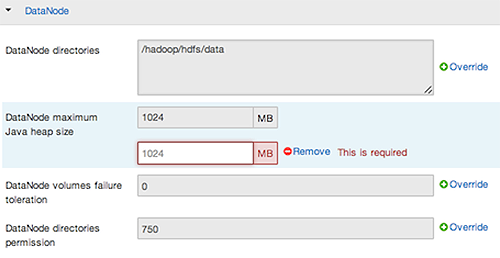
Select a Config Group, then expand components to expose settings that allow Override.
-
Provide a non-default value, then choose Override or Save.
Configuration groups enforce configuration properties that allow override, based on installed components for the selected service and group.
-
Override prompts you to choose one of the following options:
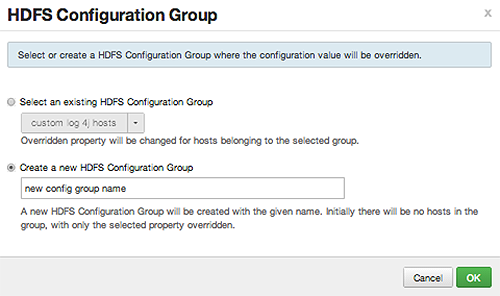
-
Select an existing configuration group (to which the property value override provided in step 3 will apply), or
-
Create a new configuration group (which will include default properties, plus the property override provided in step 3).
-
Then, choose
OK.
-
-
In Configs, choose Save.
Customizing Log Settings
Ambari Web displays default logging properties in Service Configs > Custom log 4j Properties. Log 4j properties control logging activities for the selected service.
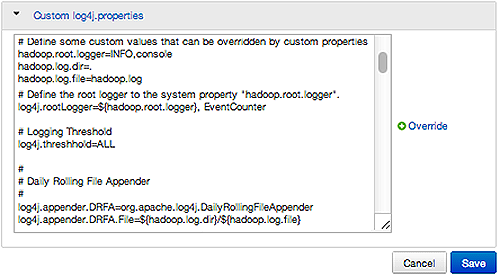
Restarting components in the service pushes the configuration properties displayed in Custom log 4j Properties to each host running components for that service. If you have customized logging properties that define how activities for each service are logged, you will see refresh indicators next to each service name after upgrading to Ambari 1.5.0 or higher. Make sure that logging properties displayed in Custom log 4j Properties include any customization. Optionally, you can create configuration groups that include custom logging properties. For more information about saving and overriding configuration settings, see Configuring Services.
Downloading Client Configs
For Services that include client components (for example Hadoop Client or Hive Client), you can download the client configuration files associated with that client from Ambari.
-
In Ambari Web, browse to the Service with the client for which you want the configurations.
-
Choose
Service Actions. -
Choose
Download Client Configs. You are prompted for a location to save the client configs bundle.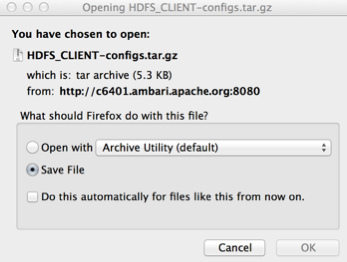
-
Save the bundle.
Service Configuration Versions
Ambari provides the ability to manage configurations associated with a Service. You can make changes to configurations, see a history of changes, compare + revert changes and push configuration changes to the cluster hosts.
Basic Concepts
It’s important to understand how service configurations are organized and stored in
Ambari. Properties are grouped into Configuration Types (config types). A set of config
types makes up the set of configurations for a service.
For example, the HDFS Service includes the following config types: hdfs-site, core-site,
hdfs-log4j, hadoop-env, hadoop-policy. If you browse to Services > HDFS > Configs, the configuration properties for these config types are available for edit.
Versioning of configurations is performed at the service-level. Therefore, when you
modify a configuration property in a service, Ambari will create a Service Config
Version. The figure below shows V1 and V2 of a Service Configuration Version with
a change to a property in Config Type A. After making the property change to Config
Type A in V1, V2 is created.

Terminology
The following table lists configuration versioning terms and concepts that you should know.
|
Term |
Description |
|---|---|
|
Configuration Property |
Configuration property managed by Ambari, such as NameNode heapsize or replication factor. |
|
Configuration Type (Config Type) |
Group of configuration properties. For example: hdfs-site is a Config Type. |
|
Service Configurations |
Set of configuration types for a particular service. For example: hdfs-site and core-site Config Types are part of the HDFS Service Configuration. |
|
Change Notes |
Optional notes to save with a service configuration change. |
|
Service Config Version (SCV) |
Particular version of configurations for a specific service. Ambari saves a history of service configuration versions. |
|
Host Config Group (HCG) |
Set of configuration properties to apply to a specific set of hosts. Each service has a default Host Config Group, and custom config groups can be created on top of the default configuration group to target property overrides to one or more hosts in the cluster. See Managing Configuration Groups for more information. |
Saving a Change
-
Make the configuration property change.
-
Choose Save.
-
You are prompted to enter notes that describe the change.
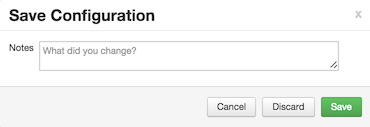
-
Click Save to confirm your change. Cancel will not save but instead returns you to the configuration page to continuing editing.
To revert the changes you made and not save, choose Discard.
To return to the configuration page and continue editing without saving changes, choose Cancel.
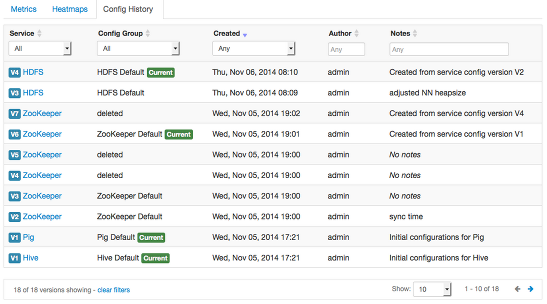
Viewing History
Service Config Version history is available from Ambari Web in two places: On the
Dashboard page under the Config History tab; and on each Service page under the Configs
tab.
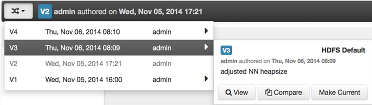
The Dashboard > Config History tab shows a list of all versions across services with each version number and the
date and time the version was created. You can also see which user authored the change
with the notes entered during save. Using this table, you can filter, sort and search
across versions.
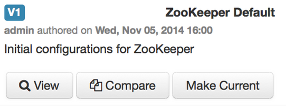
The most recent configuration changes are shown on the Service > Configs tab. Users can navigate the version scrollbar left-right to see earlier versions.
This provides a quick way to access the most recent changes to a service configuration.
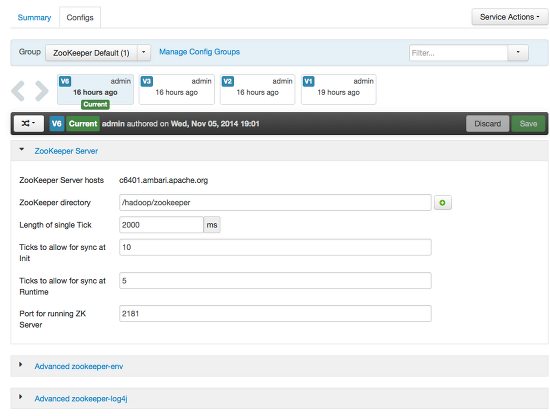
Click on any version in the scrollbar to view, and hover to display an option menu which allows you compare versions and perform a revert. Performing a revert makes any config version that you select the current version.
Comparing Versions
When navigating the version scroll area on the Services > Configs tab, you can hover over a version to display options to view, compare or revert.
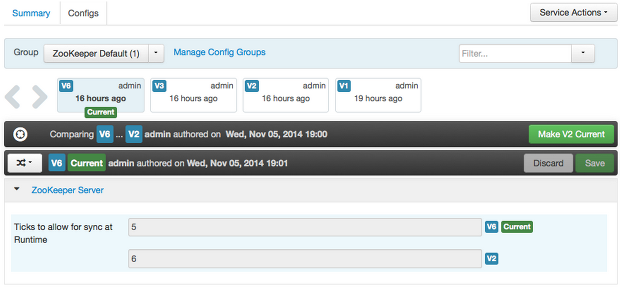
- To perform a compare between two service configuration versions:
-
Navigate to a specific configuration version. For example “V6”.
-
Using the version scrollbar, find the version would you like to compare against “V6”. For example, if you want to compare V6 to V2, find V2 in the scrollbar.
-
Hover over the version to display the option menu. Click “Compare”.
-
Ambari displays a comparison of V6 to V2, with an option to revert to V2.
-
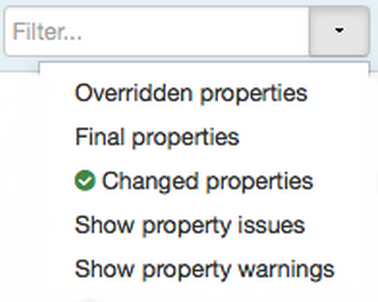
Ambari also filters the display by only “Changed properties”. This option is available under the Filter control.
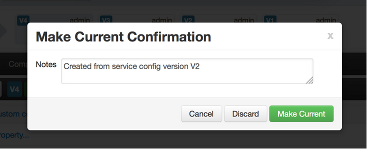
Reverting a Change
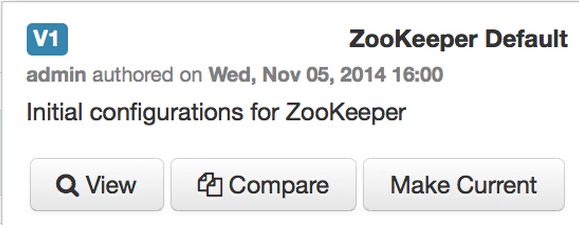
You can revert to an older service configuration version by using the “Make Current” feature. The “Make Current” will actually create a new service configuration version with the configuration properties from the version you are reverting -- it is effectively a “clone”. After initiating the Make Current operation, you are prompted to enter notes for the new version (i.e. the clone) and save. The notes text will include text about the version being cloned.
There are multiple methods to revert to a previous configuration version:
-
View a specific version and click the “Make V* Current” button.

-
Use the version navigation dropdown and click the “Make Current” button.
-
Hover on a version in the version scrollbar and click the “Make Current” button.
-
Perform a comparison and click the “Make V* Current” button.

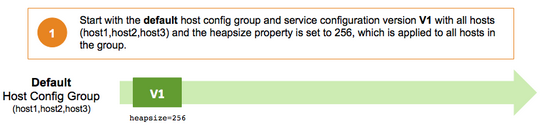
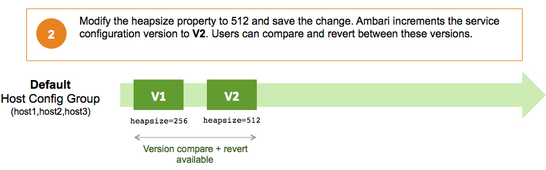
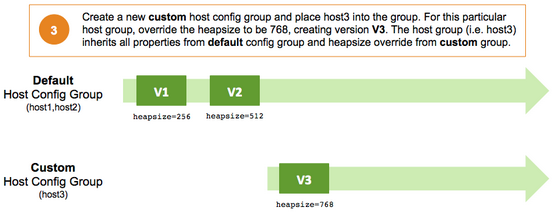
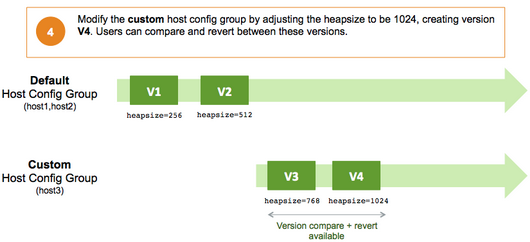
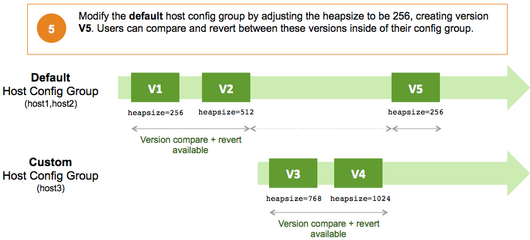
Versioning and Host Config Groups
Service configuration versions are scoped to a host config group. For example, changes made in the default group can be compared and reverted in that config group. Same with custom config groups.
The following example describes a flow where you have multiple host config groups and create service configuration versions in each config group.
Administering the Cluster
Use Admin options to view repositories and service accounts for your cluster and to enable
or disable Kerberos security for your cluster.

For more information about administering your cluster, see Administering Ambari.
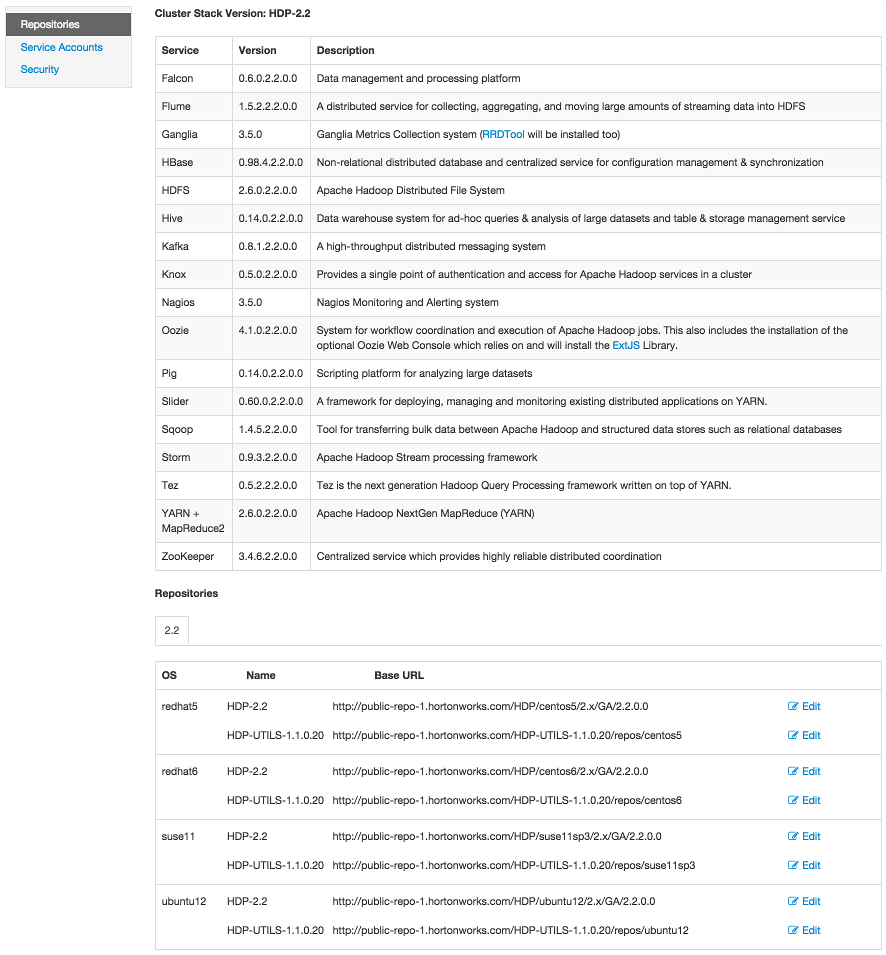
Viewing Cluster Stack Version and Repository URLs
To view the version of each Service version installed in your HDP cluster and the
base repository path, choose Admin > Repositories. Version and repository information for the HDP 2.2 Stack is shown in the following
example:
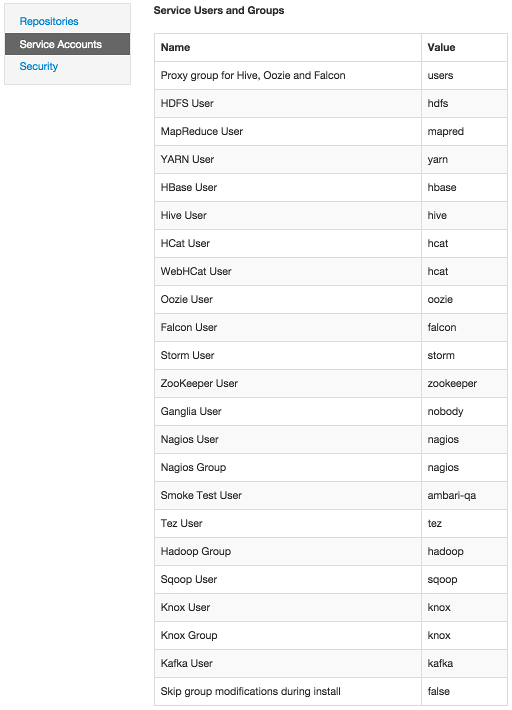
Viewing Service Users and Groups
To view Service Accounts defined in your HDP cluster, choose Admin > Serrvice Accounts. Default Service User and Group information for the HDP 2.2 Stack is shown in the
following example:
Enabling Kerberos Security
Ambari supports the Kerberos protocol which allows nodes in your cluster to prove their identities, or authenticate, in a secure manner. To enable Kerberos security you must:
-
Set up Kerberos for your cluster. For more information on setting up Kerberos, see Preparing Kerberos for Hadoop.
-
Choose
Enable Securityand follow the Enable Security Wizard.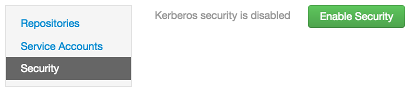
Monitoring and Alerts
Nagios is an open source network monitoring system designed to monitor all aspects of your Hadoop cluster (such as hosts, services, and so forth) over the network. It can monitor many facets of your installation, ranging from operating system attributes like CPU and memory usage to the status of applications, files, and more.
Nagios is primarily used for the following kinds of tasks:
-
Getting instant information about your organization's Hadoop infrastructure
-
Detecting and repairing problems, and mitigating future issues, before they affect end-users and customers
-
Leveraging Nagios’ event monitoring capabilities to receive alerts for potential problem areas
-
Analyzing specific trends; for example: what is the CPU usage for a particular Hadoop service weekdays between 2 p.m. and 5 p.m?
For more information, see the Nagios website at http://www.nagios.org.
Basic Nagios Architecture
Using the open source monitoring system Nagios, Ambari gathers information on the status of both of the hosts and the services that run on them.
-
Host and System Information: Ambari monitors basic host and system information such as CPU utilization, disk I/O bandwidth and operations per second, average memory and swap space utilization, and average network latency.
-
Service Information: Ambari monitors the health and performance status of each service by presenting information generated by that service. Because services that run in master/slave configurations (HDFS, MapReduce, and HBase) are fault tolerant in regard to service slaves, master information is presented individually, whereas slave information is presented largely in aggregate.
-
Alert Information: Using Nagios with Hadoop-specific plug-ins and configurations, Ambari Web can issue alerts based on service states defined on the following basic levels:
-
OK
-
Warning
-
Critical
The thresholds for these alerts can be tuned using configuration files, and new alerts can be added. For more details on Nagios architecture, see the Nagios Overview at at http://www.nagios.org.
-
Installing Nagios
The Ambari Installation Wizard gives you the option of installing and configuring Nagios, including the out-of-the-box plug-ins for Hadoop-specific alerts. The Nagios server, Nagios plug-ins, and the web-based user interface are installed on the Nagios server host, as specified during the installation procedure.
Configuration File Locations
All Hadoop-specific configurations are added to Nagios through files prefixed with
“hadoop-“ located in the /etc/nagios/objects directory of the Nagios Server host. The default general Nagios configuration file,
nagios.cfg (in /etc/nagios), is set up to pick up the new Hadoop specific configurations from this directory.
Hadoop-specific plug-ins are stored in the Nagios plug-ins directory, /usr/lib64/nagios/plug-ins/.
By default, the Nagios server runs as a user named “nagios” which is in a group also
named “nagios”. The user and group can be customized during the Ambari Cluster Install
(Cluster Install Wizard > Customize Services > Misc). After you install Nagios, use Ambari Web to start and stop the Nagios server.
Configuring Nagios Alerts For Hadoop Services
For each alert, the out-of-the-box Hadoop Nagios configuration file defines default values for the following Nagios directives:
-
Warning threshold
The value that produces a warning alert.
-
Critical threshold
The value that produces a critical alert.
-
Check interval
The number of minutes between regularly scheduled checks on the host, if the check does not change the state.
-
Retry interval
The number of minutes between “retries”, when a service changes state, Nagios can confirm that state change by retrying the check multiple times. This retry interval can be different than the original check interval.
-
Maximum number of check attempts
The maximum number of retry attempts. Usually when the state of a service changes, this change is considered “soft” until multiple retries confirm it. Once the state change is confirmed, it is considered “hard”. Ambari Web displays hard states for all the Nagios Hadoop specific checks.
Nagios Alerts For Hadoop Services
This topic provides more information about Hadoop alerts provided by Ambari. All these alerts are displayed in Ambari Web and in the native Nagios web interface.
Ambari provides two types of alerts configured out-of-the-box:
-
Host-level Alerts
These alerts refer to a specific host and specific component running on that host. These alerts check a component and system-level metrics to determine health of the host.
-
Service-level Alerts
These alerts refer to a Hadoop Service and do not refer to a specific host. These alerts check one or more components of a service as well as system-level metrics to determine overall health of a Hadoop Service.
HDFS Service Alerts
These alerts are used to monitor the HDFS service.
Blocks health
This service-level alert is triggered if the number of corrupt or missing blocks exceeds
the configured critical threshold. This alert uses the check_hdfs_blocks plug-in.
Potential causes
-
Some DataNodes are down and the replicas that are missing blocks are only on those DataNodes.
-
The corrupt/missing blocks are from files with a replication factor of 1. New replicas cannot be created because the only replica of the block is missing.
Possible remedies
-
For critical data, use a replication factor of 3.
-
Bring up the failed DataNodes with missing or corrupt blocks.
-
Identify the files associated with the missing or corrupt blocks by running the Hadoop
fsckcommand. -
Delete the corrupt files and recover them from backup, if it exists.
NameNode process
This host-level alert is triggered if the NameNode process cannot be confirmed to
be up and listening on the network for the configured critical threshold, given in
seconds. It uses the Nagios check_tcp
Potential causes
-
The NameNode process is down on the HDFS master host.
-
The NameNode process is up and running but not listening on the correct network port. The default port is 8201.
-
The Nagios server cannot connect to the HDFS master through the network.
Possible remedies
-
Check for any errors in the logs, located at
/var/log/hadoop/hdfs/. Then restart the NameNode host/process using theHMC Manage Servicestab. -
Run the
netstat-tuplpncommand to check if the NameNode process is bound to the correct network port. -
Use
pingto check the network connection between the Nagios server and the NameNode.
DataNode space
This host-level alert is triggered if storage capacity if full on the DataNode (90%
critical). It uses the check_datanode_storage.php plug-in which checks the DataNode JMX Servlet for the Capacity and Remaining properties.
Potential causes
-
Cluster storage is full.
-
If cluster storage is not full, DataNode is full.
Possible remedies
-
If the cluster has available storage, use Balancer to distribute the data to relatively less-used datanodes.
-
If the cluster is full, delete unnecessary data or add additional storage by adding either more DataNodes or more or larger disks to the DataNodes. After adding more storage run Balancer.
DataNode process
This host-level alert is triggered if the individual DataNode processes cannot be
established to be up and listening on the network for the configured critical threshold,
given in seconds. It uses the Nagios check_tcp plugin.
Potential causes
-
DataNode process is down or not responding.
-
DataNode is not down, but is not listening to the correct network port/address.
-
Nagios server cannot connect to the DataNodes.
Possible remedies
-
Check for dead DataNodes in Ambari Web.
-
Check for any errors in the DataNode logs, located at
/var/log/hadoop/hdfs. Then, restart the DataNode, if necessary. -
Run the
netstat-tuplpncommand to check if the DataNode process is bound to the correct network port. -
Use
pingto check the network connection between the Nagios server and the DataNode.
NameNode host CPU utilization
This host-level alert is triggered if CPU utilization of the NameNode exceeds certain
thresholds (200% warning, 250% critical). It uses the check_cpu.php plug-in which checks the NameNode JMX Servlet for the SystemCPULoad property. This information is only available if you are running JDK 1.7.
Potential causes
-
Unusually high CPU utilization: Can be caused by a very unusual job/query workload; but this is generally due to an issue in the daemon.
Possible remedies
-
Use the
topcommand to determine which processes are consuming excess CPU. -
Reset the offending process.
NameNode edit logs directory status
This host-level alert is triggered if the NameNode cannot write to one of its configured edit log directories.
Potential causes
-
At least one of the multiple edit log directories is mounted over NFS and has become unreachable.
-
The permissions on at least one of the multiple edit log directories is set to Read-only.
Possible remedies
-
Check permissions on all edit log directories.
-
Use the
dfs.name.dirparameter in thehdfs-site.xmlfile on the NameNode to identify the locations of all the edit log directories for the NameNode. Check whether the NameNode can reach all those locations.
NameNode Web UI
This host-level alert is triggered if the NameNode Web UI is unreachable.
Potential causes
-
The NameNode Web UI is unreachable from the Nagios Server.
-
The NameNode process is not running.
Possible remedies
-
Check whether the NameNode process is running.
-
Check whether the Nagios Server can ping the NameNode server.
-
Using a browser, check whether the Nagios Server can reach the NameNode Web UI.
Percent DataNodes with space available
This service-level alert is triggered if the storage if full on a certain percentage
of DataNodes (10% warn, 30% critical). It uses the check_aggregate.php plug-in which aggregates the result from the check_datanode_storage.php plug-in.
Potential causes
-
Cluster storage is full.
-
If cluster storage is not full, DataNode is full.
Possible remedies
-
If cluster still has storage, use Balancer to distribute the data to relatively less-used DataNodes.
-
If the cluster is full, delete unnecessary data or add additional storage by adding either more DataNodes or more or larger disks to the DataNodes. After adding more storage run Balancer.
Percent DataNodes live
This alert is triggered if the number of down DataNodes in the cluster is greater
than the configured critical threshold. It uses the check_aggregate plug-in to aggregate the results of Data node process checks.
Potential causes
-
DataNodes are down.
-
DataNodes are not down but are not listening to the correct network port/address.
-
Nagios server cannot connect to one or more DataNodes.
Possible remedies
-
Check for dead DataNodes in Ambari Web.
-
Check for any errors in the DataNode logs, located at
/var/log/hadoop/hdfs. Then, restart the DataNode hosts/processes. -
Run the
netstat-tuplpncommand to check if the DataNode process is bound to the correct network port. -
Use
pingto check the network connection between the Nagios server and the DataNodes.
NameNode RPC latency
This host-level alert is triggered if the NameNode operations RPC latency exceeds
the configured critical threshold. Typically an increase in the RPC processing time
increases the RPC queue length, causing the average queue wait time to increase for
NameNode operations. It uses the Nagios check_rpcq_latency plug-in.
Potential causes
-
A job or an application is performing too many NameNode operations.
Possible remedies
-
Review the job or the application for potential bugs causing it to perform too many NameNode operations.
HDFS capacity utilization
This service-level alert is triggered if the HDFS capacity utilization exceeds the
configured critical threshold (80% warn, 90% critical). It uses the check_hdfs_capacity.php plug-in which checks the NameNode JMX Servlet for the CapacityUsed and CapacityRemaining properties.
Potential causes
-
Cluster storage is full.
Possible remedies
-
Delete unnecessary data.
-
Archive unused data.
-
Add more DataNodes.
-
Add more or larger disks to the DataNodes.
-
After adding more storage, run Balancer.
NameNode HA Alerts (Hadoop 2 only)
These alerts are available only when you are using Hadoop 2.x and you have enabled NameNode HA.
JournalNode process
This host-level alert is triggered if the individual JournalNode process cannot be
established to be up and listening on the network for the configured critical threshold,
given in seconds. It uses the Nagios check_tcp plug-in.
Potential causes
-
The JournalNode process is down or not responding.
-
The JournalNode is not down, but is not listening to the correct network port/address.
-
The Nagios server cannot connect to the JournalNode.
Possible remedies
-
Check if the JournalNode process is dead.
-
Use
pingto check the network connection between the Nagios server and the JournalNode host.
NameNode HA Healthy process
This service-level alert is triggered if either the Active NameNode or Standby NameNode are not running.
Potential causes
-
The Active, Standby or both NameNode processes are down.
-
The Nagios Server cannot connect to one or both NameNode hosts.
Possible remedies
-
On each host running NameNode, check for any errors in the logs, located at
/var/log/hadoop/hdfs/. Then, restart the NameNode host/process using Ambari Web. -
On each host running NameNode, run the
netstat-tuplpncommand to check if the NameNode process is bound to the correct network port. -
Use
pingto check the network connection between the Nagios server and the hosts running NameNode.
YARN Alerts (Hadoop 2 only)
These alerts are used to monitor YARN.
ResourceManager process
This host-level alert is triggered if the individual ResourceManager process cannot
be established to be up and listening on the network for the configured critical threshold,
given in seconds. It uses the Nagios check_tcp plug-in.
Potential causes
-
The ResourceManager process is down or not responding.
-
The ResourceManager is not down, but is not listening to the correct network port/address.
-
Nagios Server cannot connect to the ResourceManager.
Possible remedies
-
Check for a dead ResourceManager.
-
Check for any errors in the ResourceManager logs, located at
/var/log/hadoop/yarn. Then, restart the ResourceManager, if necessary. -
Use
pingto check the network connection between the Nagios Server and the ResourceManager host.
Percent NodeManagers live
This alert is triggered if the number of down NodeManagers in the cluster is greater
than the configured critical threshold. It uses the check_aggregate plug-in to aggregate the results of DataNode process alert checks.
Potential causes
-
NodeManagers are down.
-
NodeManagers are not down but are not listening to the correct network port/address.
-
Nagios server cannot connect to one or more NodeManagers.
Possible remedies
-
Check for dead NodeManagers.
-
Check for any errors in the NodeManager logs, located at
/var/log/hadoop/yarn. Then, restart the NodeManagers hosts/processes, as necessary. -
Run the
netstat-tuplpncommand to check if the NodeManager process is bound to the correct network port. -
Use
pingto check the network connection between the Nagios Server and the NodeManagers host.
ResourceManager Web UI
This host-level alert is triggered if the ResourceManager Web UI is unreachable.
Potential causes
-
The ResourceManager Web UI is unreachable from the Nagios Server.
-
The ResourceManager process is not running.
Possible remedies
-
Check if the ResourceManager process is running.
-
Check whether the Nagios Server can ping the ResourceManager server.
-
Using a browser, check whether the Nagios Server can reach the ResourceManager Web UI.
ResourceManager RPC latency
This host-level alert is triggered if the ResourceManager operations RPC latency exceeds
the configured critical threshold. Typically an increase in the RPC processing time
increases the RPC queue length, causing the average queue wait time to increase for
ResourceManager operations. It uses the Nagios check_rpcq_latency plug-in.
Potential causes
-
A job or an application is performing too many ResourceManager operations.
Possible remedies
-
Review the job or the application for potential bugs causing it to perform too many ResourceManager operations.
ResourceManager CPU utilization
This host-level alert is triggered if CPU utilization of the ResourceManager exceeds
certain thresholds (200% warning, 250% critical). It uses the check_cpu.php plug-in which checks the ResourceManager JMX Servlet for the SystemCPULoad property. This information is only available if you are running JDK 1.7.
Potential causes
-
Unusually high CPU utilization: Can be caused by a very unusual job/query workload, but this is generally the sign of an issue in the daemon.
Possible remedies
-
Use the
topcommand to determine which processes are consuming excess CPU. -
Reset the offending process.
NodeManager process
This host-level alert is triggered if the NodeManager process cannot be established
to be up and listening on the network for the configured critical threshold, given
in seconds. It uses the Nagios check_tcp plug-in.
Potential causes
-
NodeManager process is down or not responding.
-
NodeManager is not down but is not listening to the correct network port/address.
-
Nagios Server cannot connect to the NodeManager
Possible remedies
-
Check if the NodeManager is running.
-
Check for any errors in the NodeManager logs (
/var/log/hadoop/yarn) and restart the NodeManager, if necessary. -
Use
pingto check the network connection between the Nagios Server and the NodeManager host.
NodeManager health
This host-level alert checks the node health property available from the NodeManager component.
Potential causes
-
Node Health Check script reports issues or is not configured.
Possible remedies
-
Check in the NodeManager logs (
/var/log/hadoop/yarn) for health check errors and restart the NodeManager, and restart if necessary. -
Check in the ResourceManager UI logs (
/var/log/hadoop/yarn) for health check errors.
MapReduce2 Alerts (Hadoop 2 only)
These alerts are used to monitor MR2.
HistoryServer Web UI
This host-level alert is triggered if the HistoryServer Web UI is unreachable.
Potential causes
-
The HistoryServer Web UI is unreachable from the Nagios Server.
-
The HistoryServer process is not running.
Possible remedies
-
Check if the HistoryServer process is running.
-
Check whether the Nagios Server can ping the HistoryServer server.
-
Using a browser, check whether the Nagios Server can reach the HistoryServer Web UI.
HistoryServer RPC latency
This host-level alert is triggered if the HistoryServer operations RPC latency exceeds
the configured critical threshold. Typically an increase in the RPC processing time
increases the RPC queue length, causing the average queue wait time to increase for
NameNode operations. It uses the Nagios check_rpcq_latency plug-in.
Potential causes
-
A job or an application is performing too many HistoryServer operations.
Possible remedies
-
Review the job or the application for potential bugs causing it to perform too many HistoryServer operations.
HistoryServer CPU utilization
This host-level alert is triggered if the percent of CPU utilization on the HistoryServer
exceeds the configured critical threshold. This alert uses the Nagios check_snmp_load plug-in.
Potential causes
-
Unusually high CPU utilization: Can be caused by a very unusual job/query workload, but this is generally the sign of an issue in the daemon.
-
A down SNMP daemon on the HistoryServer node, producing an unknown status.
Possible remedies
-
Use the
topcommand to determine which processes are consuming excess CPU. -
Reset the offending process.
-
Check the status of the SNMP daemon.
HistoryServer process
This host-level alert is triggered if the HistoryServer process cannot be established
to be up and listening on the network for the configured critical threshold, given
in seconds. It uses the Nagios check_tcp plug-in.
Potential causes
-
HistoryServer process is down or not responding.
-
HistoryServer is not down but is not listening to the correct network port/address.
-
Nagios Server cannot connect to the HistoryServer.
Possible remedies
-
Check the HistoryServer is running.
-
Check for any errors in the HistoryServer logs, located at
/var/log/hadoop/mapred.Then, restart the HistoryServer, if necessary. -
Use
pingto check the network connection between the Nagios Server and the HistoryServer host.
MapReduce Service Alerts (Hadoop 1 only)
These alerts are used to monitor the MapReduce service.
JobTracker RPC latency alert
This host-level alert is triggered if the JobTracker operations RPC latency exceeds
the configured critical threshold. Typically an increase in the RPC processing time
increases the RPC queue length, causing the average queue wait time to increase for
JobTracker operations. This alert uses the Nagios check_rpcq_latency plug-in.
Potential causes
-
A job or an application is performing too many JobTracker operations.
Possible remedies
-
Review the job or the application for potential bugs causing it to perform too many JobTracker operations.
JobTracker process
This host-level alert is triggered if the individual JobTracker process cannot be
confirmed to be up and listening on the network for the configured critical threshold,
given in seconds. It uses the Nagios check_tcp plug-in.
Potential causes
-
JobTracker process is down or not responding.
-
JobTracker is not down but is not listening to the correct network port/address.
-
The Nagios server cannot connect to the JobTracker
Possible remedies
-
Check if the JobTracker process is running.
-
Check for any errors in the JobTracker logs, located at
/var/log/hadoop/mapred. Then, restart the JobTracker, if necessary -
Use
pingto check the network connection between the Nagios Server and the JobTracker host.
JobTracker Web UI
This Host-level alert is triggered if the JobTracker Web UI is unreachable.
Potential causes
-
The JobTracker Web UI is unreachable from the Nagios Server.
-
The JobTracker process is not running.
Possible remedies
-
Check if the JobTracker process is running.
-
Check whether the Nagios Server can ping the JobTracker server.
-
Using a browser, check whether the Nagios Server can reach the JobTracker Web UI.
JobTracker CPU utilization
This host-level alert is triggered if CPU utilization of the JobTracker exceeds certain
thresholds (200% warning, 250% critical). It uses the check_cpu.php plug-in which checks the JobTracker JMX Servlet for the SystemCPULoad property. This information is only available if you are running JDK 1.7.
Potential causes
-
Unusually high CPU utilization: Can be caused by a very unusual job/query workload, but this is generally the sign of an issue in the daemon.
Possible remedies
-
Use the
topcommand to determine which processes are consuming excess CPU. -
Reset the offending processor.
HistoryServer Web UI
This host-level alert is triggered if the HistoryServer Web UI is unreachable.
Potential causes
-
The HistoryServer Web UI is unreachable from the Nagios Server.
-
The HistoryServer process is not running.
-
Using a browser, check whether the Nagios Server can reach the HistoryServer Web UI.
Possible remedies
-
Check the HistoryServer process is running.
-
Check whether the Nagios Server can ping the HistoryServer server.
-
Check the status of the SNMP daemon.
HistoryServer process
This host-level alert is triggered if the HistoryServer process cannot be established
to be up and listening on the network for the configured critical threshold, given
in seconds. It uses the Nagios check_tcp plug-in.
Potential causes
-
The HistoryServer process is down or not responding.
-
The HistoryServer is not down but is not listening to the correct network port/address.
-
The Nagios Server cannot connect to the HistoryServer.
Possible remedies
-
Check for any errors in the HistoryServer logs located at
/var/log/hadoop/mapred. Then, restart the HistoryServer, if necessary. -
Use
pingto check the network connection between the Nagios Server and the HistoryServer host.
HBase Service Alerts
These alerts are used to monitor the HBase service.
Percent RegionServers live
This service-level alert is triggered if the configured percentage of Region Server
processes cannot be determined to be up and listening on the network for the configured
critical threshold. The default setting is 10% to produce a WARN alert and 30% to
produce a CRITICAL alert. It uses the check_aggregate plug-in to aggregate the results of RegionServer process down checks.
Potential causes
-
Misconfiguration or less-than-ideal configuration caused the RegionServers to crash.
-
Cascading failures brought on by some workload caused the RegionServers to crash.
-
The RegionServers shut themselves down because there were problems in the dependent services, ZooKeeper, or HDFS.
-
GC paused the RegionServer for too long and the RegionServers lost contact with ZooKeeper.
Possible remedies
-
Check the dependent services to make sure they are operating correctly.
-
Look at the RegionServer log files, usually located at
/var/log/hbase/*.logfor further information. -
Look at the configuration files located at
/etc/hbase/conf. -
If the failure was associated with a particular workload, try to better understand the workload.
-
Restart the RegionServers.
HBase Master process
This alert is triggered if the HBase master processes cannot be confirmed to be up
and listening on the network for the configured critical threshold, given in seconds.
It uses the Nagios check_tcp plug-in.
Potential causes
-
The HBase master process is down.
-
The HBase master has shut itself down because there were problems in the dependent services, ZooKeeper, or HDFS.
-
The Nagios server cannot connect to the HBase master through the network.
Possible remedies
-
Check the dependent services.
-
Look at the master log files, usually located at
/var/log/hbase/*.log,for further information. -
Look at the configuration files in
/etc/hbase/conf.Use
pingto check the network connection between the Nagios server and the HBase master. -
Restart the master.
HBase Master Web UI
This host-level alert is triggered if the HBase Master Web UI is unreachable.
Potential causes
-
The HBase Master Web UI is unreachable from the Nagios Server.
-
The HBase Master process is not running.
Possible remedies
-
Check if the Master process is running.
-
Check whether the Nagios Server can ping the HBase Master server.
-
Using a browser, check whether the Nagios Server can reach the HBase Master Web UI.
HBase Master CPU utilization
This host-level alert is triggered if CPU utilization of the HBase Master exceeds
certain thresholds (200% warning, 250% critical). It uses the check_cpu.php plug-in which checks the HBase Master JMX Servlet for the SystemCPULoad property. This information is only available if you are running JDK 1.7.
Potential causes
-
Unusually high CPU utilization. Can be caused by a very unusual job/query workload, but this is generally the sign of an issue in the daemon.
Possible remedies
-
Use the
topcommand to determine which processes are consuming excess CPU. -
Reset the offending process.
RegionServer process
This host-level alert is triggered if the RegionServer processes cannot be confirmed
to be up and listening on the network for the configured critical threshold, given
in seconds. It uses the Nagios check_tcp plug-in.
Potential causes
-
The RegionServer process is down on the host.
-
The RegionServer process is up and running but not listening on the correct network port (default 60030).
-
The Nagios server cannot connect to the RegionServer through the network.
Possible remedies
-
Check for any errors in the logs, located at
/var/log/hbase/. Then, restart the RegionServer process using Ambari Web. -
Run the
netstat-tuplpncommand to check if the RegionServer process is bound to the correct network port. -
Use
pingto check the network connection between the NagiosServer and the RegionServer.
Hive Alerts
These alerts are used to monitor the Hive service.
Hive-Metastore status
This host-level alert is triggered if the Hive Metastore process cannot be determined
to be up and listening on the network for the configured critical threshold, given
in seconds. It uses the Nagios check_tcp plug-in.
Potential causes
-
The Hive Metastore service is down.
-
The database used by the Hive Metastore is down.
-
The Hive Metastore host is not reachable over the network.
Possible remedies
-
Using Ambari Web, stop the Hive service and then restart it.
-
Use
pingto check the network connection between the Nagios server and the Hive Metastore server.
WebHCat Alerts
These alerts are used to monitor the WebHCat service.
WebHCat Server status
This host-level alert is triggered if the WebHCat server cannot be determined to be up and responding to client requests.
Potential causes
-
The WebHCat server is down.
-
The WebHCat server is hung and not responding.
-
The WebHCat server is not reachable over the network.
Possible remedies
-
Restart the WebHCat server using Ambari Web.
Oozie Alerts
These alerts are used to monitor the Oozie service.
Oozie status
This host-level alert is triggered if the Oozie server cannot be determined to be up and responding to client requests.
Potential causes
-
The Oozie server is down.
-
The Oozie server is hung and not responding.
-
The Oozie server is not reachable over the network.
Possible remedies
-
Restart the Oozie service using Ambari Web.
Ganglia Alerts
These alerts are used to monitor the Ganglia service.
Ganglia Server status
This host-level alert determines if the Ganglia server is running and listening on
the network port. It uses the Nagios check_tcp plug-in.
Potential causes
-
The Ganglia server process is down.
-
The Ganglia server process is hung and not responding.
-
The network connection between the Nagios and Ganglia servers is down.
Possible remedies
-
Check the Ganglia server,
gmetadrelated log, located at/var/log/messagesfor any errors. -
Restart the Ganglia server.
-
Check if
pingworks between Nagios and Ganglia servers.
Ganglia Monitor process
These host-level alerts check if the Ganglia monitor daemons, gmond, on the Ganglia server are running and listening on the network port. This alert uses
the Nagios check_tcp plug-in.
Ganglia Monitoring daemons run for the following collections:
-
Slaves
-
NameNode
-
HBase Master
-
JobTracker (Hadoop 1 only)
-
ResourceManager (Hadoop 2 only)
-
HistoryServer (Hadoop 2 only)
Potential causes
-
A
gmondprocess is down. -
A
gmondprocess is hung and not responding. -
The network connection is down between the Nagios and Ganglia servers.
Possible remedies
-
Check the
gmondrelated log, located at/var/log/messagesfor any errors. -
Check if
pingworks between Nagios and Ganglia servers.
Nagios Alerts
These alerts are used to monitor the Nagios service.
Nagios status log freshness
This host-level alert determines if the Nagios server is updating its status log regularly.
Ambari depends on the status log located at /var/nagios/status.dat to receive all the Nagios alerts.
Potential causes
-
The Nagios server is hanging and therefore not scheduling new alerts.
-
The file
/var/nagios/status.datdoes not have appropriate write permissions for the Nagios user.
Possible remedies
-
Restart the Nagios server.
-
Check the permissions on
/var/nagios/status.dat. -
Check
/var/log/messagesfor any related errors.
ZooKeeper Alerts
These alerts are used to monitor the Zookeeper service.
Percent ZooKeeper servers live
This service-level alert is triggered if the configured percentage of ZooKeeper processes
cannot be determined to be up and listening on the network for the configured critical
threshold, given in seconds. It uses the check_aggregate plug-in to aggregate the results of Zookeeper process checks.
Potential causes
-
The majority of your ZooKeeper servers are down and not responding.
Possible remedies
-
Check the dependent services to make sure they are operating correctly.
-
Check the ZooKeeper log files located at
/var/log/hadoop/zookeeper.logfor further information. -
If the failure was associated with a particular workload, try to better understand the workload.
-
Restart the ZooKeeper servers, using Ambari Web.
Zookeeper Server process
This host-level alert is triggered if the ZooKeeper server process cannot be determined
to be up and listening on the network for the configured critical threshold, given
in seconds. It uses the Nagios check_tcp plug-in.
Potential causes
-
The ZooKeeper server process is down on the host.
-
The ZooKeeper server process is up and running but not listening on the correct network port (default 2181).
-
The Nagios server cannot connect to the ZooKeeper server through the network.
Possible remedies
-
Check for any errors in the ZooKeeper logs located at
/var/log/hbase/. Then, restart the ZooKeeper process using Ambari Web. -
Run the
netstat-tuplpncommand to check if the ZooKeeper server process is bound to the correct network port. -
Use
pingto check the network connection between the Nagios server and the ZooKeeper server.
Ambari Alerts
This alert is used to monitor the Ambari Agent service.
Ambari Agent process
This host-level alert is triggered if the Ambari Agent process cannot be confirmed
to be up and listening on the network for the configured critical threshold, given
in seconds. It uses the Nagios check_tcp plug-in.
Potential causes
-
The Ambari Agent process is down on the host.
-
The Ambari Agent process is up and running but heartbeating to the Ambari Server.
-
The Ambari Agent process is up and running but is unreachable through the network from the Nagios Server.
-
The Ambari Agent cannot connect to the Ambari Server through the network.
Possible remedies
-
Check for any errors in the logs located at
/var/log/ambari-agent/ambari-agent.log. Then, restart the Ambari Agent process. -
Use
pingto check the network connection between the Ambari Agent host and the Ambari Servers.
Installing HDP Using Ambari
This section describes the information and materials you should get ready to install a HDP cluster using Ambari. Ambari provides an end-to-end management and monitoring solution for your HDP cluster. Using the Ambari Web UI and REST APIs, you can deploy, operate, manage configuration changes, and monitor services for all nodes in your cluster from a central point.
Determine Stack Compatibility
Use this table to determine whether your Ambari and HDP stack versions are compatible.
|
Ambari |
HDP 2.2[1] |
HDP 2.1[2] |
HDP 2.0[3] |
HDP1.3 |
|---|---|---|---|---|
|
1.7.0 |
x |
x |
x |
x |
|
1.6.1 |
x |
x |
x |
|
|
1.6.0 |
x |
x |
x |
|
|
1.5.1 |
x |
x |
x |
|
|
1.5.0 |
x |
x |
||
|
1.4.4.23 |
x |
x |
||
|
1.4.3.38 |
x |
x |
||
|
1.4.2.104 |
x |
x |
||
|
1.4.1.61 |
x |
x |
||
|
1.4.1.25 |
x |
x |
||
|
1.2.5.17 |
x |
For more information about Installing Accumulo, Hue, Knox, Ranger, and Solr services, see Installing HDP Manually.
Meet Minimum System Requirements
To run Hadoop, your system must meet the following minimum requirements:
Hardware Recommendations
There is no single hardware requirement set for installing Hadoop.
For more information about hardware components that may affect your installation, see Hardware Recommendations For Apache Hadoop.
Operating Systems Requirements
The following, 64-bit operating systems are supported:
-
Red Hat Enterprise Linux (RHEL) v6.x
-
Red Hat Enterprise Linux (RHEL) v5.x (deprecated)
-
CentOS v6.x
-
CentOS v5.x (deprecated)
-
Oracle Linux v6.x
-
Oracle Linux v5.x (deprecated)
-
SUSE Linux Enterprise Server (SLES) v11 SP4 (HDP 2.2 and later)
-
SUSE Linux Enterprise Server (SLES) v11 SP3
-
SUSE Linux Enterprise Server (SLES) v11 SP1 (HDP 2.2 and HDP 2.1)
-
Ubuntu Precise v12.04
Browser Requirements
The Ambari Install Wizard runs as a browser-based Web application. You must have a machine capable of running a graphical browser to use this tool. The minimum required browser versions are:
-
Windows (Vista, 7)
-
Internet Explorer 9.0
-
Firefox 18
-
Google Chrome 26
-
-
Mac OS X (10.6 or later)
-
Firefox 18
-
Safari 5
-
Google Chrome 26
-
-
Linux (RHEL, CentOS, SLES, Oracle Linux, UBUNTU)
-
Firefox 18
-
Google Chrome 26
-
On any platform, we recommend updating your browser to the latest, stable version.
Software Requirements
On each of your hosts:
-
yum and rpm (RHEL/CentOS/Oracle Linux)
-
zypper and php_curl (SLES)
-
apt (Ubuntu)
-
scp, curl, unzip, tar, and wget
-
OpenSSL (v1.01, build 16 or later)
-
python (v2.6 or later)
JDK Requirements
The following Java runtime environments are supported:
-
Oracle JDK 1.7_67 64-bit (default)
-
Oracle JDK 1.6_31 64-bit (DEPRECATED)
-
OpenJDK 7 64-bit (not supported on SLES) To install OpenJDK 7 for RHEL, run the following command on all hosts:
yum install java-1.7.0-openjdk
Database Requirements
Ambari requires a relational database to store information about the cluster configuration and topology. If you install HDP Stack with Hive or Oozie, they also require a relational database. The following table outlines these database requirements:
|
Component |
Description |
|---|---|
|
Ambari |
By default, will install an instance of PostgreSQL on the Ambari Server host. Optionally, to use an existing instance of PostgreSQL, MySQL or Oracle. For further information, see Using Non-Default Databases for Ambari. |
|
Hive |
By default (on RHEL/CentOS/Oracle Linux 6), Ambari will install an instance of MySQL on the Hive Metastore host. Otherwise, you need to use an existing instance of PostgreSQL, MySQL or Oracle. See Using Non-Default Databases for Hive for more information. |
|
Oozie |
By default, Ambari will install an instance of Derby on the Oozie Server host. Optionally, to use an existing instance of PostgreSQL, MySQL or Oracle, see Using Non-Default Databases for Oozie for more information. |
Check the Maximum Open File Descriptors
The recommended maximum number of open file descriptors is 10000, or more. To check the current value set for the maximum number of open file descriptors, execute the following shell commands on each host:
ulimit -Snulimit -Hn
If the output is not greater than 10000, run the following command to set it to a suitable default:
ulimit -n 10000
Collect Information
Before deploying an HDP cluster, you should collect the following information:
-
The fully qualified domain name (FQDN) of each host in your system. The Ambari install wizard supports using IP addresses. You can use
hostname -fto check or verify the FQDN of a host. -
A list of components you want to set up on each host.
-
The base directories you want to use as mount points for storing:
-
NameNode data
-
DataNodes data
-
Secondary NameNode data
-
Oozie data
-
MapReduce data (Hadoop version 1.x)
-
YARN data (Hadoop version 2.x)
-
ZooKeeper data, if you install ZooKeeper
-
Various log, pid, and db files, depending on your install type
-
Prepare the Environment
To deploy your Hadoop instance, you need to prepare your deployment environment:
Check Existing Package Versions
During installation, Ambari overwrites current versions of some packages required by Ambari to manage a Hadoop cluster. Package versions other than those that Ambari installs can cause problems running the installer. Remove any package versions that do not match the following ones:
RHEL/CentOS/Oracle Linux 6
|
Component - Description |
Files and Versions |
|---|---|
|
Ambari Server Database |
postgresql 8.4.13-1.el6_3, postgresql-libs 8.4.13-1.el6_3, postgresql-server 8.4.13-1.el6_3 |
|
Ambari Agent - Installed on each host in your cluster. Communicates with the Ambari Server to execute commands. |
None |
|
Nagios Server - The host that runs the Nagios server. |
nagios 3.5.0-99, nagios-devel 3.5.0-99, nagios-www 3.5.0-99, nagios-plugins 1.4.9-1 |
|
Ganglia Server - The host that runs the Ganglia Server. |
ganglia-gmetad 3.5.0-99, ganglia-devel 3.5.0-99, libganglia 3.5.0-99, ganglia-web 3.5.7-99, rrdtool 1.4.5-1.el6 |
|
Ganglia Monitor - Installed on each host in the cluster. Sends metrics data to the Ganglia Collector. |
ganglia-gmond 3.5.0-99, libganglia 3.5.0-99 |
SLES 11
|
Component - Description |
Files and Versions |
|---|---|
|
Ambari Server Database |
postgresql 8.3.5-1, postgresql-server 8.3.5-1, postgresql-libs 8.3.5-1 |
|
Ambari Agent - Installed on each host in your cluster. Communicates with the Ambari Server to execute commands. |
None |
|
Nagios Server - The host that runs the Nagios server. |
nagios 3.5.0-99, nagios-devel 3.5.0-99, nagios-www 3.5.0-99, nagios-plugins 1.4.9-1 |
|
Ganglia Server - The host that runs the Ganglia Server. |
ganglia-gmetad 3.5.0-99 ganglia-devel 3.5.0-99 libganglia 3.5.0-99 ganglia-web 3.5.7-99 rrdtool 1.4.5-4.5.1 |
|
Ganglia Monitor - Installed on each host in the cluster. Sends metrics data to the Ganglia Collector. |
ganglia-gmond 3.5.0-99, libganglia 3.5.0-99 |
UBUNTU 12
|
Component - Description |
Files and Versions |
|---|---|
|
Ambari Server Database |
libpq5 postgresql postgresql-9.1 postgresql-client-9.1 postgresql-client-common postgresql-common ssl-cert |
|
Ambari Agent - Installed on each host in your cluster. Communicates with the Ambari Server to execute commands. |
zlibc_0.9k-4.1_amd64 |
|
Nagios Server - The host that runs the Nagios Server. |
nagios3 |
|
Ganglia Server - The host that runs the Ganglia Server. |
gmetad ganglia-webfrontend ganglia-monitor-python rrdcached |
|
Ganglia Monitor - Installed on each host in the cluster. Sends metrics data to the Ganglia Collector. |
gmetad ganglia-webfrontend ganglia-monitor-python rrdcached |
RHEL/CentOS/Oracle Linux 5
|
Component - Description |
Files and Versions |
|---|---|
|
Ambari Server Database |
libffi 3.0.5-1.el5, python26 2.6.8-2.el5, python26-libs 2.6.8-2.el5, postgresql 8.4.13-1.el6_3, postgresql-libs 8.4.13-1.el6_3, postgresql-server 8.4.13-1.el6_3 |
|
Ambari Agent - Installed on each host in your cluster. Communicates with the Ambari Server to execute commands. |
libffi 3.0.5-1.el5, python26 2.6.8-2.el5, python26-libs 2.6.8-2.el5 |
|
Nagios Server - The host that runs the Nagios server. |
nagios 3.5.0-99, nagios-devel 3.5.0-99, nagios-www 3.5.0-99, nagios-plugins 1.4.9-1 |
|
Ganglia Server - The host that runs the Ganglia Server. |
ganglia-gmetad 3.5.0-99, ganglia-devel 3.5.0-99, libganglia 3.5.0-99, ganglia-web 3.5.7-99, rrdtool 1.4.5-1.el5 |
|
Ganglia Monitor - Installed on each host in the cluster. Sends metrics data to the Ganglia Collector. |
ganglia-gmond 3.5.0-99, libganglia 3.5.0-99 |
Set Up Password-less SSH
To have Ambari Server automatically install Ambari Agents on all your cluster hosts, you must set up password-less SSH connections between the Ambari Server host and all other hosts in the cluster. The Ambari Server host uses SSH public key authentication to remotely access and install the Ambari Agent.
-
Generate public and private SSH keys on the Ambari Server host.
ssh-keygen -
Copy the SSH Public Key (id_rsa.pub) to the root account on your target hosts.
.ssh/id_rsa .ssh/id_rsa.pub -
Add the SSH Public Key to the authorized_keys file on your target hosts.
cat id_rsa.pub >> authorized_keys -
Depending on your version of SSH, you may need to set permissions on the .ssh directory (to 700) and the authorized_keys file in that directory (to 600) on the target hosts.
chmod 700 ~/.ssh chmod 600 ~/.ssh/authorized_keys -
From the Ambari Server, make sure you can connect to each host in the cluster using SSH, without having to enter a password.
ssh root@<remote.target.host> where <remote.target.host> has the value of each host name in your cluster. -
If the following warning message displays during your first connection:
Are you sure you want to continue connecting (yes/no)?EnterYes. -
Retain a copy of the SSH Private Key on the machine from which you will run the web-based Ambari Install Wizard.
Set up Service User Accounts
The Ambari install wizard creates one administrator-level user account for Ambari,
admin. The credentials for the admin account are username/password = admin/admin.
For more information about creating additional users and groups for your HDP cluster,
see Users and Groups Overview in Managing Users and Groups.
Each HDP service requires a service user account. The Ambari Install wizard creates
new and preserves any existing service user accounts, and uses these accounts when
configuring Hadoop services. Service user account creation applies to service user
accounts on the local operating system and to LDAP/AD accounts.
For more information about customizing service user accounts for each HDP service, see one of the following topics:
Enable NTP on the Cluster and on the Browser Host
The clocks of all the nodes in your cluster and the machine that runs the browser
through which you access the Ambari Web interface must be able to synchronize with
each other.
Install a network ttime protocol daem on each host:
yum install ntpd
To check that the NTP service is on, run the following command on each host:
chkconfig —list ntpd
To turn on the NTP service, run the following command on each host:
chkconfig ntpd
Check DNS
All hosts in your system must be configured for both forward and and reverse DNS.
If you are unable to configure DNS in this way, you must edit the /etc/hosts file on every host in your cluster to contain the IP address and Fully Qualified Domain Name of each of your hosts. The following instructions cover a basic /etc/hosts setup for generic Linux hosts. Different versions and flavors of Linux might require slightly different commands. Please refer to the documentation for the operating system(s) deployed in your environment.
Edit the Host File
-
Using a text editor, open the hosts file on every host in your cluster. For example:
vi /etc/hosts -
Add a line for each host in your cluster. The line should consist of the IP address and the FQDN. For example:
1.2.3.4<fully.qualified.domain.name>
Set the Hostname
-
Use the "hostname" command to set the hostname on each host in your cluster. For example:
hostname<fully.qualified.domain.name> -
Confirm that the hostname is set by running the following command:
hostname -fThis should return the <fully.qualified.domain.name> you just set.
Edit the Network Configuration File
-
Using a text editor, open the network configuration file on every host and set the desired network configuration for each host. For example:
vi /etc/sysconfig/network -
Modify the HOSTNAME property to set the fully qualified domain name.
NETWORKING=yes
                  NETWORKING_IPV6=yes
                  HOSTNAME=
<fully.qualified.domain.name>
Configuring iptables
For Ambari to communicate during setup with the hosts it deploys to and manages, certain
ports must be open and available. The easiest way to do this is to temporarily disable
iptables, as follows:chkconfig iptables off
/etc/init.d/iptables stop
You can restart iptables after setup is complete. If the security protocols in your
environment prevent disabling iptables, you can proceed with iptables enabled, if
all required ports are open and available. For more information about required ports,
see Configuring Network Port Numbers.
Ambari checks whether iptables is running during the Ambari Server setup process.
If iptables is running, a warning displays, reminding you to check that required ports
are open and available. The Host Confirm step in the Cluster Install Wizard also issues
a warning for each host that has iptables running.
Disable SELinux and PackageKit and check the umask Value
-
You must temporarily disable SELinux for the Ambari setup to function. On each host in your cluster,
setenforce 0 -
On an installation host running RHEL/CentOS with PackageKit installed, open
/etc/yum/pluginconf.d/refresh-packagekit.confusing a text editor. Make the following change:enabled=0 -
UMASK (User Mask or User file creation MASK) is the default permission or base permission given when a new file or folder is created on a Linux machine. Most Linux distros set 022 as the default umask. For a HDP cluster, make sure that umask is set to 022. To set umask 022, run the following command as root on all hosts,
vi /etc/profilethen, append the following line:umask 022
Using a Local Repository
If your cluster is behind a fire wall that prevents or limits Internet access, you can install Ambari and a Stack using local repositories. This section describes how to:
-
Set up a local repository having:
Obtaining the Repositories
This section describes how to obtain:
Ambari Repositories
If you do not have Internet access for setting up the Ambari repository, use the link appropriate for your OS family to download a tarball that contains the software.
RHEL/CentOS/Oracle Linux 6
wget -nv http://public-repo-1.hortonworks.com/ambari/centos6/ambari-1.7.0-centos6.tar.gz
SLES 11
wget -nv http://public-repo-1.hortonworks.com/ambari/suse11/ambari-1.7.0-suse11.tar.gz
UBUNTU 12
wget -nv http://public-repo-1.hortonworks.com/ambari/ubuntu12/ambari-1.7.0-ubuntu12.tar.gz
RHEL/CentOS/ORACLE Linux 5 (DEPRECATED)
wget -nv http://public-repo-1.hortonworks.com/ambari/centos5/ambari-1.7.0-centos5.tar.gz
If you have temporary Internet access for setting up the Ambari repository, use the link appropriate for your OS family to download a repository that contains the software.
RHEL/CentOS/Oracle Linux 6
wget -nv http://public-repo-1.hortonworks.com/ambari/centos6/1.x/updates/1.7.0/ambari.repo
                     -O /etc/yum.repos.d/ambari.repo
SLES 11
wget -nv http://public-repo-1.hortonworks.com/ambari/suse11/1.x/updates/1.7.0/ambari.repo
                     -O /etc/zypp/repos.d/ambari.repo
UBUNTU 12
wget -nv http://public-repo-1.hortonworks.com/ambari/ubuntu12/1.x/updates/1.7.0/ambari.list
                     -O /etc/apt/sources.list/ambari.repo
RHEL/CentOS/ORACLE Linux 5 (DEPRECATED)
wget -nv http://public-repo-1.hortonworks.com/ambari/centos5/1.x/updates/1.7.0/ambari.repo
                     -O /etc/yum.repos.d/ambari.repo
HDP Stack Repositories
If you do not have Internet access to set up the Stack repositories, use the link appropriate for your OS family to download a tarball that contains the HDP Stack version you plan to install.
RHEL/CentOS/Oracle Linux 6
wget -nv http://public-repo-1.hortonworks.com/HDP/centos6/HDP-2.2.0.0-centos6-rpm.tar.gz

                     wget -nv http://public-repo-1.hortonworks.com/HDP-UTILS-1.1.0.20/repos/centos6/HDP-UTILS-1.1.0.20-centos6.tar.gz
SLES 11SP3
wget -nv http://public-repo-1.hortonworks.com/HDP/suse11sp3/HDP-2.2.0.0-suse11sp3-rpm.tar.gz

                     wget -nv http://public-repo-1.hortonworks.com/HDP-UTILS-1.1.0.20/repos/suse11sp3/HDP-UTILS-1.1.0.20-suse11sp3.tar.gz
UBUNTU 12
wget -nv http://public-repo-1.hortonworks.com/HDP/ubuntu12/HDP-2.2.0.0-ubuntu12-deb.tar.gz

                     wget -nv http://public-repo-1.hortonworks.com/HDP-UTILS-1.1.0.20/repos/ubuntu12/HDP-UTILS-1.1.0.20-ubuntu12.tar.gz
RHEL/CentOS/ORACLE Linux 5 (DEPRECATED)
wget -nv http://public-repo-1.hortonworks.com/HDP/centos5/HDP-2.2.0.0-centos5-rpm.tar.gz

                     wget -nv http://public-repo-1.hortonworks.com/HDP-UTILS-1.1.0.20/repos/centos5/HDP-UTILS-1.1.0.20-centos5.tar.gz
RHEL/CentOS/Oracle Linux 6
wget -nv http://public-repo-1.hortonworks.com/HDP/centos6/HDP-2.1.5.0-centos6-rpm.tar.gz
                     wget -nv http://public-repo-1.hortonworks.com/HDP-UTILS-1.1.0.17/repos/centos6/HDP-UTILS-1.1.0.17-centos6.tar.gz
SLES 11
wget -nv http://public-repo-1.hortonworks.com/HDP/sles11sp1/HDP-2.1.5.0-sles11sp1-rpm.tar.gz
                     wget -nv http://public-repo-1.hortonworks.com/HDP-UTILS-1.1.0.17/repos/suse11/HDP-UTILS-1.1.0.17-suse11.tar.gz
UBUNTU 12
wget -nv http://public-repo-1.hortonworks.com/HDP/ubuntu12/HDP-2.1.5.0-ubuntu12-tars-tarball.tar.gz
                     wget -nv http://public-repo-1.hortonworks.com/HDP-UTILS-1.1.0.18/repos/ubuntu12/
RHEL/CentOS/ORACLE Linux 5 (DEPRECATED)
wget -nv http://public-repo-1.hortonworks.com/HDP/centos5/HDP-2.1.3.0-centos5-rpm.tar.gz
                     wget -nv http://public-repo-1.hortonworks.com/HDP-UTILS-1.1.0.17/repos/centos5/HDP-UTILS-1.1.0.17-centos5.tar.gz
RHEL/CentOS/Oracle Linux 6
wget -nv http://public-repo-1.hortonworks.com/HDP/centos6/HDP-2.0.12.0-centos6-rpm.tar.gz
                     wget -nv http://public-repo-1.hortonworks.com/HDP-UTILS-1.1.0.17/repos/centos6/HDP-UTILS-1.1.0.17-centos6.tar.gz
SLES 11
wget -nv http://public-repo-1.hortonworks.com/HDP/suse11/HDP-2.0.12.0-suse11-rpm.tar.gz
                     wget -nv http://public-repo-1.hortonworks.com/HDP-UTILS-1.1.0.17/repos/suse11/HDP-UTILS-1.1.0.17-suse11.tar.gz
RHEL/CentOS/ORACLE Linux 5 (DEPRECATED)
wget -nv http://public-repo-1.hortonworks.com/HDP/centos5/HDP-2.0.12.0-centos5-rpm.tar.gz
                     wget -nv http://public-repo-1.hortonworks.com/HDP-UTILS-1.1.0.17/repos/centos5/HDP-UTILS-1.1.0.17-centos5.tar.gz
RHEL/CentOS/Oracle Linux 6
wget -nv http://public-repo-1.hortonworks.com/HDP/centos6/HDP-1.3.9.0-centos6-rpm.tar.gz
                     wget -nv http://public-repo-1.hortonworks.com/HDP-UTILS-1.1.0.16/repos/centos6/HDP-UTILS-1.1.0.16-centos6.tar.gz
SLES 11
wget -nv http://public-repo-1.hortonworks.com/HDP/suse11/HDP-1.3.9.0-suse11-rpm.tar.gz
                     wget -nv http://public-repo-1.hortonworks.com/HDP-UTILS-1.1.0.16/repos/suse11/HDP-UTILS-1.1.0.16-suse11.tar.gz
RHEL/CentOS/ORACLE Linux 5 (DEPRECATED)
wget -nv http://public-repo-1.hortonworks.com/HDP/centos5/HDP-1.3.9.0-centos5-rpm.tar.gz
                     wget -nv http://public-repo-1.hortonworks.com/HDP-UTILS-1.1.0.16/repos/centos5/HDP-UTILS-1.1.0.16-centos5.tar.gz
If you have temporary Internet access for setting up the Stack repositories, use the link appropriate for your OS family to download a repository that contains the HDP Stack version you plan to install.
RHEL/CentOS/Oracle Linux 6
wget -nv http://public-repo-1.hortonworks.com/HDP/centos6/2.x/GA/2.2.0.0/hdp.repo
                     -O /etc/yum.repos.d/HDP.repo
SLES 11SP3
wget -nv http://public-repo-1.hortonworks.com/HDP/suse11sp3/2.x/GA/2.2.0.0/hdp.repo
                     -O /etc/zypp/repos.d/HDP.repo
UBUNTU 12
wget -nv http://public-repo-1.hortonworks.com/HDP/ubuntu12/2.x/GA/2.2.0.0/hdp.list
                     -O /etc/apt/sources.list.d/HDP.list
RHEL/CentOS/ORACLE Linux 5 (DEPRECATED)
wget -nv http://public-repo-1.hortonworks.com/HDP/centos5/2.x/GA/2.2.0.0/hdp.repo
                     -O /etc/yum.repos.d/HDP.repo
RHEL/CentOS/Oracle Linux 6
wget -nv http://public-repo-1.hortonworks.com/HDP/centos6/2.x/updates/2.1.5.0/hdp.repo
                     -O /etc/yum.repos.d/HDP.repo
SLES 11SP3
wget -nv http://public-repo-1.hortonworks.com/HDP/suse11sp3/2.x/updates/2.1.5.0/hdp.repo
                     -O /etc/zypp/repos.d/HDP.repo
UBUNTU 12
wget -nv http://public-repo-1.hortonworks.com/HDP/ubuntu12/2.1.5.0/hdp.list /etc/apt/sources.list.d/HDP.list
RHEL/CentOS/ORACLE Linux 5 (DEPRECATED)
wget -nv http://public-repo-1.hortonworks.com/HDP/centos5/2.x/updates/2.1.5.0/hdp.repo
                     -O /etc/yum.repos.d/hdp.repo
RHEL/CentOS/Oracle Linux 6
wget -nv http://public-repo-1.hortonworks.com/HDP/centos6/2.x/updates/2.0.12.0/hdp.repo
                     -O /etc/yum.repos.d/HDP.repo
SLES 11
wget -nv http://public-repo-1.hortonworks.com/HDP/suse11/2.x/updates/2.0.12.0/hdp.repo
                     -O /etc/zypp/repos.d/HDP.repo
RHEL/CentOS/ORACLE 5 (DEPRECATED)
wget -nv http://public-repo-1.hortonworks.com/HDP/centos5/2.x/updates/2.0.12.0/hdp.repo
                     -O /etc/yum.repos.d/HDP.repo
RHEL/CentOS/Oracle Linux 6
wget -nv http://public-repo-1.hortonworks.com/HDP/centos6/1.x/updates/1.3.7.0/hdp.repo
                     -O /etc/yum.repos.d/HDP.repo
SLES 11
wget -nv http://public-repo-1.hortonworks.com/HDP/suse11/1.x/updates/1.3.7.0/hdp.repo
                     -O /etc/zypp/repos.d/HDP.repo
RHEL/CentOS/ORACLE Linux 5 (DEPRECATED)
wget -nv http://public-repo-1.hortonworks.com/HDP/centos5/1.x/updates/1.3.7.0/hdp.repo
                     -O /etc/yum.repos.d/HDP.repo
Setting Up a Local Repository
Based on your Internet access, choose one of the following options:
-
No Internet Access
This option involves downloading the repository tarball, moving the tarball to the selected mirror server in your cluster, and extracting to create the repository.
-
Temporary Internet Access
This option involves using your temporary Internet access to sync (using reposync) the software packages to your selected mirror server and creating the repository.
Both options proceed in a similar, straightforward way. Setting up for each option presents some key differences, as described in the following sections:
Getting Started Setting Up a Local Repository
To get started setting up your local repository, complete the following prerequisites:
-
Select an existing server in, or accessible to the cluster, that runs a supported operating system
-
Enable network access from all hosts in your cluster to the mirror server
-
Ensure the mirror server has a package manager installed such as yum (RHEL / CentOS / Oracle Linux), zypper (SLES), or apt-get (Ubuntu)
-
Optional: If your repository has temporary Internet access, and you are using RHEL/CentOS/Oracle Linux as your OS, install yum utilities:
yum install yum-utils createrepo
-
Create an HTTP server.
-
On the mirror server, install an HTTP server (such as Apache httpd) using the instructions provided here .
-
Activate this web server.
-
Ensure that any firewall settings allow inbound HTTP access from your cluster nodes to your mirror server.
-
-
On your mirror server, create a directory for your web server.
-
For example, from a shell window, type:
-
For RHEL/CentOS/Oracle Linux:
mkdir -p /var/www/html/ -
For SLES:
mkdir -p /srv/www/htdocs/rpms -
For Ubuntu:
mkdir -p /var/www/html/
-
-
If you are using a symlink, enable the
followsymlinkson your web server.
-
Setting Up a Local Repository with No Internet Access
After completing the Getting Started Setting up a Local Repository procedure, finish setting up your repository by completing the following steps:
-
Obtain the tarball for the repository you would like to create. For options, see Obtaining the Repositories.
-
Copy the repository tarballs to the web server directory and untar.
-
Browse to the web server directory you created.
-
For RHEL/CentOS/Oracle Linux:
cd /var/www/html/ -
For SLES:
cd /srv/www/htdocs/rpms -
For Ubuntu:
cd /var/www/html/
-
-
Untar the repository tarballs to the following locations: where <web.server>, <web.server.directory>, <OS>, <version>, and <latest.version> represent the name, home directory, operating system type, version, and most recent release version, respectively.
Untar Locations for a Local Repository - No Internet Access
Repository Content
Repository Location
Ambari Repository
Untar under <web.server.directory>
HDP Stack Repositories
Create directory and untar under <web.server.directory>/hdp
-
-
Confirm you can browse to the newly created local repositories.
URLs for a Local Repository - No Internet Access
Repository
URL
Ambari Base URL
http://<web.server>/ambari/<OS>/2.x/updates/1.7.0
HDP Base URL
http://<web.server>/hdp/HDP/<OS>/2.x/updates/<latest.version>
HDP-UTILS Base URL
http://<web-server>/hdp/HDP-UTILS-<version>/repos/<OS>
-
Optional: If you have multiple repositories configured in your environment, deploy the following plug-in on all the nodes in your cluster.
-
Install the plug-in.
-
For RHEL and CentOS 6:
yum install yum-plugin-priorities -
For RHEL and CentOS 5:
yum install yum-priorities
-
-
Edit the
/etc/yum/pluginconf.d/priorities.conffile to add the following:[main] enabled=1 gpgcheck=0
-
Setting up a Local Repository With Temporary Internet Access
After completing the Getting Started Setting up a Local Repository procedure, finish setting up your repository by completing the following steps:
-
Put the repository configuration files for Ambari and the Stack in place on the host. For options, see Obtaining the Repositories.
-
Confirm availability of the repositories.
-
For RHEL/CentOS/Oracle Linux:
yum repolist -
For SLES:
zypper repos -
For Ubuntu:
dpkg-list
-
-
Synchronize the repository contents to your mirror server.
-
Browse to the web server directory:
-
For RHEL/CentOS/Oracle Linux:
cd /var/www/html -
For SLES:
cd /srv/www/htdocs/rpms
-
-
For Ambari, create
ambaridirectory and reposync.mkdir -p ambari/<OS> cd ambari/<OS> reposync -r Updates-ambari-1.7.0 -
For HDP Stack Repositories, create
hdpdirectory and reposync.mkdir -p hdp/<OS> cd hdp/<OS> reposync -r HDP-<latest.version> reposync -r HDP-UTILS-<version>
-
-
Generate the repository metadata.
-
For Ambari:
createrepo <web.server.directory>/ambari/<OS>/Updates-ambari-1.7.0 -
For HDP Stack Repositories:
createrepo <web.server.directory>/hdp/<OS>/HDP-<latest.version>
                        createrepo <web.server.directory>/hdp/<OS>/HDP-UTILS-<version>
-
-
Confirm that you can browse to the newly created repository.
URLs for the New Repository
Repository
URL
Ambari Base URL
http://<web.server>/ambari/<OS>/Updates-ambari-1.7.0
HDP Base URL
http://<web.server>/hdp/<OS>/HDP-<latest.version>
HDP-UTILS Base URL
http://<web.server>/hdp/<OS>/HDP-UTILS-<version>
-
Optional. If you have multiple repositories configured in your environment, deploy the following plug-in on all the nodes in your cluster.
-
Install the plug-in.
-
For RHEL and CentOS 6:
yum install yum-plugin-priorities
-
-
Edit the
/etc/yum/pluginconf.d/priorities.conffile to add the following:[main] enabled=1 gpgcheck=0
-
Preparing The Ambari Repository Configuration File
-
Download the
ambari.repofile from the mirror server you created in the preceding sections or from the public repository.-
From your mirror server:
http://<web_server>/ambari/<OS>/1.x/updates/1.7.0/ambari.repo -
From the public repository:
http://public-repo-1.hortonworks.com/ambari/<OS>/1.x/updates/1.7.0/ambari.repo
-
-
Edit the ambari.repo file using the Ambari repository Base URL obtained when setting up your local repository. Refer to step 3 in Setting Up a Local Repository with No Internet Access, or step 5 in Setting Up a Local Repository with Temporary Internet Access, if necessary.
Base URLs for a Local Repository
Repository
URL
Ambari Base URL
http://<web-server>/ambari/<OS>/1.x/updates/1.7.0
-
If this an Ambari updates release, disable the GA repository definition.
[ambari-1.x]
name=Ambari 1.x baseurl=http://public-repo-1.hortonworks.com/ambari/centos6/1.x/GA gpgcheck=1 gpgkey=http://public-repo-1.hortonworks.com/ambari/centos6/RPM-GPG-KEY/RPM-GPG-KEY-Jenkins enabled=0 priority=1[Updates-ambari-1.7.0]name=ambari-1.7.0 - Updates baseurl= <this.is.the.AMBARI.base.url> gpgcheck=1 gpgkey=http://public-repo-1.hortonworks.com/ambari/centos6/RPM-GPG-KEY/RPM-GPG-KEY-Jenkins enabled=1 priority=1 -
Place the ambari.repo file on the machine you plan to use for the Ambari Server.
-
For RHEL/CentOS/Oracle Linux:
/etc/yum.repos.d/ambari.repo -
For SLES:
/etc/zypp/repos.d/ambari.repo -
For Ubuntu:
/etc/apt-get install/list.d/ambari.list -
Edit the
/etc/yum/pluginconf.d/priorities.conffile to add the following:[main] enabled=1 gpgcheck=0
-
-
Proceed to Installing Ambari Server to install and setup Ambari Server.
Installing Ambari Server
Select the instructions for the OS family running on your installation host.
RHEL/CentOS/Oracle Linux 6
On a server host that has Internet access, use a command line editor to perform the following steps:
-
Log in to your host as
root. You maysudoassuif your environment requires such access. For example, type:<username>
ssh<hostname.FQDN>sudo su -where <username> is your user name and <hostname.FQDN> is the fully qualified domain name of your server host. -
Download the Ambari repository file to a directory on your installation host.
wget -nv http://public-repo-1.hortonworks.com/ambari/centos6/1.x/updates/1.7.0/ambari.repo -O /etc/yum.repos.d/ambari.repo -
Confirm that the repository is configured by checking the repo list.
yum repolistYou should see values similar to the following for Ambari repositories in the list.Version values vary, depending on the installation.
repo id
repo name
status
AMBARI.1.7.0-1.x
Ambari 1.x
5
base
CentOS-6 - Base
6,518
extras
CentOS-6 - Extras
15
updates
CentOS-6 - Updates
209
-
Install the Ambari bits. This also installs the default PostgreSQL Ambari database.
yum install ambari-server -
Enter
ywhen prompted to to confirm transaction and dependency checks.A successful installation displays output similar to the following:
Installing : postgresql-libs-8.4.20-1.el6_5.x86_64
                           1/4
                           Installing : postgresql-8.4.20-1.el6_5.x86_64
                           2/4
                           Installing : postgresql-server-8.4.20-1.el6_5.x86_64
                           3/4
                           Installing : ambari-server-1.7.0-135.noarch
                           4/4
                           Verifying  : postgresql-server-8.4.20-1.el6_5.x86_64
                           1/4
                           Verifying  : postgresql-libs-8.4.20-1.el6_5.x86_64
                           2/4
                           Verifying  : ambari-server-1.7.0-135.noarch
                           3/4
                           Verifying  : postgresql-8.4.20-1.el6_5.x86_64
                           4/4

                           Installed:
                           ambari-server.noarch 0:1.7.0-135

                           Dependency Installed:
                           postgresql.x86_64 0:8.4.20-1.el6_5             postgresql-libs.x86_64 0:8.4.20-1.el6_5
                           postgresql-server.x86_64 0:8.4.20-1.el6_5

                           Complete!
SLES 11
On a server host that has Internet access, use a command line editor to perform the following steps:
-
Log in to your host as
root. You maysudoassuif your environment requires such access. For example, type: -
<username>
ssh<hostname.FQDN>sudo su -where <username> is your user name and <hostname.FQDN> is the fully qualified domain name of your server host. -
Download the Ambari repository file to a directory on your installation host.
wget -nv http://public-repo-1.hortonworks.com/ambari/suse11/1.x/updates/1.7.0/ambari.repo -O /etc/zypp/repos.d/ambari.repo -
Confirm the downloaded repository is configured by checking the repo list.
zypper reposYou should see the Ambari repositories in the list.Version values vary, depending on the installation.
Alias
Name
Enabled
Refresh
AMBARI.1.7.0-1.x
Ambari 1.x
Yes
No
http-demeter.uni-regensburg.de-c997c8f9
SUSE-Linux-Enterprise-Software-Development-Kit-11-SP1 11.1.1-1.57
Yes
Yes
opensuse
OpenSuse
Yes
Yes
-
Install the Ambari bits. This also installs PostgreSQL.
zypper install ambari-server -
Enter
ywhen prompted to to confirm transaction and dependency checks.A successful installation displays output similar to the following: Retrieving package postgresql-libs-8.3.5-1.12.x86_64 (1/4), 172.0 KiB (571.0 KiB unpacked) Retrieving: postgresql-libs-8.3.5-1.12.x86_64.rpm [done (47.3 KiB/s)] Installing: postgresql-libs-8.3.5-1.12 [done] Retrieving package postgresql-8.3.5-1.12.x86_64 (2/4), 1.0 MiB (4.2 MiB unpacked) Retrieving: postgresql-8.3.5-1.12.x86_64.rpm [done (148.8 KiB/s)] Installing: postgresql-8.3.5-1.12 [done] Retrieving package postgresql-server-8.3.5-1.12.x86_64 (3/4), 3.0 MiB (12.6 MiB unpacked) Retrieving: postgresql-server-8.3.5-1.12.x86_64.rpm [done (452.5 KiB/s)] Installing: postgresql-server-8.3.5-1.12 [done] Updating etc/sysconfig/postgresql... Retrieving package ambari-server-1.7.0-135.noarch (4/4), 99.0 MiB (126.3 MiB unpacked) Retrieving: ambari-server-1.7.0-135.noarch.rpm [done (3.0 MiB/s)] Installing: ambari-server-1.7.0-135 [done] ambari-server 0:off 1:off 2:off 3:on 4:off 5:on 6:off
UBUNTU 12
On a server host that has Internet access, use a command line editor to perform the following steps:
-
Log in to your host as
root. You maysudoassuif your environment requires such access. For example, type: -
<username>
ssh<hostname.FQDN>sudo su -where <username> is your user name and <hostname.FQDN> is the fully qualified domain name of your server host. -
Download the Ambari repository file to a directory on your installation host.
wget -nv http://public-repo-1.hortonworks.com/ambari/ubuntu12/1.x/updates/1.7.0/ambari.list -O /etc/apt/sources.list.d/ambari.list apt-key adv --recv-keys --keyserver keyserver.ubuntu.com B9733A7A07513CAD apt-get update -
Confirm that Ambari packages downloaded successfully by checking the package name list.
apt-cache pkgnamesYou should see the Ambari packages in the list.Version values vary, depending on the installation.
Alias
Name
AMBARI-dev-2.x
Ambari 2.x
-
Install the Ambari bits. This also installs PostgreSQL.
apt-get install ambari-server
RHEL/CentOS/ORACLE Linux 5 (DEPRECATED)
On a server host that has Internet access, use a command line editor to perform the following steps:
-
Log in to your host as
root. You maysudoassuif your environment requires such access. For example, type: -
<username>
ssh<hostname.FQDN>sudo su -where <username> is your user name and <hostname.FQDN> is the fully qualified domain name of your server host. -
Download the Ambari repository file to a directory on your installation host.
wget -nv http://public-repo-1.hortonworks.com/ambari/centos5/1.x/updates/1.7.0/ambari.repo -O /etc/yum.repos.d/ambari.repo -
Confirm the repository is configured by checking the repo list.
yum repolistYou should see the Ambari repositories in the list.AMBARI.1.7.0-1.x | 951 B 00:00 AMBARI.1.7.0-1.x/primary | 1.6 kB 00:00 AMBARI.1.7.0-1.x 5/5 epel | 3.7 kB 00:00 epel/primary_db | 3.9 MB 00:01repo Id
repo Name
status
AMBARI.1.7.0-1.x
Ambari 1.x
5
base
CentOS-5 - Base
3,667
epel
Extra Packages for Enterprise Linux 5 - x86_64
7,614
puppet
Puppet
433
updates
CentOS-5 - Updates
118
-
Install the Ambari bits. This also installs PostgreSQL.
yum install ambari-server
Set Up the Ambari Server
The ambari-server command manages the setup process. Run the following command on the Ambari server
host:
You may append Setup Options to the command.
ambari-server setup
Respond to the following prompts:
-
If you have not temporarily disabled SELinux, you may get a warning. Accept the default (
y), and continue. -
By default, Ambari Server runs under
root. Accept the default (n) at theCustomize user account for ambari-server daemonprompt, to proceed asroot. If you want to create a different user to run the Ambari Server, or to assign a previously created user, selectyat theCustomize user account for ambari-server daemonprompt, then provide a user name. -
If you have not temporarily disabled
iptablesyou may get a warning. Enteryto continue. -
Select a JDK version to download. Enter 1 to download Oracle JDK 1.7.
-
Accept the Oracle JDK license when prompted. You must accept this license to download the necessary JDK from Oracle. The JDK is installed during the deploy phase.
-
Select
natEnter advanced database configurationto use the default, embedded PostgreSQL database for Ambari. The default PostgreSQL database name isambari. The default user name and password areambari/bigdata. Otherwise, to use an existing PostgreSQL, MySQL or Oracle database with Ambari, selecty.-
If you are using an existing PostgreSQL, MySQL, or Oracle database instance, use one of the following prompts:
-
To use an existing Oracle 11g r2 instance, and select your own database name, user name, and password for that database, enter
2.Select the database you want to use and provide any information requested at the prompts, including host name, port, Service Name or SID, user name, and password.
-
To use an existing MySQL 5.x database, and select your own database name, user name, and password for that database, enter
3.Select the database you want to use and provide any information requested at the prompts, including host name, port, database name, user name, and password.
-
To use an existing PostgreSQL 9.x database, and select your own database name, user name, and password for that database, enter
4.Select the database you want to use and provide any information requested at the prompts, including host name, port, database name, user name, and password.
-
-
At Proceed with configuring remote database connection properties [y/n] choose
y. -
Setup completes.
Setup Options
The following table describes options frequently used for Ambari Server setup.
|
Option |
Description |
|---|---|
|
-j (or --java-home) |
Specifies the JAVA_HOME path to use on the Ambari Server and all hosts in the cluster.
By default when you do not specify this option, Ambari Server setup downloads the
Oracle JDK 1.7 binary and accompanying Java Cryptography Extension (JCE) Policy Files
to /var/lib/ambari-server/resources. Ambari Server then installs the JDK to /usr/jdk64. |
|
--jdbc-driver |
Should be the path to the JDBC driver JAR file. Use this option to specify the location of the JDBC driver JAR and to make that JAR available to Ambari Server for distribution to cluster hosts during configuration. Use this option with the --jdbc-db option to specify the database type. |
|
--jdbc-db |
Specifies the database type. Valid values are: [postgres | mysql | oracle] Use this option with the --jdbc-driver option to specify the location of the JDBC driver JAR file. |
|
-s (or --silent) |
Setup runs silently. Accepts all default prompt values. |
|
-v (or --verbose) |
Prints verbose info and warning messages to the console during Setup. |
|
-g (or --debug) |
Start Ambari Server in debug mode |
Next Steps
Start the Ambari Server
-
Run the following command on the Ambari Server host:
ambari-server start -
To check the Ambari Server processes:
ambari-server status -
To stop the Ambari Server:
ambari-server stop
Next Steps
Install, configure and deploy an HDP cluster
Install, Configure and Deploy a HDP Cluster
This section describes how to use the Ambari install wizard running in your browser to install, configure, and deploy your cluster.
Log In to Apache Ambari
After starting the Ambari service, open Ambari Web using a web browser.
-
Point your browser to
http://<your.ambari.server>:8080, -
Log in to the Ambari Server using the default user name/password: admin/admin. You can change these credentials later.
For a new cluster, the Ambari install wizard displays a Welcome page from which you launch the Ambari Install wizard.
Launching the Ambari Install Wizard
From the Ambari Welcome page, choose Launch Install Wizard.

Name Your Cluster
-
In
Name your cluster, type a name for the cluster you want to create. Use no white spaces or special characters in the name. -
Choose
Next.
Select Stack
The Service Stack (the Stack) is a coordinated and tested set of HDP components. Use a radio button to select the Stack version you want to install. To install an HDP 2x stack, select the HDP 2.2, HDP 2.1, or HDP 2.0 radio button.
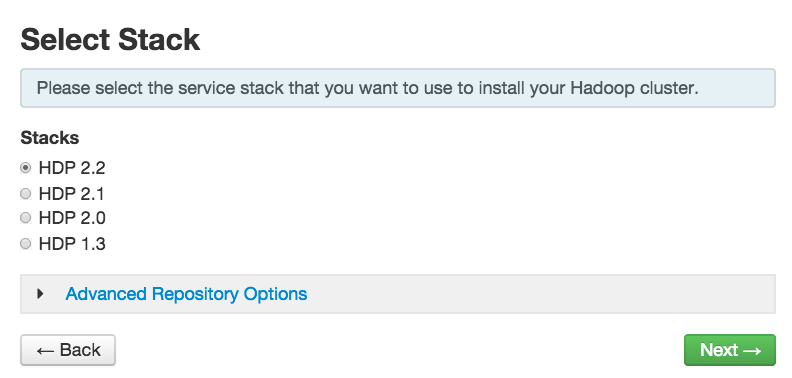
Expand Advanced Repository Options to select the Base URL of a repository from which Stack software packages download. Ambari sets the default Base URL for each repository, depending on the Internet connectivity available to the Ambari server host, as follows:
-
For an Ambari Server host having Internet connectivity, Ambari sets the repository Base URL for the latest patch release for the HDP Stack version. For an Ambari Server having NO Internet connectivity, the repository Base URL defaults to the latest patch release version available at the time of Ambari release.
-
You can override the repository Base URL for the HDP Stack with an earlier patch release if you want to install a specific patch release for a given HDP Stack version. For example, the HDP 2.1 Stack will default to the HDP 2.1 Stack patch release 7, or HDP-2.1.7. If you want to install HDP 2.1 Stack patch release 2, or HDP-2.1.2 instead, obtain the Base URL from the HDP Stack documentation, then enter that location in Base URL.
-
If you are using a local repository, see Optional: Configure Ambari for Local Repositories for information about configuring a local repository location, then enter that location as the Base URL instead of the default, public-hosted HDP Stack repositories.
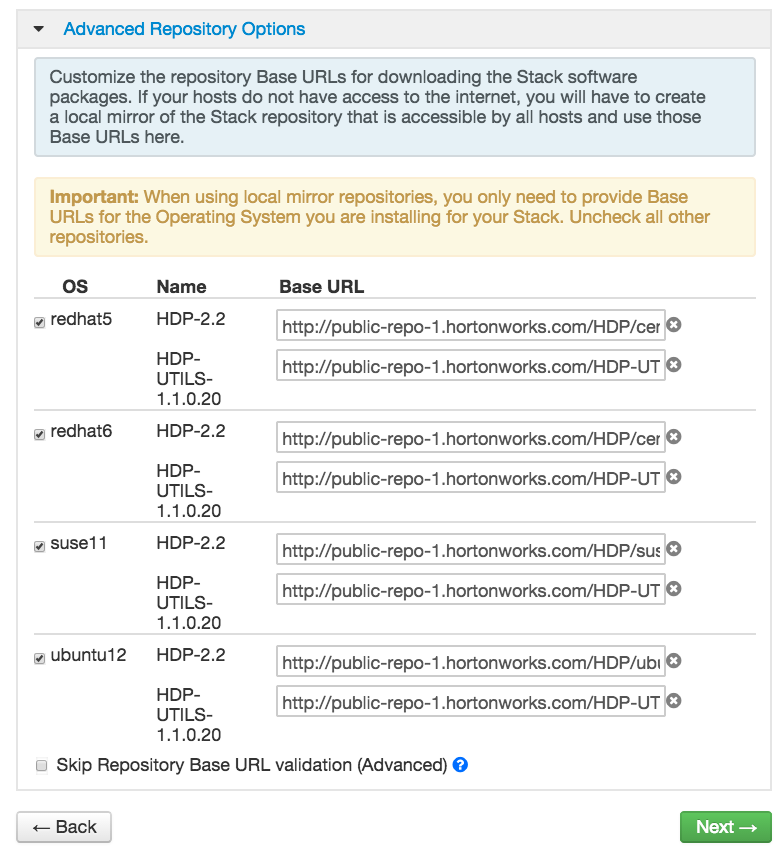
Operating Systems mapped to each OS Family
|
OS Family |
Operating Systems |
|---|---|
|
redhat6 |
Red Hat 6, CentOS 6, Oracle Linux 6 |
|
suse11 |
SUSE Linux Enterprise Server 11 |
|
ubuntu12 |
Ubuntu Precise 12.04 |
|
redhat5 |
Red Hat 5, CentOS 5, Oracle Linux 5 |
Install Options
In order to build up the cluster, the install wizard prompts you for general information about how you want to set it up. You need to supply the FQDN of each of your hosts. The wizard also needs to access the private key file you created in Set Up Password-less SSH. Using the host names and key file information, the wizard can locate, access, and interact securely with all hosts in the cluster.
-
Use the
Target Hoststext box to enter your list of host names, one per line. You can use ranges inside brackets to indicate larger sets of hosts. For example, for host01.domain through host10.domain usehost[01-10].domain -
If you want to let Ambari automatically install the Ambari Agent on all your hosts using SSH, select
Provide your SSH Private Keyand either use theChoose Filebutton in theHost Registration Informationsection to find the private key file that matches the public key you installed earlier on all your hosts or cut and paste the key into the text box manually.Fill in the user name for the SSH key you have selected. If you do not want to use
root, you must provide the user name for an account that can executesudowithout entering a password. -
If you do not want Ambari to automatically install the Ambari Agents, select
Perform manual registration. For further information, see Installing Ambari Agents Manually. -
Choose
Register and Confirmto continue.
Confirm Hosts
Confirm Hosts prompts you to confirm that Ambari has located the correct hosts for your cluster
and to check those hosts to make sure they have the correct directories, packages,
and processes required to continue the install.
If any hosts were selected in error, you can remove them by selecting the appropriate
checkboxes and clicking the grey Remove Selected button. To remove a single host, click the small white Remove button in the Action column.
At the bottom of the screen, you may notice a yellow box that indicates some warnings
were encountered during the check process. For example, your host may have already
had a copy of wget or curl. Choose Click here to see the warnings to see a list of what was checked and what caused the warning. The warnings page also
provides access to a python script that can help you clear any issues you may encounter
and let you run Rerun Checks.
When you are satisfied with the list of hosts, choose Next.
Choose Services
Based on the Stack chosen during Select Stack, you are presented with the choice of Services to install into the cluster. HDP Stack comprises many services. You may choose to install any other available services now, or to add services later. The install wizard selects all available services for installation by default.
-
Choose
noneto clear all selections, or chooseallto select all listed services. -
Choose or clear individual checkboxes to define a set of services to install now.
-
After selecting the services to install now, choose
Next.
Assign Masters
The Ambari install wizard assigns the master components for selected services to appropriate hosts in your cluster and displays the assignments in Assign Masters. The left column shows services and current hosts. The right column shows current master component assignments by host, indicating the number of CPU cores and amount of RAM installed on each host.
-
To change the host assignment for a service, select a host name from the drop-down menu for that service.
-
To remove a ZooKeeper instance, click the green minus icon next to the host address you want to remove.
-
When you are satisfied with the assignments, choose
Next.
Assign Slaves and Clients
The Ambari installation wizard assigns the slave components (DataNodes, NodeManagers, and RegionServers) to appropriate hosts in your cluster. It also attempts to select hosts for installing the appropriate set of clients.
-
Use all or none to select all of the hosts in the column or none of the hosts, respectively.
If a host has a red asterisk next to it, that host is also running one or more master components. Hover your mouse over the asterisk to see which master components are on that host.
-
Fine-tune your selections by using the checkboxes next to specific hosts.
-
When you are satisfied with your assignments, choose
Next.
Customize Services
Customize Services presents you with a set of tabs that let you manage configuration settings for HDP
components. The wizard sets reasonable defaults for each of the options here, but
you can use this set of tabs to tweak those settings. You are strongly encouraged
to do so, as your requirements may be slightly different. Pay particular attention
to the directories suggested by the installer.
Hover your cursor over each of the properties to see a brief description of what it does. The number of tabs you see is based on the type of installation you have decided to do. A typical installation has at least ten groups of configuration properties and other related options, such as database settings for Hive/HCat and Oozie, admin name/password, and alert email for Nagios.
The install wizard sets reasonable defaults for all properties. You must provide database
passwords for the Hive, Nagios, and Oozie services, the Master Secret for Knox, and
a valid email address to which system alerts will be sent. Select each service that
displays a number highlighted red. Then, fill in the required field on the Service
Config tab. Repeat this until the red flags disappear.
For example, Choose Hive. Expand the Hive Metastore section, if necessary. In Database
Password, provide a password, then retype to confirm it, in the fields marked red
and "This is required."
For more information about customizing specific services for a particular HDP Stack,
see Customizing HDP Services.
After you complete Customizing Services, choose Next.
Review
The assignments you have made are displayed. Check to make sure everything is correct. If you need to make changes, use the left navigation bar to return to the appropriate screen.
To print your information for later reference, choose Print.
When you are satisfied with your choices, choose Deploy.
Install, Start and Test
The progress of the install displays on the screen. Ambari installs, starts, and runs a simple test on each component. Overall status of the process displays in progress bar at the top of the screen and host-by-host status displays in the main section. Do not refresh your browser during this process. Refreshing the browser may interrupt the progress indicators.
To see specific information on what tasks have been completed per host, click the
link in the Message column for the appropriate host. In the Tasks pop-up, click the individual task to see the related log files. You can select filter
conditions by using the Show drop-down list. To see a larger version of the log contents, click the Open icon or to copy the contents to the clipboard, use the Copy icon.
When Successfully installed and started the services appears, choose Next.
Complete
The Summary page provides you a summary list of the accomplished tasks. Choose Complete. Ambari Web GUI displays.
Upgrading Ambari
This section describes how to upgrade Ambari Server to 1.7.0, including how to upgrade the HDP stack to 2.2 and how to upgrade an older Ambari Server version to 1.2.5.
Upgrading Ambari Server to 1.7.0
This procedure upgrades Ambari Server from version 1.2.5 and above to 1.7.0. If your current Ambari Server version is 1.2.4 or below, you must upgrade the Ambari Server version to 1.2.5 before upgrading to version 1.7.0. Upgrading the Ambari Server version does not change the underlying Hadoop Stack.
-
Stop the Nagios and Ganglia services. In
Ambari Web:-
Browse to
Servicesand select the Nagios service. -
Use
Service Actionsto stop the Nagios service. -
Wait for the Nagios service to stop.
-
Browse to
Servicesand select the Ganglia service. -
Use
Service Actionsto stop the Ganglia service. -
Wait for the Ganglia service to stop.
-
-
Stop the Ambari Server. On the Ambari Server host,
ambari-server stop -
Stop all Ambari Agents. On each Ambari Agent host,
ambari-agent stop -
Fetch the new Ambari repo using
wgetand replace the old repository file with the new repository file on all hosts in your cluster.Select the repository appropriate for your environment from the following list:
-
For RHEL/CentOS 6/Oracle Linux 6:
wget -nv http://public-repo-1.hortonworks.com/ambari/centos6/1.x/updates/1.7.0/ambari.repo -O /etc/yum.repos.d/ambari.repo -
For SLES 11:
wget -nv http://public-repo-1.hortonworks.com/ambari/suse11/1.x/updates/1.7.0/ambari.repo -O /etc/zypp/repos.d/ambari.repo -
For Ubuntu 12:
wget -nv http://public-repo-1.hortonworks.com/ambari/ubuntu12/1.x/updates/1.7.0/ambari.list -O /etc/apt/sources/list.d/ambari.list -
For RHEL/CentOS 5/Oracle Linux 5: (DEPRECATED)
wget -nv http://public-repo-1.hortonworks.com/ambari/centos5/1.x/updates/1.7.0/ambari.repo -O /etc/yum.repos.d/ambari.repo
-
-
Upgrade Ambari Server.
At the Ambari Server host:
-
For RHEL/CentOS/Oracle Linux:
yum clean all yum upgrade ambari-server ambari-log4j -
For SLES:
zypper clean zypper up ambari-server ambari-log4j -
For Ubuntu:
apt-get clean all
                        apt-get install ambari-server ambari-log4j
-
-
Check for upgrade success by noting progress during the Ambari server installation process you started in Step 5.
-
As the process runs, the console displays output similar, although not identical, to the following:
Setting up Upgrade Process Resolving Dependencies --> Running transaction check ---> Package ambari-server.x86_64 0:1.2.2.3-1 will be updated ---> Package ambari-server.x86_64 0:1.2.2.4-1 will be updated ... ---> Package ambari-server.x86_64 0:1.2.2.5-1 will be an update ... -
If the upgrade fails, the console displays output similar to the following:
Setting up Upgrade Process No Packages marked for Update -
A successful upgrade displays the following output:
Updated: ambari-log4j.noarch 0:1.7.0.111-1 ambari-server.noarch 0:1.7.0-111 Complete!
-
-
Upgrade the Ambari Server schema.
On the Ambari Server host:
ambari-server upgrade -
Upgrade the Ambari Agent on all hosts.
At each Ambari Agent host:
-
For RHEL/CentOS/Oracle Linux:
yum upgrade ambari-agent ambari-log4j -
For SLES:
zypper up ambari-agent ambari-log4j -
For Ubuntu:
apt-get update
                        apt-get install ambari-agent ambari-log4j
-
-
On each Agent host, check for a file named
/etc/ambari-agent/conf.save. If that folder exists, rename it back to/etc/ambari-agent/conf.mv /etc/ambari-agent/conf.save /etc/ambari-agent/conf -
After the upgrade process completes, check each host to make sure the new 1.7.0 files have been installed:
rpm -qa | grep ambari -
Start the Ambari Server. At the Ambari Server host,
ambari-server start -
Start the Ambari Agents on all hosts. At each Ambari Agent host,
ambari-agent start -
Open Ambari Web.
Point your browser to http://<your.ambari.server>:8080
where <your.ambari.server> is the name of your ambari server host. For example, c6401.ambari.apache.org. -
Log in, using the Ambari administrator credentials that you have set up.
For example, the default name/password is
admin/admin. -
Start the Nagios and Ganglia services.
In Ambari Web,
-
Browse to
Servicesand select each service. -
Use
Service Actionsto start the service.
-
-
If you have customized logging properties, you will see a Restart indicator next to each service name after upgrading to Ambari 1.7.0.
To preserve any custom logging properties after upgrading, for each service:
-
Replace default logging properties with your custom logging properties, using
Service Configs > Custom
                        log4j.properties
. -
Restart all components in any services for which you have customized logging properties.
-
-
Review the HDP-UTILS repository Base URL setting.
-
Review your Ambari LDAP authentication settings.
If you have configured Ambari for LDAP authentication, you must re-run "ambari-server setup-ldap". For further information, see Set Up LDAP or Active Directory Authentication.
Upgrading the HDP Stack from 2.1 to 2.2
The HDP Stack is the coordinated set of Hadoop components that you have installed
on hosts in your cluster. Your set of Hadoop components and hosts is unique to your
cluster. Before upgrading the Stack on your cluster, review all Hadoop services and
hosts in your cluster. For example, use the Hosts and Services views in Ambari Web,
which summarize and list the components installed on each Ambari host, to determine
the components installed on each host. For more information about using Ambari to
view components in your cluster, see Working with Hosts, and Viewing Components on a Host.
Upgrading the HDP Stack is a three-step procedure:
In preparation for future HDP 2.2 releases to support rolling upgrades, the HDP RPM
package version naming convention has changed to include the HDP 2.2 product version
in file and directory names. HDP 2.2 marks the first release where HDP rpms, debs,
and directories contain versions in the names to permit side-by-side installations
of later HDP releases. To transition between previous releases and HDP 2.2, Hortonworks
provides hdp-select, a script that symlinks your directories to hdp/current and lets you maintain using the same binary and configuration paths that you were
using before.
The following instructions have you remove your older version HDP components, install
hdp-select, and install HDP 2.2 components to prepare for rolling upgrade.
Prepare the 2.1 Stack for Upgrade
To prepare for upgrading the HDP Stack, perform the following tasks:
-
Disable Security.
-
Checkpoint user metadata and capture the HDFS operational state.
This step supports rollback and restore of the original state of HDFS data, if necessary. -
Backup Hive and Oozie metastore databases.
This step supports rollback and restore of the original state of Hive and Oozie data, if necessary.
-
Stop all HDP and Ambari services.
-
Make sure to finish all current jobs running on the system before upgrading the stack.
-
Use
Ambari Web>Services>Service Actions -
Stop any client programs that access HDFS.
Perform steps 3 through 8 on the NameNode host. In a highly-available NameNode configuration, execute the following procedure on the primary NameNode.
-
If HDFS is in a non-finalized state from a prior upgrade operation, you must finalize HDFS before upgrading further. Finalizing HDFS will remove all links to the metadata of the prior HDFS version. Do this only if you do not want to rollback to that prior HDFS version.
On the NameNode host, as the HDFS user,
su -l<HDFS_USER>hdfs dfsadmin -finalizeUpgradewhere <HDFS_USER> is the HDFS Service user. For example, hdfs. -
Check the NameNode directory to ensure that there is no snapshot of any prior HDFS upgrade.
Specifically, using
Ambari Web > HDFS > Configs > NameNode, examine the<dfs.namenode.name.dir>or the<dfs.name.dir>directory in the NameNode Directories property. Make sure that only a "\current" directory and no "\previous" directory exists on the NameNode host. -
Create the following logs and other files.
Creating these logs allows you to check the integrity of the file system, post-upgrade.
As the HDFS user,su -l<HDFS_USER> where <HDFS_USER> is the HDFS Service user. For example, hdfs.-
Run
fsckwith the following flags and send the results to a log.The resulting file contains a complete block map of the file system. You use this log later to confirm the upgrade.
hdfs fsck / -files -blocks -locations > dfs-old-fsck-1.log -
Optional: Capture the complete namespace of the file system.
The following command does a recursive listing of the root file system:
hadoop dfs -ls -R / > dfs-old-lsr-1.log -
Create a list of all the DataNodes in the cluster.
hdfs dfsadmin -report > dfs-old-report-1.log -
Optional: Copy all unrecoverable data stored in HDFS to a local file system or to a backup instance of HDFS.
-
-
Save the namespace.
You must be the HDFS service user to do this and you must put the cluster in Safe Mode.
hdfs dfsadmin -safemode enterhdfs dfsadmin -saveNamespace -
Copy the checkpoint files located in <dfs.name.dir/current> into a backup directory.
Find the directory, using Ambari Web > HDFS > Configs > NameNode > NameNode Directories on your primary NameNode host.
-
Store the layoutVersion for the NameNode.
Make a copy of the file at <dfs.name.dir>
/current/VERSION, where <dfs.name.dir> is the value of the config parameter NameNode directories. This file will be used later to verify that the layout version is upgraded. -
Stop HDFS.
-
Stop ZooKeeper.
-
Using
Ambari Web>Services> <service.name> >Summary, review each service and make sure that all services in the cluster are completely stopped. -
At the Hive Metastore database host, stop the Hive metastore service, if you have not done so already.
-
If you are upgrading Hive and Oozie, back up the Hive and Oozie metastore databases on the Hive and Oozie database host machines, respectively.
-
Optional - Back up the Hive Metastore database.
Hive Metastore Database Backup and Restore
Database Type
Backup
Restore
MySQL
mysqldump <dbname> > <outputfilename.sql> For example: mysqldump hive > /tmp/mydir/backup_hive.sql
mysql <dbname> < <inputfilename.sql> For example: mysql hive < /tmp/mydir/backup_hive.sql
Postgres
sudo -u <username> pg_dump <databasename> > <outputfilename.sql> For example: sudo -u postgres pg_dump hive > /tmp/mydir/backup_hive.sql
sudo -u <username> psql <databasename> < <inputfilename.sql> For example: sudo -u postgres psql hive < /tmp/mydir/backup_hive.sql
Oracle
Connect to the Oracle database using sqlplus export the database: exp username/password@database full=yes file=output_file.dmp
Import the database: imp username/password@database ile=input_file.dmp
-
Optional - Back up the Oozie Metastore database.
Oozie Metastore Database Backup and Restore
Database Type
Backup
Restore
MySQL
mysqldump <dbname> > <outputfilename.sql> For example: mysqldump oozie > /tmp/mydir/backup_oozie.sql
mysql <dbname> < <inputfilename.sql> For example: mysql oozie < /tmp/mydir/backup_oozie.sql
Postgres
sudo -u <username> pg_dump <databasename> > <outputfilename.sql> For example: sudo -u postgres pg_dump oozie > /tmp/mydir/backup_oozie.sql
sudo -u <username> psql <databasename> < <inputfilename.sql> For example: sudo -u postgres psql oozie < /tmp/mydir/backup_oozie.sql
-
-
Backup Hue. If you are using the embedded SQLite database, you must perform a backup of the database before you upgrade Hue to prevent data loss. To make a backup copy of the database, stop Hue, then "dump" the database content to a file, as follows:
./etc/init.d/hue stop

                  su $HUE_USER
                  mkdir ~/hue_backup
                  cd /var/lib/hue
                  sqlite3 desktop.db .dump > ~/hue_backup/desktop.bak
For other databases, follow your vendor-specific instructions to create a backup. -
On the Ambari Server host, stop Ambari Server and confirm that it is stopped.
ambari-server stopambari-server status -
Stop all Ambari Agents. On every host in your cluster known to Ambari,
ambari-agent stop
Upgrade the 2.1 Stack to 2.2
-
Upgrade the HDP repository on all hosts and replace the old repository file with the new file:
-
For RHEL/CentOS/Oracle Linux 6:
wget -nv http://public-repo-1.hortonworks.com/HDP/centos6/2.x/GA/2.2.0.0/hdp.repo -O /etc/yum.repos.d/HDP.repo -
For SLES 11 SP3:
wget -nv http://public-repo-1.hortonworks.com/HDP/suse11sp3/2.x/GA/2.2.0.0/hdp.repo -O /etc/zypp/repos.d/HDP.repo -
For SLES 11 SP1:
wget -nv http://public-repo-1.hortonworks.com/HDP/sles11sp1/2.x/GA/2.2.0.0/hdp.repo -O /etc/zypp/repos.d/HDP.repo -
For UBUNTU12:
wget -nv http://public-repo-1.hortonworks.com/HDP/ubuntu1/2.x/GA/2.2.0.0/hdp.list -O /etc/apt/sourceslist.d/HDP.list -
For RHEL/CentOS/Oracle Linux 5: (DEPRECATED)
wget -nv http://public-repo-1.hortonworks.com/HDP/centos5/2.x/GA/2.2.0.0/hdp.repo -O /etc/yum.repos.d/HDP.repo
-
-
Update the Stack version in the Ambari Server database.
On the Ambari Server host, use the following command to update the Stack version to HDP-2.2:
ambari-server upgradestack HDP-2.2 -
Back up the files in following directories on the Oozie server host and make sure that all files, including *site.xml files are copied.
mkdir oozie-conf-bak cp -R /etc/oozie/conf/* oozie-conf-bak -
Remove the old oozie directories on all Oozie server and client hosts
-
rm -rf /etc/oozie/conf -
rm -rf /usr/lib/oozie/ -
rm -rf /var/lib/oozie/
-
-
Upgrade the Stack on all Ambari Agent hosts.
-
For RHEL/CentOS/Oracle Linux:
-
On all hosts, clean the yum repository.
yum clean all -
Remove all HDP 2.1 components that you want to upgrade.
This command un-installs the HDP 2.1 component bits. It leaves the user data and metadata, but removes your configurations.
yum erase "hadoop*" "webhcat*" "hcatalog*" "oozie*" "pig*" "hdfs*" "sqoop*" "zookeeper*" "hbase*" "hive*" "tez*" "storm*" "falcon*" "flume*" "phoenix*" "accumulo*" "mahout*" "hue*" "hdp_mon_nagios_addons" -
Remove your old hdp.repo and hdp-utils repo files.
rm etc/yum/repos.d/hdp.repo hdp-utils.repo -
Install all HDP 2.2 components that you want to upgrade.
yum install "hadoop_2_2_0_0_*" "oozie_2_2_0_0_*" "pig_2_2_0_0_*" "sqoop_2_2_0_0_*" "zookeeper_2_2_0_0_*" "hbase_2_2_0_0_*" "hive_2_2_0_0_*" "tez_2_2_0_0_*" "storm_2_2_0_0_*" "falcon_2_2_0_0_*" "flume_2_2_0_0_*" "phoenix_2_2_0_0_*" "accumulo_2_2_0_0_*" "mahout_2_2_0_0_*" rpm -e --nodeps hue-shell yum install hue hue-common hue-beeswax hue-hcatalog hue-pig hue-oozie -
Verify that the components were upgraded.
yum list installed | grep HDP-<old.stack.version.number>No component file names should appear in the returned list.
-
-
For SLES:
-
On all hosts, clean the zypper repository.
zypper clean --all -
Remove all HDP 2.1 components that you want to upgrade.
This command un-installs the HDP 2.1 component bits. It leaves the user data and metadata, but removes your configurations.
zypper remove "hadoop*" "webhcat*" "hcatalog*" "oozie*" "pig*" "hdfs*" "sqoop*" "zookeeper*" "hbase*" "hive*" "tez*" "storm*" "falcon*" "flume*" "phoenix*" "accumulo*" "mahout*" "hue*" "hdp_mon_nagios_addons" -
Remove your old hdp.repo and hdp-utils repo files.
rm etc/zypp/repos.d/hdp.repo hdp-utils.repo -
Install all HDP 2.2 components that you want to upgrade.
zypper install "hadoop\_2_2_0_0_*" "oozie\_2_2_0_0_*" "pig\_2_2_0_0_*" "sqoop\_2_2_0_0_*" "zookeeper\_2_2_0_0_*" "hbase\_2_2_0_0_*" "hive\_2_2_0_0_*" "tez\_2_2_0_0_*" "storm\_2_2_0_0_*" "falcon\_2_2_0_0_*" "flume\_2_2_0_0_*" "phoenix\_2_2_0_0_*" "accumulo\_2_2_0_0_*" "mahout\_2_2_0_0_*" rpm -e --nodeps hue-shell zypper install hue hue-common hue-beeswax hue-hcatalog hue-pig hue-oozie -
Verify that the components were upgraded.
rpm -qa | grep hdfs, && rpm -qa | grep hive && rpm -qa | grep hcatalogNo component files names should appear in the returned list.
-
If any components were not upgraded, upgrade them as follows:
yast --update hdfs hcatalog hive
-
-
-
Symlink directories, using
hdp-select.Check that the
hdp-selectpackage installed:rpm -qa | grep hdp-select
You should see:hdp-select-2.2.0.0-2041.el6.noarch for the HDP 2.2 release.
If not, then run:yum install hdp-select
Runhdp-selectas root, on every node.hdp-select set all 2.2.0.0-<$version>where $version is the build number. For the HDP 2.2 release <$version> = 2041. -
On the Hive Metastore database host, stop the Hive Metastore service, if you have not done so already. Make sure that the Hive Metastore database is running.
-
Upgrade the Hive metastore database schema from v13 to v14, using the following instructions:
-
Set java home:
export JAVA_HOME=/path/to/java -
Copy (rewrite) old Hive configurations to new conf dir:
cp -R /etc/hive/conf.server/* /etc/hive/conf/ -
Copy jdbc connector to
/usr/hdp/<$version>/hive/lib, if it is not already in that location. -
<HIVE_HOME>
/bin/schematool -upgradeSchema -dbType<databaseType> where <HIVE_HOME> is the Hive installation directory.For example, on the Hive Metastore host:
/usr/hdp/2.2.0.0-<$version>/hive/bin/schematool -upgradeSchema -dbType <databaseType>
where <$version> is the 2.2.0 build number and <databaseType> is derby, mysql, oracle, or postgres.
-
Complete the Upgrade of the 2.1 Stack to 2.2
-
Start Ambari Server.
On the Ambari Server host,
ambari-server start -
Start all Ambari Agents.
At each Ambari Agent host,
ambari-agent start -
Update the repository Base URLs in Ambari Server for the HDP-2.2 stack.
Browse to
Ambari Web > Admin > Repositories,then set the values for the HDP and HDP-UTILS repository Base URLs. For more information about viewing and editing repository Base URLs, see Viewing Cluster Stack Version and Repository URLs. -
Using the Ambari Web UI, add the Tez service if if it has not been installed already. For more information about adding a service, see Adding a Service.
-
Using the Ambari Web UI, add any new services that you want to run on the HDP 2.2 stack. You must add a Service before editing configuration properties necessary to complete the upgrade.
-
Using the
Ambari Web UI>Services, start the ZooKeeper service. -
Copy (rewrite) old hdfs configurations to new conf directory, on all Datanode and Namenode hosts,
cp /etc/hadoop/conf.empty/hdfs-site.xml.rpmsave /etc/hadoop/conf/hdfs-site.xml; cp /etc/hadoop/conf.empty/hadoop-env.sh.rpmsave /etc/hadoop/conf/hadoop-env.sh.xml; cp /etc/hadoop/conf.empty/log4j.properties.rpmsave /etc/hadoop/conf/log4j.properties; cp /etc/hadoop/conf.empty/core-site.xml.rpmsave /etc/hadoop/conf/core-site.xml -
If you are upgrading from an HA NameNode configuration, start all JournalNodes.
At each JournalNode host, run the following command:
su -l<HDFS_USER>-c "/usr/hdp/2.2.0.0-<$version>/hadoop/sbin/hadoop-daemon.sh start journalnode"where <HDFS_USER> is the HDFS Service user. For example, hdfs. -
Because the file system version has now changed, you must start the NameNode manually. On the active NameNode host, as the HDFS user,
su -l<HDFS_USER>-c "export HADOOP_LIBEXEC_DIR=/usr/hdp/2.2.0.0-<$version>/hadoop/libexec && /usr/hdp/2.2.0.0-<$version>/hadoop/sbin/hadoop-daemon.sh start namenode -upgrade"where <HDFS_USER> is the HDFS Service user. For example, hdfs.To check if the Upgrade is progressing, check that the "
\previous" directory has been created in\NameNodeand\JournalNodedirectories. The "\previous" directory contains a snapshot of the data before upgrade. -
Start all DataNodes.
At each DataNode, as the HDFS user,
su -l <HDFS_USER> -c "/usr/hdp/2.2.0.0-<$version>/hadoop/sbin/hadoop-daemon.sh --config /etc/hadoop/conf start datanode"where <HDFS_USER> is the HDFS Service user. For example, hdfs.
-
Update HDFS Configuration Properties for HDP 2.2
Using
Ambari Web UI > Services > HDFS > Configs > core-site.xml:-
Add
Name
Value
hadoop.http.authentication.simple.anonymous.allowed
true
Using Ambari Web UI > Services > HDFS > Configs > hdfs-site.xml:-
Add
Name
Value
dfs.namenode.startup.delay.block.deletion.sec
3600
-
Modify
Name
Value
dfs.datanode.max.transfer.threads
4096
-
-
Restart HDFS.
-
Open the Ambari Web GUI. If the browser in which Ambari is running has been open throughout the process, clear the browser cache, then refresh the browser.
-
Choose
Ambari Web > Services > HDFS > Service Actions > Restart All. -
Choose
Service Actions > Run Service Check. Makes sure the service check passes.
-
-
After the DataNodes are started, HDFS exits SafeMode. To monitor the status, run the following command, on each DataNode:
sudo su -l<HDFS_USER>-c "hdfs dfsadmin -safemode get"
where <HDFS_USER> is the HDFS Service user. For example, hdfs.
When HDFS exits SafeMode, the following message displays:Safe mode is OFF -
Make sure that the HDFS upgrade was successful. Optionally, repeat step 5 in Prepare the 2.1 Stack for Upgrade to create new versions of the logs and reports, substituting "-
new" for "-old" in the file names as necessary.-
Compare the old and new versions of the following log files:
-
dfs-old-fsck-1.logversusdfs-new-fsck-1.log.The files should be identical unless the hadoop fsck reporting format has changed in the new version.
-
dfs-old-lsr-1.logversusdfs-new-lsr-1.log.The files should be identical unless the format of hadoop fs -lsr reporting or the data structures have changed in the new version.
-
dfs-old-report-1.logversusfs-new-report-1.logMake sure that all DataNodes in the cluster before upgrading are up and running.
-
-
-
Upgrade Application Timeline Server (ATS) components for YARN.
-
If upgrading your HDP Stack version from 2.1.1 or 2.1.2, you must modify the following YARN configuration property:
Browse to
Ambari Web > Services > YARN Configs > Application Timeline Server, and set yarn.timeline-service.store-class=org.apache.hadoop.yarn.server.timeline.LeveldbTimelineStore -
If YARN is installed in your HDP 2.1 stack, and the ATS components are NOT, then you must create and install ATS service and host components using the API. Run the following commands on the server that will host the YARN ATS in your cluster. Be sure to replace <your_ATS_component_hostname> with a host name appropriate for your environment.
-
Create the ATS Service Component.
curl --user admin:admin -H "X-Requested-By: ambari" -i -X POST http://localhost:8080/api/v1/clusters/<your_cluster_name>/services/YARN/components/APP_TIMELINE_SERVER -
Create the ATS Host Component.
curl --user admin:admin -H "X-Requested-By: ambari" -i -X POST http://localhost:8080/api/v1/clusters/<your_cluster_name>/hosts/<your_ATS_component_hostname>/host_components/APP_TIMELINE_SERVER -
Install the ATS Host Component.
curl --user admin:admin -H "X-Requested-By: ambari" -i -X PUT -d '{"HostRoles": { "state": "INSTALLED"}}' http://localhost:8080/api/v1/clusters/<your_cluster_name>/hosts/<your_ATS_component_hostname>/host_components/APP_TIMELINE_SERVER
-
-
-
Prepare MR2 and Yarn for work. Execute HDFS commands on any host.
-
Create mapreduce dir in hdfs.
su -l<HDFS_USER>-c "hdfs dfs -mkdir -p /hdp/apps/2.2.0.0-<$version>/mapreduce/" -
Copy new mapreduce.tar.gz to HDFS mapreduce dir.
su -l<HDFS_USER>-c "hdfs dfs -copyFromLocal /usr/hdp/2.2.0.0-<$version>/hadoop/mapreduce.tar.gz /hdp/apps/2.2.0.0-<$version>/mapreduce/." -
Grant permissions for created mapreduce dir in hdfs.
su -l <HDFS_USER> -c "hdfs dfs -chown -R <HDFS_USER>:<HADOOP_GROUP> /hdp"; su -l <HDFS_USER> -c "hdfs dfs -chmod -R 555 /hdp/apps/2.2.0.0-<$version>/mapreduce"; su -l <HDFS_USER> -c "hdfs dfs -chmod -R 444 /hdp/apps/2.2.0.0-<$version>/mapreduce/mapreduce.tar.gz" -
Update YARN Configuration Properties for HDP 2.2
On ambari-server host,
cd /var/lib/ambari-server/resources/scripts-
then run the following scripts:
./configs.sh set localhost<your.cluster.name>capacity-scheduler "yarn.scheduler.capacity.resource-calculator" "org.apache.hadoop.yarn.util.resource.DefaultResourceCalculator"; ./configs.sh set localhost<your.cluster.name>capacity-scheduler "yarn.scheduler.capacity.root.accessible-node-labels" "*"; ./configs.sh set localhost<your.cluster.name>capacity-scheduler "yarn.scheduler.capacity.root.accessible-node-labels.default.capacity" "-1"; ./configs.sh set localhost<your.cluster.name>capacity-scheduler "yarn.scheduler.capacity.root.accessible-node-labels.default.maximum-capacity" "-1"; ./configs.sh set localhost<your.cluster.name>capacity-scheduler "yarn.scheduler.capacity.root.default-node-label-expression" ""
Using
Ambari Web UI>Service>Yarn>Configs>Advanced>yarn-site:-
Add
Name
Value
yarn.application.classpath
$HADOOP_CONF_DIR,/usr/hdp/current/hadoop-client/*, /usr/hdp/current/hadoop-client/lib/*, /usr/hdp/current/hadoop-hdfs-client/*, /usr/hdp/current/hadoop-hdfs-client/lib/*, /usr/hdp/current/hadoop-yarn-client/* ,/usr/hdp/current/hadoop-yarn-client/lib/*
hadoop.registry.zk.quorum
<!--List of hostname:port pairs defining the zookeeper quorum binding for the registry-->
hadoop.registry.rm.enabled
false
yarn.client.nodemanager-connect.max-wait-ms
900000
yarn.client.nodemanager-connect.retry-interval-ms
10000
yarn.node-labels.fs-store.retry-policy-spec
2000, 500
yarn.node-labels.fs-store.root-dir
/system/yarn/node-labels
yarn.node-labels.manager-class
org.apache.hadoop.yarn.server.resourcemanager.nodelabels.MemoryRMNodeLabelsManager
yarn.nodemanager.bind-host
0.0.0.0
yarn.nodemanager.disk-health-checker.max-disk-utilization-per-disk-percentage
90
yarn.nodemanager.disk-health-checker.min-free-space-per-disk-mb
1000
yarn.nodemanager.linux-container-executor.cgroups.hierarchy
hadoop-yarn
yarn.nodemanager.linux-container-executor.cgroups.mount
false
yarn.nodemanager.linux-container-executor.cgroups.strict-resource-usage
false
yarn.nodemanager.linux-container-executor.resources-handler.class
org.apache.hadoop.yarn.server.nodemanager.util.DefaultLCEResourcesHandler
yarn.nodemanager.log-aggregation.debug-enabled
false
yarn.nodemanager.log-aggregation.num-log-files-per-app
30
yarn.nodemanager.log-aggregation.roll-monitoring-interval-seconds
-1
yarn.nodemanager.recovery.dir
/var/log/hadoop-yarn/nodemanager/recovery-state
yarn.nodemanager.recovery.enabled
false
yarn.nodemanager.resource.cpu-vcores
1
yarn.nodemanager.resource.percentage-physical-cpu-limit
100
yarn.resourcemanager.bind-host
0.0.0.0
yarn.resourcemanager.connect.max-wait.ms
900000
yarn.resourcemanager.connect.retry-interval.ms
30000
yarn.resourcemanager.fs.state-store.retry-policy-spec
2000, 500
yarn.resourcemanager.fs.state-store.uri
<enter a "space" as the property value>
yarn.resourcemanager.ha.enabled
false
yarn.resourcemanager.recovery.enabled
false
yarn.resourcemanager.state-store.max-completed-applications
${yarn.resourcemanager.max-completed-applications}
yarn.resourcemanager.store.class
org.apache.hadoop.yarn.server.resourcemanager.recovery.ZKRMStateStore
yarn.resourcemanager.system-metrics-publisher.dispatcher.pool-size
10
yarn.resourcemanager.system-metrics-publisher.enabled
true
yarn.resourcemanager.webapp.delegation-token-auth-filter.enabled
false
yarn.resourcemanager.work-preserving-recovery.enabled
false
yarn.resourcemanager.work-preserving-recovery.scheduling-wait-ms
10000
yarn.resourcemanager.zk-acl
world:anyone:rwcda
yarn.resourcemanager.zk-address
localhost:2181
yarn.resourcemanager.zk-num-retries
1000
yarn.resourcemanager.zk-retry-interval-ms
1000
yarn.resourcemanager.zk-state-store.parent-path
/rmstore
yarn.resourcemanager.zk-timeout-ms
10000
yarn.timeline-service.bind-host
0.0.0.0
yarn.timeline-service.client.max-retries
30
yarn.timeline-service.client.retry-interval-ms
1000
yarn.timeline-service.http-authentication.simple.anonymous.allowed
true
yarn.timeline-service.http-authentication.type
simple
yarn.timeline-service.leveldb-timeline-store.read-cache-size
104857600
yarn.timeline-service.leveldb-timeline-store.start-time-read-cache-size
10000
yarn.timeline-service.leveldb-timeline-store.start-time-write-cache-size
10000
-
Modify
Name
Value
yarn.timeline-service.webapp.address
<PUT_THE_FQDN_OF_ATS_HOST_NAME_HERE>:8188
yarn.timeline-service.webapp.https.address
<PUT_THE_FQDN_OF_ATS_HOST_NAME_HERE>:8190
yarn.timeline-service.address
<PUT_THE_FQDN_OF_ATS_HOST_NAME_HERE>:10200
-
-
Update MapReduce2 Configuration Properties for HDP 2.2
Using
Ambari Web UI>Services > MapReduce2>Configs>mapred-site.xml:-
Add
Name
Value
mapreduce.job.emit-timeline-data
false
mapreduce.jobhistory.bind-host
0.0.0.0
mapreduce.reduce.shuffle.fetch.retry.enabled
1
mapreduce.reduce.shuffle.fetch.retry.interval-ms
1000
mapreduce.reduce.shuffle.fetch.retry.timeout-ms
30000
mapreduce.application.framework.path
/hdp/apps/${hdp.version}/mapreduce/mapreduce.tar.gz#mr-framework
-
Modify
Name
Value
mapreduce.admin.map.child.java.opts
-server -XX:NewRatio=8 -Djava.net.preferIPv4Stack=true -Dhdp.version=${hdp.version}
mapreduce.admin.reduce.child.java.opts
-server -XX:NewRatio=8 -Djava.net.preferIPv4Stack=true -Dhdp.version=${hdp.version}
yarn.app.mapreduce.am.admin-command-opts
-Dhdp.version=${hdp.version}
yarn.app.mapreduce.am.command-opts
-Xmx546m -Dhdp.version=${hdp.version}
mapreduce.application.classpath
$PWD/mr-framework/hadoop/share/hadoop/mapreduce/*: $PWD/mr-framework/hadoop/share/hadoop/mapreduce/lib/*: $PWD/mr-framework/hadoop/share/hadoop/common/*: $PWD/mr-framework/hadoop/share/hadoop/common/lib/*: $PWD/mr-framework/hadoop/share/hadoop/yarn/*: $PWD/mr-framework/hadoop/share/hadoop/yarn/lib/*: $PWD/mr-framework/hadoop/share/hadoop/hdfs/*: $PWD/mr-framework/hadoop/share/hadoop/hdfs/lib/*: /usr/hdp/${hdp.version}/hadoop/lib/hadoop-lzo-0.6.0.${hdp.version}.jar:/etc/hadoop/conf/secure$
mapreduce.admin.user.env
LD_LIBRARY_PATH=/usr/hdp/${hdp.version}/hadoop/lib/native:/usr/hdp/${hdp.version}/hadoop/lib/native/Linux-amd64-64
-
-
Update HBase Configuration Properties for HDP 2.2
Using
Ambari Web UI>Services>HBase>Configs>hbase-site.xml:-
Add
Name
Value
hbase.hregion.majorcompaction.jitter
0.50
-
Modify
Name
Value
hbase.hregion.majorcompaction
604800000
hbase.hregion.memstore.block.multiplier
4
-
Remove
Name
Value
hbase.hstore.flush.retries.number
120
-
-
Update Hive Configuration Properties for HDP 2.2
Using
Ambari Web UI>Services>Hive>Configs>hive-site.xml:-
Add
Name
Value
hive.cluster.delegation.token.store.zookeeper.connectString
<!-- The ZooKeeper token store connect string. -->
hive.auto.convert.sortmerge.join.to.mapjoin
false
hive.cbo.enable
true
hive.cli.print.header
false
hive.cluster.delegation.token.store.class
org.apache.hadoop.hive.thrift.ZooKeeperTokenStore
hive.cluster.delegation.token.store.zookeeper.znode
/hive/cluster/delegation
hive.conf.restricted.list
hive.security.authenticator.manager,hive.security.authorization.manager,hive.users.in.admin.role
hive.convert.join.bucket.mapjoin.tez
false
hive.exec.compress.intermediate
false
hive.exec.compress.output
false
hive.exec.dynamic.partition
true
hive.exec.dynamic.partition.mode
nonstrict
hive.exec.max.created.files
100000
hive.exec.max.dynamic.partitions
5000
hive.exec.max.dynamic.partitions.pernode
2000
hive.exec.orc.compression.strategy
SPEED
hive.exec.orc.default.compress
ZLIB
hive.exec.orc.default.stripe.size
67108864
hive.exec.parallel
false
hive.exec.parallel.thread.number
8
hive.exec.reducers.bytes.per.reducer
67108864
hive.exec.reducers.max
1009
hive.exec.scratchdir
/tmp/hive
hive.exec.submit.local.task.via.child
true
hive.exec.submitviachild
false
hive.fetch.task.aggr
false
hive.fetch.task.conversion
more
hive.fetch.task.conversion.threshold
1073741824
hive.map.aggr.hash.force.flush.memory.threshold
0.9
hive.map.aggr.hash.min.reduction
0.5
hive.map.aggr.hash.percentmemory
0.5
hive.mapjoin.optimized.hashtable
true
hive.merge.mapfiles
true
hive.merge.mapredfiles
false
hive.merge.orcfile.stripe.level
true
hive.merge.rcfile.block.level
true
hive.merge.size.per.task
256000000
hive.merge.smallfiles.avgsize
16000000
hive.merge.tezfiles
false
hive.metastore.authorization.storage.checks
false
hive.metastore.client.connect.retry.delay
5s
hive.metastore.connect.retries
24
hive.metastore.failure.retries
24
hive.metastore.server.max.threads
100000
hive.optimize.constant.propagation
true
hive.optimize.metadataonly
true
hive.optimize.null.scan
true
hive.optimize.sort.dynamic.partition
false
hive.orc.compute.splits.num.threads
10
hive.prewarm.enabled
false
hive.prewarm.numcontainers
10
hive.security.metastore.authenticator.manager
org.apache.hadoop.hive.ql.security.HadoopDefaultMetastoreAuthenticator
hive.security.metastore.authorization.auth.reads
true
hive.server2.allow.user.substitution
true
hive.server2.logging.operation.enabled
true
hive.server2.logging.operation.log.location
${system:java.io.tmpdir}/${system:user.name}/operation_logs
hive.server2.table.type.mapping
CLASSIC
hive.server2.thrift.http.path
cliservice
hive.server2.thrift.http.port
10001
hive.server2.thrift.max.worker.threads
500
hive.server2.thrift.sasl.qop
auth
hive.server2.transport.mode
binary
hive.server2.use.SSL
false
hive.smbjoin.cache.rows
10000
hive.stats.dbclass
fs
hive.stats.fetch.column.stats
false
hive.stats.fetch.partition.stats
true
hive.support.concurrency
false
hive.tez.auto.reducer.parallelism
false
hive.tez.cpu.vcores
-1
hive.tez.dynamic.partition.pruning
true
hive.tez.dynamic.partition.pruning.max.data.size
104857600
hive.tez.dynamic.partition.pruning.max.event.size
1048576
hive.tez.log.level
INFO
hive.tez.max.partition.factor
2.0
hive.tez.min.partition.factor
0.25
hive.tez.smb.number.waves
0.5
hive.user.install.directory
/user/
hive.vectorized.execution.reduce.enabled
false
hive.zookeeper.client.port
2181
hive.zookeeper.namespace
hive_zookeeper_namespace
hive.zookeeper.quorum
<!-- List of zookeeper server to talk to -->
-
Modify
Name
Value
hive.metastore.client.socket.timeout
1800s
hive.optimize.reducededuplication.min.reducer
4
hive.security.authorization.manager
org.apache.hadoop.hive.ql.security.authorization.plugin.sqlstd.SQLStdConfOnlyAuthorizerFactory
hive.security.metastore.authorization.manager
org.apache.hadoop.hive.ql.security.authorization.StorageBasedAuthorizationProvider, org.apache.hadoop.hive.ql.security.authorization.MetaStoreAuthzAPIAuthorizerEmbedOnly
hive.server2.support.dynamic.service.discovery
true
hive.vectorized.groupby.checkinterval
4096
fs.file.impl.disable.cache
true
fs.hdfs.impl.disable.cache
true
-
-
-
Using
Ambari Web>Services>Service Actions, start YARN. -
Using
Ambari Web>Services>Service Actions, start MapReduce2. -
Using
Ambari Web>Services>Service Actions, start HBase and ensure the service check passes. -
Using
Ambari Web>Services>Service Actions,start the Hive service. -
Upgrade Oozie.
-
Perform the following preparation steps on each Oozie server host:
-
Copy configurations from
oozie-conf-bakto the/etc/oozie/confdirectory on each Oozie server and client. -
Create
/usr/hdp/2.2.0.0-<$version>/oozie/libext-upgrade22directory.mkdir /usr/hdp/2.2.0.0-<$version>/oozie/libext-upgrade22 -
Copy the JDBC jar of your Oozie database to both
/usr/hdp/2.2.0.0-<$version>/oozie/libext-upgrade22and/usr/hdp/2.2.0.0-<$version>/oozie/libtools. For example, if you are using MySQL, copy yourmysql-connector-java.jar. -
Copy these files to
/usr/hdp/2.2.0.0-<$version>/oozie/libext-upgrade22directorycp /usr/hdp/2.2.0.0-<$version>/hadoop/lib/hadoop-lzo-*.jar /usr/hdp/2.2.0.0-<$version>/oozie/libext-upgrade22; cp /usr/share/HDP-oozie/ext-2.2.zip /usr/hdp/2.2.0.0-<$version>/oozie/libext-upgrade22; cp /usr/share/HDP-oozie/ext-2.2.zip /usr/hdp/2.2.0.0-<$version>/oozie/libext -
Grant read/write access to the Oozie user.
chmod -R 777 /usr/hdp/2.2.0.0-<$version>/oozie/libext-upgrade22
-
-
Upgrade steps:
-
On the Services view, make sure that YARN and MapReduce2 services are running.
-
Make sure that the Oozie service is stopped.
-
In
/etc/oozie/conf/oozie-env.sh, comment outCATALINA_BASEproperty, also do the same using Ambari Web UI inServices>Oozie>Configs>Advanced oozie-env. -
Upgrade Oozie. At the Oozie database host, as the Oozie service user:
sudo su -l<OOZIE_USER>-c"/usr/hdp/2.2.0.0-<$version>/oozie/bin/ooziedb.sh upgrade -run"where <OOZIE_USER> is the Oozie service user. For example, oozie.Make sure that the output contains the string "Oozie DB has been upgraded to Oozie version <OOZIE_Build_Version>.
-
Prepare the Oozie WAR file.
On the Oozie server, as the Oozie user
sudo su -l<OOZIE_USER>-c "/usr/hdp/2.2.0.0-<$version>/oozie/bin/oozie-setup.sh prepare-war -d /usr/hdp/2.2.0.0-<$version>/oozie/libext-upgrade22"where <OOZIE_USER> is the Oozie service user. For example, oozie.Make sure that the output contains the string "New Oozie WAR file added".
-
Using
Ambari Web, chooseServices>Oozie>Configs, expandoozie-log4j, then add the following property:log4j.appender.oozie.layout.ConversionPattern=%d{ISO8601} %5p %c{1}:%L - SERVER[${oozie.instance.id}] %m%n
where ${oozie.instance.id} is determined by Oozie, automatically. -
Using
Ambari Web>Services>Oozie>Configs,expandAdvanced oozie-site, then edit the following properties:-
In
oozie.service.coord.push.check.requeue.interval, replace the existing property value with the following one:30000 -
In
oozie.service.URIHandlerService.uri.handlers, append to the existing property value the following string, if is it is not already present:org.apache.oozie.dependency.FSURIHandler,org.apache.oozie.dependency.HCatURIHandler -
In
oozie.services, make sure all the following properties are present:org.apache.oozie.service.SchedulerService, org.apache.oozie.service.InstrumentationService, org.apache.oozie.service.MemoryLocksService, org.apache.oozie.service.UUIDService, org.apache.oozie.service.ELService, org.apache.oozie.service.AuthorizationService, org.apache.oozie.service.UserGroupInformationService, org.apache.oozie.service.HadoopAccessorService, org.apache.oozie.service.JobsConcurrencyService, org.apache.oozie.service.URIHandlerService, org.apache.oozie.service.DagXLogInfoService, org.apache.oozie.service.SchemaService, org.apache.oozie.service.LiteWorkflowAppService, org.apache.oozie.service.JPAService, org.apache.oozie.service.StoreService, org.apache.oozie.service.CoordinatorStoreService, org.apache.oozie.service.SLAStoreService, org.apache.oozie.service.DBLiteWorkflowStoreService, org.apache.oozie.service.CallbackService, org.apache.oozie.service.ActionService, org.apache.oozie.service.ShareLibService, org.apache.oozie.service.CallableQueueService, org.apache.oozie.service.ActionCheckerService, org.apache.oozie.service.RecoveryService, org.apache.oozie.service.PurgeService, org.apache.oozie.service.CoordinatorEngineService, org.apache.oozie.service.BundleEngineService, org.apache.oozie.service.DagEngineService, org.apache.oozie.service.CoordMaterializeTriggerService, org.apache.oozie.service.StatusTransitService, org.apache.oozie.service.PauseTransitService, org.apache.oozie.service.GroupsService, org.apache.oozie.service.ProxyUserService, org.apache.oozie.service.XLogStreamingService, org.apache.oozie.service.JvmPauseMonitorService -
Add the
oozie.service.AuthorizationService.security.enabledfalseSpecifies whether security (user name/admin role) is enabled or not. If disabled any user can manage Oozie system and manage any job.
-
Add the
oozie.service.HadoopAccessorService.kerberos.enabledfalseIndicates if Oozie is configured to use Kerberos.
-
In
oozie.services.ext, append to the existing property value the following string, if is it is not already present:org.apache.oozie.service.PartitionDependencyManagerService,org.apache.oozie.service.HCatAccessorService -
After modifying all properties on the Oozie Configs page, choose
Saveto updateoozie.site.xml, using the modified configurations.
-
-
Replace the content of
/usr/oozie/sharein HDFS.On the Oozie server host:
-
Extract the Oozie sharelib into a
tmpfolder.mkdir -p /tmp/oozie_tmp; cp /usr/hdp/2.2.0.0-<$version>/oozie/oozie-sharelib.tar.gz /tmp/oozie_tmp; cd /tmp/oozie_tmp; tar xzvf oozie-sharelib.tar.gz; -
Back up the
/user/oozie/sharefolder in HDFS and then delete it.If you have any custom files in this folder, back them up separately and then add them to the /share folder after updating it.
mkdir /tmp/oozie_tmp/oozie_share_backup;
                                    chmod 777 /tmp/oozie_tmp/oozie_share_backup;
su -l<HDFS_USER>-c "hdfs dfs -copyToLocal /user/oozie/share /tmp/oozie_tmp/oozie_share_backup"; su -l<HDFS_USER>-c "hdfs dfs -rm -r /user/oozie/share";where <HDFS_USER> is the HDFS service user. For example, hdfs. -
Add the latest share libs that you extracted in step 1. After you have added the files, modify ownership and acl.
su -l<HDFS_USER>-c "hdfs dfs -copyFromLocal /tmp/oozie_tmp/share /user/oozie/."; su -l<HDFS_USER>-c "hdfs dfs -chown -R <OOZIE_USER>:<HADOOP_GROUP> /user/oozie"; su -l<HDFS_USER>-c "hdfs dfs -chmod -R 755 /user/oozie";where <HDFS_USER> is the HDFS service user. For example, hdfs.
-
-
-
Update Oozie Configuration Properties for HDP 2.2
Using
Ambari Web UI > Services > Oozie > Configs > oozie-site.xml:-
Add
Name
Value
oozie.authentication.simple.anonymous.allowed
true
oozie.service.coord.check.maximum.frequency
false
oozie.service.HadoopAccessorService.kerberos.enabled
false
-
Modify
Name
Value
oozie.service.SchemaService.wf.ext.schemas
shell-action-0.1.xsd,shell-action-0.2.xsd,shell-action-0.3.xsd,email-action-0.1.xsd,email-action-0.2.xsd, hive-action-0.2.xsd,hive-action-0.3.xsd,hive-action-0.4.xsd,hive-action-0.5.xsd,sqoop-action-0.2.xsd, sqoop-action-0.3.xsd,sqoop-action-0.4.xsd,ssh-action-0.1.xsd,ssh-action-0.2.xsd,distcp-action-0.1.xsd, distcp-action-0.2.xsd,oozie-sla-0.1.xsd,oozie-sla-0.2.xsd
oozie.services.ext
org.apache.oozie.service.JMSAccessorService,org.apache.oozie.service.PartitionDependencyManagerService, org.apache.oozie.service.HCatAccessorService
-
-
-
Use the
Ambari Web UI>Servicesview to start the Oozie service.Make sure that ServiceCheck passes for Oozie.
-
Update WebHCat.
-
Modify the
webhcat-siteconfig type.Using
Ambari Web>Services>WebHCat, modify the following configuration:Action
Property Name
Property Value
Modify
templeton.storage.class
org.apache.hive.hcatalog.templeton.tool.ZooKeeperStorage
-
Expand
Advanced>webhcat-site.xml.Check if property
templeton.portexists. If not, then add it using the Custom webhcat-site panel. The default value for templeton.port = 50111. -
On each WebHCat host, update the Pig and Hive tar bundles, by updating the following files:
-
/apps/webhcat/pig.tar.gz -
/apps/webhcat/hive.tar.gz
- For example, to update a *.tar.gz file:
-
Move the file to a local directory.
su -l<HCAT_USER>-c "hadoop --config /etc/hadoop/conf fs -copyToLocal /apps/webhcat/*.tar.gz<local_backup_dir>" -
Remove the old file.
su -l<HCAT_USER>-c "hadoop --config /etc/hadoop/conf fs -rm /apps/webhcat/*.tar.gz" -
Copy the new file.
su -l <HCAT_USER> -c "hdfs --config /etc/hadoop/conf dfs -copyFromLocal /usr/hdp/2.2.0.0-<$version>/hive/hive.tar.gz /apps/webhcat/"; su -l <HCAT_USER> -c "hdfs --config /etc/hadoop/conf dfs -copyFromLocal /usr/hdp/2.2.0.0-<$version>/pig/pig.tar.gz /apps/webhcat/";where <HCAT_USER> is the HCatalog service user. For example, hcat.
-
-
On each WebHCat host, update
/app/webhcat/hadoop-streaming.jarfile.-
Move the file to a local directory.
su -l<HCAT_USER>-c "hadoop --config /etc/hadoop/conf fs -copyToLocal /apps/webhcat/hadoop-streaming*.jar <local_backup_dir>" -
Remove the old file.
su -l <HCAT_USER> -c "hadoop --config /etc/hadoop/conf fs -rm /apps/webhcat/hadoop-streaming*.jar" -
Copy the new hadoop-streaming.jar file.
su -l <HCAT_USER> -c "hdfs --config /etc/hadoop/conf dfs -copyFromLocal /usr/hdp/2.2.0.0-<$version>/hadoop-mapreduce/hadoop-streaming*.jar /apps/webhcat"where <HCAT_USER> is the HCatalog service user. For example, hcat.
-
-
-
If Tez was not installed during the upgrade, you must prepare Tez for work, using the following steps:
If you use Tez as the Hive execution engine, and if the variable hive.server2.enabled.doAs is set to true, you must create a scratch directory on the NameNode host for the username that will run the HiveServer2 service. If you installed Tez before upgrading the Stack, use the following commands:
sudo su -c "hdfs -makedir /tmp/hive-<username>" sudo su -c "hdfs -chmod 777 /tmp/hive-<username>"where <username> is the name of the user that runs the HiveServer2 service.-
Update Tez Configuration Properties for HDP 2.2
Using
Ambari Web UI>Services>Tez>Configs>tez-site.xml:-
Add
Name
Value
tez.am.container.idle.release-timeout-max.millis
20000
tez.am.container.idle.release-timeout-min.millis
10000
tez.am.launch.cluster-default.cmd-opts
-server -Djava.net.preferIPv4Stack=true -Dhdp.version=${hdp.version}
tez.am.launch.cmd-opts
-XX:+PrintGCDetails -verbose:gc -XX:+PrintGCTimeStamps -XX:+UseNUMA -XX:+UseParallelGC
tez.am.launch.env
LD_LIBRARY_PATH=/usr/hdp/${hdp.version}/hadoop/lib/native:/usr/hdp/${hdp.version}/hadoop/lib /native/Linux-amd64-64
tez.am.max.app.attempts
2
tez.am.maxtaskfailures.per.node
10
tez.cluster.additional.classpath.prefix
/usr/hdp/${hdp.version}/hadoop/lib/hadoop-lzo-0.6.0.${hdp.version}.jar:/etc/hadoop/conf/secure
tez.counters.max
2000
tez.counters.max.groups
1000
tez.generate.debug.artifacts
false
tez.grouping.max-size
1073741824
tez.grouping.min-size
16777216
tez.grouping.split-waves
1.7
tez.history.logging.service.class
org.apache.tez.dag.history.logging.ats.ATSHistoryLoggingService
tez.runtime.compress
true
tez.runtime.compress.codec
org.apache.hadoop.io.compress.SnappyCodec
tez.runtime.io.sort.mb
272
tez.runtime.unordered.output.buffer.size-mb
51
tez.shuffle-vertex-manager.max-src-fraction
0.4
tez.shuffle-vertex-manager.min-src-fraction
0.2
tez.task.am.heartbeat.counter.interval-ms.max
4000
tez.task.launch.cluster-default.cmd-opts
-server -Djava.net.preferIPv4Stack=true -Dhdp.version=${hdp.version}
tez.task.launch.cmd-opts
-XX:+PrintGCDetails -verbose:gc -XX:+PrintGCTimeStamps -XX:+UseNUMA -XX:+UseParallelGC
tez.task.launch.env
LD_LIBRARY_PATH=/usr/hdp/${hdp.version}/hadoop/lib/native:/usr/hdp/${hdp.version}/hadoop/lib /native/Linux-amd64-64
tez.task.max-events-per-heartbeat
500
tez.task.resource.memory.mb
682
-
Modify
Name
Value
tez.am.container.reuse.non-local-fallback.enabled
false
tez.am.resource.memory.mb
1364
tez.lib.uris
/hdp/apps/${hdp.version}/tez/tez.tar.gz
tez.session.client.timeout.secs
-1
-
Remove
Name
Value
tez.am.container.session.delay-allocation-millis
10000
tez.am.env
LD_LIBRARY_PATH=/usr/hdp/2.2.0.0-1947/hadoop/lib/native:/usr/hdp/2.2.0.0-1947/hadoop/lib/native/Linux-amd64-64
tez.am.grouping.max-size
1073741824
tez.am.grouping.min-size
16777216
tez.am.grouping.split-waves
1.4
tez.am.java.opt
-server -Xmx546m -Djava.net.preferIPv4Stack=true -XX:+UseNUMA -XX:+UseParallelGC
tez.am.shuffle-vertex-manager.max-src-fraction
0.4
tez.am.shuffle-vertex-manager.min-src-fraction
0.2
tez.runtime.intermediate-input.compress.codec
org.apache.hadoop.io.compress.SnappyCodec
tez.runtime.intermediate-input.is-compressed
false
tez.runtime.intermediate-output.compress.codec
org.apache.hadoop.io.compress.SnappyCodec
tez.runtime.intermediate-output.should-compress
false
tez.yarn.ats.enabled
true
-
-
Put Tez libraries in hdfs. Execute at any host:
su -l hdfs -c "hdfs dfs -mkdir -p /hdp/apps/2.2.0.0-<$version>/tez/"
su -l hdfs -c "hdfs dfs -copyFromLocal /usr/hdp/2.2.0.0-<$version>/tez/lib/tez.tar.gz /hdp/apps/2.2.0.0-<$version>/tez/."
su -l hdfs -c "hdfs dfs -chown -R <HDFS_USER>:<HADOOP_GROUP> /hdp" su -l hdfs -c "hdfs dfs -chmod -R 555 /hdp/apps/2.2.0.0-1899/tez" su -l hdfs -c "hdfs dfs -chmod -R 444 /hdp/apps/2.2.0.0-1899/tez/tez.tar.gz"
-
-
Prepare the Storm service properties.
-
Edit nimbus.childopts.
Using Ambari Web UI > Services > Storm > Configs > Nimbus > find nimbus.childopts. Update the path for the jmxetric-1.0.4.jar to: /usr/hdp/current/storm-nimbus/contrib/storm-jmxetric/lib/jmxetric-1.0.4.jar. If nimbus.childopts property value contains "-Djava.security.auth.login.config=/path/to/storm_jaas.conf", remove this text.
-
Edit supervisor.childopts.
Using Ambari Web UI > Services > Storm > Configs > Supervisor > find supervisor.childopts. Update the path for the jmxetric-1.0.4.jar to: /usr/hdp/current/storm-nimbus/contrib/storm-jmxetric/lib/jmxetric-1.0.4.jar. If supervisor.childopts property value contains "-Djava.security.auth.login.config=/etc/storm/conf/storm_jaas.conf", remove this text.
-
Edit worker.childopts.
Using Ambari Web UI > Services > Storm > Configs > Advanced > storm-site find worker.childopts. Update the path for the jmxetric-1.0.4.jar to: /usr/hdp/current/storm-nimbus/contrib/storm-jmxetric/lib/jmxetric-1.0.4.jar.
Check if the _storm.thrift.nonsecure.transport property exists. If not, add it, _storm.thrift.nonsecure.transport = backtype.storm.security.auth.SimpleTransportPlugin, using the Custom storm-site panel. -
Remove the
storm.local.dirfrom every host where the Storm component is installed.You can find this property in the Storm > Configs > General tab.
rm -rf<storm.local.dir> -
If you are planning to enable secure mode, navigate to
Ambari Web UI>Services>Storm>Configs>Advanced storm-siteand add the following property:_storm.thrift.secure.transport=backtype.storm.security.auth.kerberos.KerberosSaslTransportPlugin
-
-
Upgrade Pig.
Copy the the Pig configuration files to /etc/pig/conf.
cp /etc/pig/conf.dist/pig.properties.rpmsave /etc/pig/conf/pig.properties; cp /etc/pig/conf.dist/pig-env.sh /etc/pig/conf/; cp /etc/pig/conf.dist/log4j.properties.rpmsave /etc/pig/conf/log4j.properties -
Using
Ambari Web UI>Services>Storm, start the Storm service. -
Prepare the Falcon service properties:
-
Update Falcon Configuration Properties for HDP 2.2
Using
Ambari Web UI>Services>Falcon>Configs>falcon startup properties:-
Add
Name
Value
*.application.services
org.apache.falcon.security.AuthenticationInitializationService,\ org.apache.falcon.workflow.WorkflowJobEndNotificationService,\ org.apache.falcon.service.ProcessSubscriberService,\ org.apache.falcon.entity.store.ConfigurationStore,\ org.apache.falcon.rerun.service.RetryService,\ org.apache.falcon.rerun.service.LateRunService,\ org.apache.falcon.service.LogCleanupService
Using
Ambari Web UI>Services>Falcon>Configs>advanced falcon-startup:-
Add
Name
Value
*.dfs.namenode.kerberos.principal
nn/_HOST@EXAMPLE.COM
*.falcon.enableTLS
false
*.falcon.http.authentication.cookie.domain
EXAMPLE.COM
*.falcon.http.authentication.kerberos.keytab
/etc/security/keytabs/spnego.service.keytab
*.falcon.http.authentication.kerberos.principal
HTTP/_HOST@EXAMPLE.COM
*.falcon.security.authorization.admin.groups
falcon
*.falcon.security.authorization.admin.users
falcon,ambari-qa
*.falcon.security.authorization.enabled
false
*.falcon.security.authorization.provider
org.apache.falcon.security.DefaultAuthorizationProvider
*.falcon.security.authorization.superusergroup
falcon
*.falcon.service.authentication.kerberos.keytab
/etc/security/keytabs/falcon.service.keytab
*.falcon.service.authentication.kerberos.principal
falcon/_HOST@EXAMPLE.COM
*.journal.impl
org.apache.falcon.transaction.SharedFileSystemJournal
prism.application.services
org.apache.falcon.entity.store.ConfigurationStore
prism.configstore.listeners
org.apache.falcon.entity.v0.EntityGraph,\ org.apache.falcon.entity.ColoClusterRelation,\ org.apache.falcon.group.FeedGroupMap
-
-
-
Using
Ambari Web>Services>Service Actions, re-start all stopped services. -
The upgrade is now fully functional but not yet finalized. Using the
finalizecommand removes the previous version of the NameNode and DataNode storage directories.The upgrade must be finalized before another upgrade can be performed.
To finalize the upgrade, execute the following command once, on the primary NameNode host in your HDP cluster,
sudo su -l<HDFS_USER>-c "hdfs dfsadmin -finalizeUpgrade"where <HDFS_USER> is the HDFS service user. For example, hdfs.
Upgrading the HDP Stack from 2.0 to 2.2
The HDP Stack is the coordinated set of Hadoop components that you have installed
on hosts in your cluster. Your set of Hadoop components and hosts is unique to your
cluster. Before upgrading the Stack on your cluster, review all Hadoop services and
hosts in your cluster to confirm the location of Hadoop components. For example, use
the Hosts and Services views in Ambari Web, which summarize and list the components installed on each Ambari
host, to determine the components installed on each host. For more information about
using Ambari to view components in your cluster, see Working with Hosts, and Viewing Components on a Host.
Complete the following procedures to upgrade the Stack from version 2.0 to version 2.2 on your current, Ambari-installed-and-managed cluster.
In preparation for future HDP 2.2 releases to support rolling upgrades, the HDP RPM
package version naming convention has changed to include the HDP 2.2 product version
in file and directory names. HDP 2.2 marks the first release where HDP rpms, debs,
and directories contain versions in the names to permit side-by-side installations
of later HDP releases. To transition between previous releases and HDP 2.2, Hortonworks
provides hdp-select, a script that symlinks your directories to hdp/current and lets you maintain using the same binary and configuration paths that you were
using before.
The following instructions have you remove your old versions of HDP, install hdp-select,
and install HDP 2.2 to prepare for rolling upgrade.
Prepare the 2.0 Stack for Upgrade
To prepare for upgrading the HDP Stack, this section describes how to perform the following tasks:
-
Disable Security.
-
Checkpoint user metadata and capture the HDFS operational state. This step supports rollback and restore of the original state of HDFS data, if necessary.
-
Backup Hive and Oozie metastore databases. This step supports rollback and restore of the original state of Hive and Oozie data, if necessary.
-
Stop all HDP and Ambari services.
-
Make sure to finish all current jobs running on the system before upgrading the stack.
-
Use
Ambari Web>Services>Service Actions -
Stop any client programs that access HDFS.
Perform steps 3 through 8 on the NameNode host. In a highly-available NameNode configuration, execute the following procedure on the primary NameNode.
-
If HDFS is in a non-finalized state from a prior upgrade operation, you must finalize HDFS before upgrading further. Finalizing HDFS will remove all links to the metadata of the prior HDFS version - do this only if you do not want to rollback to that prior HDFS version.
On the NameNode host, as the HDFS user,
su -l<HDFS_USER>hdfs dfsadmin -finalizeUpgradewhere <HDFS_USER> is the HDFS Service user. For example, hdfs. -
Check the NameNode directory to ensure that there is no snapshot of any prior HDFS upgrade. Specifically, using
Ambari Web > HDFS > Configs > NameNode, examine the <$dfs.namenode.name.dir> or the <$dfs.name.dir> directory in the NameNode Directories property. Make sure that only a "\current" directory and no "\previous" directory exists on the NameNode host. -
Create the following logs and other files.
Creating these logs allows you to check the integrity of the file system, post-upgrade.
As the HDFS user,su -l<HDFS_USER>
where <HDFS_USER> is the HDFS Service user. For example, hdfs.-
Run
fsckwith the following flags and send the results to a log. The resulting file contains a complete block map of the file system. You use this log later to confirm the upgrade.hdfs fsck / -files -blocks -locations > dfs-old-fsck-1.log -
Optional: Capture the complete namespace of the filesystem. The following command does a recursive listing of the root file system:
hadoop dfs -ls -R / > dfs-old-lsr-1.log -
Create a list of all the DataNodes in the cluster.
hdfs dfsadmin -report > dfs-old-report-1.log -
Optional: Copy all unrecoverable data stored in HDFS to a local file system or to a backup instance of HDFS.
-
-
Save the namespace.
You must be the HDFS service user to do this and you must put the cluster in Safe Mode.
hdfs dfsadmin -safemode enterhdfs dfsadmin -saveNamespace -
Copy the checkpoint files located in <$dfs.name.dir/current> into a backup directory.
Find the directory, using Ambari Web > HDFS > Configs > NameNode > NameNode Directories on your primary NameNode host. -
Store the layoutVersion for the NameNode. Make a copy of the file at <dfs.name.dir>
/current/VERSIONwhere <dfs.name.dir> is the value of the config parameterNameNode directories. This file will be used later to verify that the layout version is upgraded. -
Stop HDFS.
-
Stop ZooKeeper.
-
Using
Ambari Web>Services> <service.name> >Summary, review each service and make sure that all services in the cluster are completely stopped. -
On the Hive Metastore database host, stop the Hive metastore service, if you have not done so already.
-
If you are upgrading Hive and Oozie, back up the Hive and Oozie metastore databases on the Hive and Oozie database host machines, respectively.
-
Optional - Back up the Hive Metastore database.
Hive Metastore Database Backup and Restore
Database Type
Backup
Restore
MySQL
mysqldump <dbname> > <outputfilename.sql> For example: mysqldump hive > /tmp/mydir/backup_hive.sql
mysql <dbname> < <inputfilename.sql> For example: mysql hive < /tmp/mydir/backup_hive.sql
Postgres
sudo -u <username> pg_dump <databasename> > <outputfilename.sql> For example: sudo -u postgres pg_dump hive > /tmp/mydir/backup_hive.sql
sudo -u <username> psql <databasename> < <inputfilename.sql> For example: sudo -u postgres psql hive < /tmp/mydir/backup_hive.sql
Oracle
Connect to the Oracle database using sqlplus export the database: exp username/password@database full=yes file=output_file.dmp
Import the database: imp username/password@database ile=input_file.dmp
-
Optional - Back up the Oozie Metastore database.
Oozie Metastore Database Backup and Restore
Database Type
Backup
Restore
MySQL
mysqldump <dbname> > <outputfilename.sql> For example: mysqldump oozie > /tmp/mydir/backup_oozie.sql
mysql <dbname> < <inputfilename.sql> For example: mysql oozie < /tmp/mydir/backup_oozie.sql
Postgres
sudo -u <username> pg_dump <databasename> > <outputfilename.sql> For example: sudo -u postgres pg_dump oozie > /tmp/mydir/backup_oozie.sql
sudo -u <username> psql <databasename> < <inputfilename.sql> For example: sudo -u postgres psql oozie < /tmp/mydir/backup_oozie.sql
-
-
On the Ambari Server host, stop Ambari Server and confirm that it is stopped.
ambari-server stopambari-server status -
Stop all Ambari Agents.
At every host in your cluster known to Ambari,
ambari-agent stop
Upgrade the 2.0 Stack to 2.2
-
Upgrade the HDP repository on all hosts and replace the old repository file with the new file:
-
For RHEL/CentOS/Oracle Linux 6:
wget -nv http://public-repo-1.hortonworks.com/HDP/centos6/2.x/GA/2.2.0.0/hdp.repo -O /etc/yum.repos.d/HDP.repo -
For SLES 11 SP3:
wget -nv http://public-repo-1.hortonworks.com/HDP/suse11sp3/2.x/GA/2.2.0.0/hdp.repo -O /etc/zypp/repos.d/HDP.repo -
For SLES 11 SP1:
wget -nv http://public-repo-1.hortonworks.com/HDP/sles11sp1/2.x/GA/2.2.0.0/hdp.repo -O /etc/zypp/repos.d/HDP.repo -
For UBUNTU:
wget -nv http://public-repo-1.hortonworks.com/HDP/ubuntu1/2.x/GA/2.2.0.0/hdp.list -O /etc/apt/sourceslist.d/HDP.list -
For RHEL/CentOS/Oracle Linux 5:
wget -nv http://public-repo-1.hortonworks.com/HDP/centos5/2.x/GA/2.2.0.0/hdp.repo -O /etc/yum.repos.d/HDP.repo
-
-
Update the Stack version in the Ambari Server database. On the Ambari Server host, use the following command to update the Stack version to HDP-2.2:
ambari-server upgradestack HDP-2.2 -
Back up the files in following directories on the Oozie server host and make sure that all files, including *site.xml files are copied.
mkdir oozie-conf-bak cp -R /etc/oozie/conf/* oozie-conf-bak -
Remove the old oozie directories on all Oozie server and client hosts.
-
rm -rf /etc/oozie/conf -
r
m -rf /usr/lib/oozie/ -
rm -rf /var/lib/oozie/
-
-
Upgrade the Stack on all Ambari Agent hosts.
-
For RHEL/CentOS/Oracle Linux:
-
On all hosts, clean the yum repository.
yum clean all -
Remove all components that you want to upgrade. At least, WebHCat, HCatlaog, and Oozie components. This command un-installs the HDP 2.0 component bits. It leaves the user data and metadata, but removes your configurations.
yum erase "hadoop*" "webhcat*" "hcatalog*" "oozie*" "pig*" "hdfs*" "sqoop*" "zookeeper*" "hbase*" "hive*" "phoenix*" "accumulo*" "mahout*" "hue*" "flume*" "hdp_mon_nagios_addons" -
Remove your old hdp.repo and hdp-utils repo files.
rm etc/yum/repos.d/hdp.repo hdp-utils.repo -
Install the following components:
yum install "hadoop_2_2_0_0_*" "zookeeper_2_2_0_0_*" "hive_2_2_0_0_*" "flume_2_2_0_0_*" "phoenix_2_2_0_0_*" "accumulo_2_2_0_0_*" "mahout_2_2_0_0_*" rpm -e --nodeps hue-shell yum install hue hue-common hue-beeswax hue-hcatalog hue-pig hue-oozie -
Verify that the components were upgraded.
yum list installed | grep HDP-<old-stack-version-number>Nothing should appear in the returned list.
-
-
For SLES:
-
On all hosts, clean the zypper repository.
zypper clean --all -
Remove WebHCat, HCatalog, and Oozie components. This command uninstalls the HDP 2.0 component bits. It leaves the user data and metadata, but removes your configurations.
zypper remove "hadoop*" "webhcat*" "hcatalog*" "oozie*" "pig*" "hdfs*" "sqoop*" "zookeeper*" "hbase*" "hive*" "phoenix*" "accumulo*" "mahout*" "hue*" "flume*" "hdp_mon_nagios_addons" -
Remove your old hdp.repo and hdp-utils repo files.
rm etc/zypp/repos.d/hdp.repo hdp-utils.repo -
Install the following components:
zypper install "hadoop\_2_2_0_0_*" "oozie\_2_2_0_0_*" "pig\_2_2_0_0_*" "sqoop\_2_2_0_0_*" "zookeeper\_2_2_0_0_*" "hbase\_2_2_0_0_*" "hive\_2_2_0_0_*" "flume\_2_2_0_0_*" "phoenix\_2_2_0_0_*" "accumulo\_2_2_0_0_*" "mahout\_2_2_0_0_*" rpm -e --nodeps hue-shell zypper install hue hue-common hue-beeswax hue-hcatalog hue-pig hue-oozie -
Verify that the components were upgraded.
rpm -qa | grep hadoop, && rpm -qa | grep hive && rpm -qa | grep hcatalogNo 2.0 components should appear in the returned list.
-
If components were not upgraded, upgrade them as follows:
yast --update hadoop hcatalog hive
-
-
-
Symlink directories, using
hdp-select.Check that the
hdp-selectpackage installed:rpm -qa | grep hdp-select
You should see:hdp-select-2.2.0.0-2041.el6.noarch
If not, then run:yum install hdp-select
Runhdp-selectas root, on every node. In/usr/bin:hdp-select set all 2.2.0.0-<$version> -
On the Hive Metastore database host, stop the Hive Metastore service, if you have not done so already. Make sure that the Hive Metastore database is running.
-
Upgrade the Hive metastore database schema from v12 to v14, using the following instructions:
-
Set java home:
export JAVA_HOME=/path/to/java -
Copy (rewrite) old Hive configurations to new conf dir:
cp -R /etc/hive/conf.server/* /etc/hive/conf/ -
Copy the jdbc connector to
/usr/hdp/<$version>/hive/lib, if it not there, yet. -
<HIVE_HOME>
/bin/schematool -upgradeSchema -dbType<databaseType>where <HIVE_HOME> is the Hive installation directory.
For example, on the Hive Metastore host:
/usr/hdp/2.2.0.0-<$version>/hive/bin/schematool -upgradeSchema -dbType <databaseType> where <$version> is the 2.2.0 build number and <databaseType> is derby, mysql, oracle, or postgres.
-
Complete the Upgrade of the 2.0 Stack to 2.2
-
Start Ambari Server.
On the Server host,
amber-server start -
Start all Ambari Agents.
On each Ambari Agent host,
ambari-agent start -
Update the repository Base URLs in the Ambari Server for the HDP 2.2 stack.
Browse to
Ambari Web>Admin>Repositories, then set the value of the HDP and HDP-UTILS repository Base URLs. For more information about viewing and editing repository Base URLs, see Viewing Cluster Stack Version and Repository URLs. -
Using the
Ambari Web UI > Services, start the ZooKeeper service. -
At all Datanode and Namenode hosts, copy (rewrite) old hdfs configurations to new conf directory:
cp /etc/hadoop/conf.empty/hdfs-site.xml.rpmsave /etc/hadoop/conf/hdfs-site.xml;cp /etc/hadoop/conf.empty/hadoop-env.sh.rpmsave /etc/hadoop/conf/hadoop-env.sh;cp /etc/hadoop/conf.empty/log4j.properties.rpmsave /etc/hadoop/conf/log4j.properties;cp /etc/hadoop/conf.empty/core-site.xml.rpmsave /etc/hadoop/conf/core-site.xml -
If you are upgrading from an HA NameNode configuration, start all JournalNodes.
On each JournalNode host, run the following command:
su -l<HDFS_USER>-c "/usr/hdp/2.2.0.0-<$version>/hadoop/sbin/hadoop-daemon.sh start journalnode"where <HDFS_USER> is the HDFS Service user. For example, hdfs. -
Because the file system version has now changed, you must start the NameNode manually.
On the active NameNode host, as the HDFS user:
su -l <HDFS_USER> -c "export HADOOP_LIBEXEC_DIR=/usr/hdp/2.2.0.0-<$version>/hadoop/libexec && /usr/hdp/2.2.0.0-<$version>/hadoop/sbin/hadoop-daemon.sh start namenode -upgrade"To check if the Upgrade is in progress, check that the "
\previous" directory has been created in \NameNode and \JournalNode directories. The "\previous" directory contains a snapshot of the data before upgrade. -
Start all DataNodes.
On each DataNode, as the HDFS user,
su -l <HDFS_USER> -c "/usr/hdp/2.2.0.0-<$version>/hadoop/sbin/hadoop-daemon.sh --config /etc/hadoop/conf start datanode"where <HDFS_USER> is the HDFS Service user. For example, hdfs.
-
Update HDFS Configuration Properties for HDP 2.2
Using
Ambari Web UI>Services>HDFS>Configs>core-site.xml:-
Add
Name
Value
hadoop.proxyuser.falcon.groups
users
hadoop.proxyuser.falcon.hosts
*
Using Ambari Web UI>Services>HDFS>Configs>hdfs-site.xml:-
Add
Name
Value
dfs.namenode.startup.delay.block.deletion.sec
3600
-
Modify
Name
Value
dfs.datanode.max.transfer.threads
4096
-
-
Restart HDFS.
-
Open the Ambari Web GUI. If the browser in which Ambari is running has been open throughout the process, clear the browser cache, then refresh the browser.
-
Choose
Ambari Web>Services>HDFS>Service Actions>Restart All. -
Choose
Service Actions>Run Service Check. Makes sure the service checks pass.
-
-
After the DataNodes are started, HDFS exits safe mode. Monitor the status, by running the following command, as the HDFS user:
sudo su -l<HDFS_USER>-c "hdfs dfsadmin -safemode get"When HDFS exits safe mode, the following message displays:
Safe mode is OFF -
Make sure that the HDFS upgrade was successful.
-
Compare the old and new versions of the following log files:
-
dfs-old-fsck-1.logversusdfs-new-fsck-1.log.The files should be identical unless the hadoop fsck reporting format has changed in the new version.
-
dfs-old-lsr-1.logversusdfs-new-lsr-1.log.The files should be identical unless the format of hadoop fs -lsr reporting or the data structures have changed in the new version.
-
dfs-old-report-1.logversusfs-new-report-1.log.Make sure that all DataNodes in the cluster before upgrading are up and running.
-
-
-
Update HBase Configuration Properties for HDP 2.2
Using
Ambari Web UI>Services>HBase>Configs>hbase-site.xml:-
Add
Name
Value
hbase.hregion.majorcompaction.jitter
0.50
-
Modify
Name
Value
hbase.hregion.majorcompaction
604800000
hbase.hregion.memstore.block.multiplier
4
-
Remove
Name
Value
hbase.hstore.flush.retries.number
120
-
-
Using Ambari Web, navigate to
Services>Hive>Configs>AdvancedHive (Advanced) hive.security.authorization.manager=org.apache.hadoop.hive.ql.security.authorization.StorageBasedAuthorizationProvider hive.security.metastore.authorization.manager=org.apache.hadoop.hive.ql.security.authorization.StorageBasedAuthorizationProvider hive.security.authenticator.manager=org.apache.hadoop.hive.ql.security.ProxyUserAuthenticator -
Update Hive Configuration Properties for HDP 2.2
Using
Ambari Web UI>Services>Hive>Configs>hive-site.xml:-
Add
Name
Value
hive.cluster.delegation.token.store.zookeeper.connectString
<!-- The ZooKeeper token store connect string. -->
datanucleus.cache.level2.type
none
hive.auto.convert.sortmerge.join.to.mapjoin
false
hive.cbo.enable
true
hive.cli.print.header
false
hive.cluster.delegation.token.store.class
org.apache.hadoop.hive.thrift.ZooKeeperTokenStore
hive.cluster.delegation.token.store.zookeeper.znode
/hive/cluster/delegation
hive.compactor.abortedtxn.threshold
1000
hive.compactor.check.interval
300L
hive.compactor.delta.num.threshold
10
hive.compactor.delta.pct.threshold
0.1f
hive.compactor.initiator.on
false
hive.compactor.worker.threads
0
hive.compactor.worker.timeout
86400L
hive.compute.query.using.stats
true
hive.conf.restricted.list
hive.security.authenticator.manager,hive.security.authorization.manager,hive.users.in.admin.role
hive.convert.join.bucket.mapjoin.tez
false
hive.enforce.sortmergebucketmapjoin
true
hive.exec.compress.intermediate
false
hive.exec.compress.output
false
hive.exec.dynamic.partition
true
hive.exec.dynamic.partition.mode
nonstrict
hive.exec.max.created.files
100000
hive.exec.max.dynamic.partitions
5000
hive.exec.max.dynamic.partitions.pernode
2000
hive.exec.orc.compression.strategy
SPEED
hive.exec.orc.default.compress
ZLIB
hive.exec.orc.default.stripe.size
67108864
hive.exec.parallel
false
hive.exec.parallel.thread.number
8
hive.exec.reducers.bytes.per.reducer
67108864
hive.exec.reducers.max
1009
hive.exec.scratchdir
/tmp/hive
hive.exec.submit.local.task.via.child
true
hive.exec.submitviachild
false
hive.fetch.task.aggr
false
hive.fetch.task.conversion
more
hive.fetch.task.conversion.threshold
1073741824
hive.limit.optimize.enable
true
hive.limit.pushdown.memory.usage
0.04
hive.map.aggr.hash.force.flush.memory.threshold
0.9
hive.map.aggr.hash.min.reduction
0.5
hive.map.aggr.hash.percentmemory
0.5
hive.mapjoin.optimized.hashtable
true
hive.merge.mapfiles
true
hive.merge.mapredfiles
false
hive.merge.orcfile.stripe.level
true
hive.merge.rcfile.block.level
true
hive.merge.size.per.task
256000000
hive.merge.smallfiles.avgsize
16000000
hive.merge.tezfiles
false
hive.metastore.authorization.storage.checks
false
hive.metastore.client.connect.retry.delay
5s
hive.metastore.connect.retries
24
hive.metastore.failure.retries
24
hive.metastore.kerberos.keytab.file
/etc/security/keytabs/hive.service.keytab
hive.metastore.kerberos.principal
hive/_HOST@EXAMPLE.COM
hive.metastore.server.max.threads
100000
hive.optimize.constant.propagation
true
hive.optimize.metadataonly
true
hive.optimize.null.scan
true
hive.optimize.sort.dynamic.partition
false
hive.orc.compute.splits.num.threads
10
hive.orc.splits.include.file.footer
false
hive.prewarm.enabled
false
hive.prewarm.numcontainers
10
hive.security.metastore.authenticator.manager
org.apache.hadoop.hive.ql.security.HadoopDefaultMetastoreAuthenticator
hive.security.metastore.authorization.auth.reads
true
hive.server2.allow.user.substitution
true
hive.server2.authentication.spnego.keytab
HTTP/_HOST@EXAMPLE.COM
hive.server2.authentication.spnego.principal
/etc/security/keytabs/spnego.service.keytab
hive.server2.logging.operation.enabled
true
hive.server2.logging.operation.log.location
${system:java.io.tmpdir}/${system:user.name}/operation_logs
hive.server2.table.type.mapping
CLASSIC
hive.server2.tez.default.queues
default
hive.server2.tez.sessions.per.default.queue
1
hive.server2.thrift.http.path
cliservice
hive.server2.thrift.http.port
10001
hive.server2.thrift.max.worker.threads
500
hive.server2.thrift.sasl.qop
auth
hive.server2.transport.mode
binary
hive.server2.use.SSL
false
hive.smbjoin.cache.rows
10000
hive.stats.autogather
true
hive.stats.dbclass
fs
hive.stats.fetch.column.stats
false
hive.stats.fetch.partition.stats
true
hive.support.concurrency
false
hive.tez.auto.reducer.parallelism
false
hive.tez.cpu.vcores
-1
hive.tez.dynamic.partition.pruning
true
hive.tez.dynamic.partition.pruning.max.data.size
104857600
hive.tez.dynamic.partition.pruning.max.event.size
1048576
hive.tez.input.format
org.apache.hadoop.hive.ql.io.HiveInputFormat
hive.tez.log.level
INFO
hive.tez.max.partition.factor
2.0
hive.tez.min.partition.factor
0.25
hive.tez.smb.number.waves
0.5
hive.txn.manager
org.apache.hadoop.hive.ql.lockmgr.DummyTxnManager
hive.txn.max.open.batch
1000
hive.txn.timeout
300
hive.user.install.directory
/user/
hive.vectorized.execution.reduce.enabled
false
hive.vectorized.groupby.checkinterval
4096
hive.vectorized.groupby.flush.percent
0.1
hive.vectorized.groupby.maxentries
100000
hive.zookeeper.client.port
2181
hive.zookeeper.namespace
hive_zookeeper_namespace
hive.zookeeper.quorum
<!-- List of zookeeper server to talk to -->
-
Modify
Name
Value
hive.auto.convert.join.noconditionaltask.size
238026752
hive.metastore.client.socket.timeout
1800s
hive.optimize.reducededuplication.min.reducer
4
hive.security.authorization.manager
org.apache.hadoop.hive.ql.security.authorization.plugin.sqlstd.SQLStdConfOnlyAuthorizerFactory
hive.security.metastore.authorization.manager
org.apache.hadoop.hive.ql.security.authorization.StorageBasedAuthorizationProvider,org.apache.hadoop.hive.ql.security.authorization.MetaStoreAuthzAPIAuthorizerEmbedOnly
hive.server2.support.dynamic.service.discovery
true
hive.tez.container.size
682
hive.tez.java.opts
-server -Xmx546m -Djava.net.preferIPv4Stack=true -XX:NewRatio=8 -XX:+UseNUMA -XX:+UseParallelGC -XX:+PrintGCDetails -verbose:gc -XX:+PrintGCTimeStamps
fs.file.impl.disable.cache
true
fs.hdfs.impl.disable.cache
true
-
-
If YARN is installed in your HDP 2.0 stack, and the Application Timeline Server (ATS) components are NOT, then you must create and install ATS service and host components via API by running the following commands on the server that will host the YARN application timeline server in your cluster. Be sure to replace <your_ATS_component_hostname> with a host name appropriate for your envrionment.
-
Create the ATS Service Component.
curl --user admin:admin -H "X-Requested-By: ambari" -i -X POST http://localhost:8080/api/v1/clusters/<your_cluster_name>/services/YARN/components/APP_TIMELINE_SERVER -
Create the ATS Host Component.
curl --user admin:admin -H "X-Requested-By: ambari" -i -X POST http://localhost:8080/api/v1/clusters/<your_cluster_name>/hosts/<your_ATS_component_hostname>/host_components/APP_TIMELINE_SERVER -
Install the ATS Host Component.
curl --user admin:admin -H "X-Requested-By: ambari" -i -X PUT -d '{ "HostRoles": { "state": "INSTALLED"}}' http://localhost:8080/api/v1/clusters/<your_cluster_name>/hosts/<your_ATS_component_hostname>/host_components/APP_TIMELINE_SERVER
-
-
Make the following config changes required for Application Timeline Server. Use the Ambari web UI to navigate to the service dashboard and add/modify the following configurations:
YARN (Custom yarn-site.xml)
yarn.timeline-service.leveldb-timeline-store.path=/var/log/hadoop-yarn/timeline
yarn.timeline-service.leveldb-timeline-store.ttl-interval-ms=300000
yarn.timeline-service.store-class=org.apache.hadoop.yarn.server.timeline.LeveldbTimelineStore
yarn.timeline-service.ttl-enable=true
yarn.timeline-service.ttl-ms=2678400000
yarn.timeline-service.generic-application-history.store-class=org.apache.hadoop.yarn.server.applicationhistoryservice.NullApplicationHistoryStore
yarn.timeline-service.webapp.address=<PUT_THE_FQDN_OF_ATS_HOST_NAME_HERE>:8188
yarn.timeline-service.webapp.https.address=<PUT_THE_FQDN_OF_ATS_HOST_NAME_HERE>:8190
yarn.timeline-service.address=<PUT_THE_FQDN_OF_ATS_HOST_NAME_HERE>:10200
HIVE (hive-site.xml) hive.execution.engine=mr hive.exec.failure.hooks=org.apache.hadoop.hive.ql.hooks.ATSHook hive.exec.post.hooks=org.apache.hadoop.hive.ql.hooks.ATSHook hive.exec.pre.hooks=org.apache.hadoop.hive.ql.hooks.ATSHook hive.tez.container.size=<map-container-size>*If mapreduce.map.memory.mb > 2GB then set it equal to mapreduce.map.memory. Otherwise, set it equal tomapreduce.reduce.memory.mb* hive.tez.java.opts="-server -Xmx" + Math.round(0.8 * map-container-size) + "m -Djava.net.preferIPv4Stack=true -XX:NewRatio=8 -XX:+UseNUMA -XX:+UseParallelGC" -
Prepare MR2 and Yarn for work. Execute hdfs commands on any host.
-
Create mapreduce dir in hdfs.
su -l<HDFS_USER>-c "hdfs dfs -mkdir -p /hdp/apps/2.2.0.0-<$version>/mapreduce/" -
Copy new mapreduce.tar.gz to hdfs mapreduce dir.
su -l <HDFS_USER> -c "hdfs dfs -copyFromLocal /usr/hdp/2.2.0.0-<$version>/hadoop/mapreduce.tar.gz /hdp/apps/2.2.0.0-<$version>/mapreduce/." -
Grant permissions for created mapreduce dir in hdfs.
su -l <HDFS_USER> -c "hdfs dfs -chown -R <HDFS_USER>:<HADOOP_GROUP> /hdp"; su -l <HDFS_USER> -c "hdfs dfs -chmod -R 555 /hdp/apps/2.2.0.0-<$version>/mapreduce"; su -l <HDFS_USER> -c "hdfs dfs -chmod -R 444 /hdp/apps/2.2.0.0-<$version>/mapreduce/mapreduce.tar.gz" -
Using
Ambari Web UI>Service>Mapreduce2>Configs>Advanced>mapred-site:-
Add
Name
Value
mapreduce.job.emit-timeline-data
false
mapreduce.jobhistory.bind-host
0.0.0.0
mapreduce.reduce.shuffle.fetch.retry.enabled
1
mapreduce.reduce.shuffle.fetch.retry.interval-ms
1000
mapreduce.reduce.shuffle.fetch.retry.timeout-ms
30000
-
Modify
Name
Value
mapreduce.admin.map.child.java.opts
-server -XX:NewRatio=8 -Djava.net.preferIPv4Stack=true -Dhdp.version=${hdp.version}
mapreduce.admin.reduce.child.java.opts
-server -XX:NewRatio=8 -Djava.net.preferIPv4Stack=true -Dhdp.version=${hdp.version}
mapreduce.map.java.opts
-Xmx546m
mapreduce.map.memory.mb
682
mapreduce.reduce.java.opts
-Xmx546m
mapreduce.task.io.sort.mb
273
yarn.app.mapreduce.am.admin-command-opts
-Dhdp.version=${hdp.version}
yarn.app.mapreduce.am.command-opts
-Xmx546m -Dhdp.version=${hdp.version}
yarn.app.mapreduce.am.resource.mb
682
mapreduce.application.framework.path
/hdp/apps/${hdp.version}/mapreduce/mapreduce.tar.gz#mr-framework
mapreduce.application.classpath
$PWD/mr-framework/hadoop/share/hadoop/mapreduce/*:$PWD/mr-framework/hadoop/share/hadoop/mapreduce/lib/*:$PWD/mr-framework/hadoop/share/hadoop/common/*:$PWD/mr-framework/hadoop/share/hadoop/common/lib/*:$PWD/mr-framework/hadoop/share/hadoop/yarn/*:$PWD/mr-framework/hadoop/share/hadoop/yarn/lib/*:$PWD/mr-framework/hadoop/share/hadoop/hdfs/*:$PWD/mr-framework/hadoop/share/hadoop/hdfs/lib/*:/usr/hdp/${hdp.version}/hadoop/lib/hadoop-lzo-0.6.0.${hdp.version}.jar:/etc/hadoop/conf/secure
mapreduce.admin.user.env
LD_LIBRARY_PATH=/usr/hdp/${hdp.version}/hadoop/lib/native:/usr/hdp/${hdp.version}/hadoop/lib/native/Linux-amd64-64
-
-
Using
Ambari Web UI>Service>Yarn>Configs>Advanced>yarn-site. Add/modify the following property:Name
Value
hadoop.registry.zk.quorum
<!--List of hostname:port pairs defining the zookeeper quorum binding for the registry-->
hadoop.registry.rm.enabled
false
yarn.client.nodemanager-connect.max-wait-ms
900000
yarn.client.nodemanager-connect.retry-interval-ms
10000
yarn.node-labels.fs-store.retry-policy-spec
2000, 500
yarn.node-labels.fs-store.root-dir
/system/yarn/node-labels
yarn.node-labels.manager-class
org.apache.hadoop.yarn.server.resourcemanager.nodelabels.MemoryRMNodeLabelsManager
yarn.nodemanager.bind-host
0.0.0.0
yarn.nodemanager.disk-health-checker.max-disk-utilization-per-disk-percentage
90
yarn.nodemanager.disk-health-checker.min-free-space-per-disk-mb
1000
yarn.nodemanager.linux-container-executor.cgroups.hierarchy
hadoop-yarn
yarn.nodemanager.linux-container-executor.cgroups.mount
false
yarn.nodemanager.linux-container-executor.cgroups.strict-resource-usage
false
yarn.nodemanager.linux-container-executor.resources-handler.class
org.apache.hadoop.yarn.server.nodemanager.util.DefaultLCEResourcesHandler
yarn.nodemanager.log-aggregation.debug-enabled
false
yarn.nodemanager.log-aggregation.num-log-files-per-app
30
yarn.nodemanager.log-aggregation.roll-monitoring-interval-seconds
-1
yarn.nodemanager.recovery.dir
/var/log/hadoop-yarn/nodemanager/recovery-state
yarn.nodemanager.recovery.enabled
false
yarn.nodemanager.resource.cpu-vcores
1
yarn.nodemanager.resource.percentage-physical-cpu-limit
100
yarn.resourcemanager.bind-host
0.0.0.0
yarn.resourcemanager.connect.max-wait.ms
900000
yarn.resourcemanager.connect.retry-interval.ms
30000
yarn.resourcemanager.fs.state-store.retry-policy-spec
2000, 500
yarn.resourcemanager.fs.state-store.uri
<enter a "space" as the property value>
yarn.resourcemanager.ha.enabled
false
yarn.resourcemanager.recovery.enabled
false
yarn.resourcemanager.state-store.max-completed-applications
${yarn.resourcemanager.max-completed-applications}
yarn.resourcemanager.store.class
org.apache.hadoop.yarn.server.resourcemanager.recovery.ZKRMStateStore
yarn.resourcemanager.system-metrics-publisher.dispatcher.pool-size
10
yarn.resourcemanager.system-metrics-publisher.enabled
true
yarn.resourcemanager.webapp.delegation-token-auth-filter.enabled
false
yarn.resourcemanager.work-preserving-recovery.enabled
false
yarn.resourcemanager.work-preserving-recovery.scheduling-wait-ms
10000
yarn.resourcemanager.zk-acl
world:anyone:rwcda
yarn.resourcemanager.zk-address
localhost:2181
yarn.resourcemanager.zk-num-retries
1000
yarn.resourcemanager.zk-retry-interval-ms
1000
yarn.resourcemanager.zk-state-store.parent-path
/rmstore
yarn.resourcemanager.zk-timeout-ms
10000
yarn.timeline-service.bind-host
0.0.0.0
yarn.timeline-service.client.max-retries
30
yarn.timeline-service.client.retry-interval-ms
1000
yarn.timeline-service.enabled
true
yarn.timeline-service.http-authentication.simple.anonymous.allowed
true
yarn.timeline-service.http-authentication.type
simple
yarn.timeline-service.leveldb-timeline-store.read-cache-size
104857600
yarn.timeline-service.leveldb-timeline-store.start-time-read-cache-size
10000
yarn.timeline-service.leveldb-timeline-store.start-time-write-cache-size
10000
-
-
Using
Ambari Web>Services>Service Actions, start YARN. -
Using
Ambari Web>Services>Service Actions, start MapReduce2. -
Using
Ambari Web>Services>Service Actions,start HBase and ensure the service check passes. -
Using
Ambari Web>Services>Service Actions,start the Hive service. -
Upgrade Oozie.
-
Perform the following preparation steps on each Oozie server host:
-
Copy configurations from
oozie-conf-bakto the/etc/oozie/confdirectory on each Oozie server and client. -
Create
/usr/hdp/2.2.0.0-<$version>/oozie/libext-upgrade22directory.mkdir /usr/hdp/2.2.0.0-<$version>/oozie/libext-upgrade22 -
Copy the JDBC jar of your Oozie database to both
/usr/hdp/2.2.0.0-<$version>/oozie/libext-upgrade22and/usr/hdp/2.2.0.0-<$version>/oozie/libtools. For example, if you are using MySQL, copy yourmysql-connector-java.jar. -
Copy these files to
/usr/hdp/2.2.0.0-<$version>/oozie/libext-upgrade22directorycp /usr/lib/hadoop/lib/hadoop-lzo*.jar /usr/hdp/2.2.0.0-<$version>/oozie/libext-upgrade22; cp /usr/share/HDP-oozie/ext-2.2.zip /usr/hdp/2.2.0.0-<$version>/oozie/libext-upgrade22; cp /usr/share/HDP-oozie/ext-2.2.zip /usr/hdp/2.2.0.0-<$version>/oozie/libext -
Grant read/write access to the Oozie user.
chmod -R 777 /usr/hdp/2.2.0.0-<$version>/oozie/libext-upgrade22
-
-
Upgrade steps:
-
On the Services view, make sure that YARN and MapReduce2 services are running.
-
Make sure that the Oozie service is stopped.
-
In
oozie-env.sh, comment outCATALINA_BASEproperty, also do the same using Ambari Web UI inServices>Oozie>Configs>Advanced oozie-env. -
Upgrade Oozie.
At the Oozie server host, as the Oozie service user:
sudo su -l<OOZIE_USER>-c"/usr/hdp/2.2.0.0-<$version>/oozie/bin/ooziedb.sh upgrade -run"where <OOZIE_USER> is the Oozie service user. For example, oozie.Make sure that the output contains the string "Oozie DB has been upgraded to Oozie version <OOZIE_Build_Version>.
-
Prepare the Oozie WAR file.
At the Oozie server, as the Oozie user
sudo su -l<OOZIE_USER>-c "/usr/hdp/2.2.0.0-<$version>/oozie/bin/oozie-setup.sh prepare-war -d /usr/hdp/2.2.0.0-<$version>/oozie/libext-upgrade22"where <OOZIE_USER> is the Oozie service user. For example, oozie.Make sure that the output contains the string "New Oozie WAR file added".
-
Using
Ambari Web, chooseServices > Oozie > Configs, expand oozie-log4j, then add the following property:log4j.appender.oozie.layout.ConversionPattern=%d{ISO8601} %5p %c{1}:%L - SERVER[${oozie.instance.id}] %m%nwhere ${oozie.instance.id} is determined by oozie, automatically. -
Using Ambari Web, choose
Services>Oozie>Configs,expandAdvanced oozie-site, then edit the following properties:-
In
oozie.service.coord.push.check.requeue.interval, replace the existing property value with the following one:30000 -
In
oozie.service.SchemaService.wf.ext.schemas, append (using copy/paste) to the existing property value the following string, if is it is not already present:shell-action-0.1.xsd,shell-action-0.2.xsd,shell-action-0.3.xsd,email-action-0.1.xsd,email-action-0.2.xsd,hive-action-0.2.xsd,hive-action-0.3.xsd,hive-action-0.4.xsd,hive-action-0.5.xsd,sqoop-action-0.2.xsd,sqoop-action-0.3.xsd,sqoop-action-0.4.xsd,ssh-action-0.1.xsd,ssh-action-0.2.xsd,distcp-action-0.1.xsd,distcp-action-0.2.xsd,oozie-sla-0.1.xsd,oozie-sla-0.2.xsd -
In
oozie.service.URIHandlerService.uri.handlers, append to the existing property value the following string, if is it is not already present:org.apache.oozie.dependency.FSURIHandler,org.apache.oozie.dependency.HCatURIHandler -
In
oozie.services, make sure all the following properties are present:org.apache.oozie.service.SchedulerService, org.apache.oozie.service.InstrumentationService, org.apache.oozie.service.MemoryLocksService, org.apache.oozie.service.UUIDService, org.apache.oozie.service.ELService, org.apache.oozie.service.AuthorizationService, org.apache.oozie.service.UserGroupInformationService, org.apache.oozie.service.HadoopAccessorService, org.apache.oozie.service.JobsConcurrencyService, org.apache.oozie.service.URIHandlerService, org.apache.oozie.service.DagXLogInfoService, org.apache.oozie.service.SchemaService, org.apache.oozie.service.LiteWorkflowAppService, org.apache.oozie.service.JPAService, org.apache.oozie.service.StoreService, org.apache.oozie.service.CoordinatorStoreService, org.apache.oozie.service.SLAStoreService, org.apache.oozie.service.DBLiteWorkflowStoreService, org.apache.oozie.service.CallbackService, org.apache.oozie.service.ActionService, org.apache.oozie.service.ShareLibService, org.apache.oozie.service.CallableQueueService, org.apache.oozie.service.ActionCheckerService, org.apache.oozie.service.RecoveryService, org.apache.oozie.service.PurgeService, org.apache.oozie.service.CoordinatorEngineService, org.apache.oozie.service.BundleEngineService, org.apache.oozie.service.DagEngineService, org.apache.oozie.service.CoordMaterializeTriggerService, org.apache.oozie.service.StatusTransitService, org.apache.oozie.service.PauseTransitService, org.apache.oozie.service.GroupsService, org.apache.oozie.service.ProxyUserService, org.apache.oozie.service.XLogStreamingService, org.apache.oozie.service.JvmPauseMonitorService -
Add the
oozie.services.coord.check.maximum.frequencyproperty with the following property value:falseIf you set this property to true, Oozie rejects any coordinators with a frequency faster than 5 minutes. It is not recommended to disable this check or submit coordinators with frequencies faster than 5 minutes: doing so can cause unintended behavior and additional system stress.
-
Add the
oozie.service.AuthorizationService.security.enabledfalse
Specifies whether security (user name/admin role) is enabled or not. If disabled any user can manage Oozie system and manage any job. -
Add the
oozie.service.HadoopAccessorService.kerberos.enabledfalseIndicates if Oozie is configured to use Kerberos.
-
Add the
oozie.authentication.simple.anonymous.allowedtrue
Indicates if anonymous requests are allowed. This setting is meaningful only when using 'simple' authentication. -
In
oozie.services.ext, append to the existing property value the following string, if is it is not already present:org.apache.oozie.service.PartitionDependencyManagerService,org.apache.oozie.service.HCatAccessorService -
Update Oozie Configuration Properties for HDP 2.2
Using
Ambari Web UI > Services > Oozie > Configs > oozie-site.xml:-
Add
Name
Value
oozie.authentication.simple.anonymous.allowed
true
oozie.service.coord.check.maximum.frequency
false
oozie.service.ELService.ext.functions.coord-action-create
now=org.apache.oozie.extensions.OozieELExtensions#ph2_now,
today=org.apache.oozie.extensions.OozieELExtensions#ph2_today,
yesterday=org.apache.oozie.extensions.OozieELExtensions#ph2_yesterday,
currentMonth=org.apache.oozie.extensions.OozieELExtensions#ph2_currentMonth,
lastMonth=org.apache.oozie.extensions.OozieELExtensions#ph2_lastMonth,
currentYear=org.apache.oozie.extensions.OozieELExtensions#ph2_currentYear,
lastYear=org.apache.oozie.extensions.OozieELExtensions#ph2_lastYear,
latest=org.apache.oozie.coord.CoordELFunctions#ph2_coord_latest_echo,
future=org.apache.oozie.coord.CoordELFunctions#ph2_coord_future_echo,
formatTime=org.apache.oozie.coord.CoordELFunctions#ph2_coord_formatTime,
user=org.apache.oozie.coord.CoordELFunctions#coord_user
oozie.service.ELService.ext.functions.coord-action-create-inst
now=org.apache.oozie.extensions.OozieELExtensions#ph2_now_inst,
today=org.apache.oozie.extensions.OozieELExtensions#ph2_today_inst,
yesterday=org.apache.oozie.extensions.OozieELExtensions#ph2_yesterday_inst,
currentMonth=org.apache.oozie.extensions.OozieELExtensions#ph2_currentMonth_inst,
lastMonth=org.apache.oozie.extensions.OozieELExtensions#ph2_lastMonth_inst,
currentYear=org.apache.oozie.extensions.OozieELExtensions#ph2_currentYear_inst,
lastYear=org.apache.oozie.extensions.OozieELExtensions#ph2_lastYear_inst,
latest=org.apache.oozie.coord.CoordELFunctions#ph2_coord_latest_echo,
future=org.apache.oozie.coord.CoordELFunctions#ph2_coord_future_echo,
formatTime=org.apache.oozie.coord.CoordELFunctions#ph2_coord_formatTime,
user=org.apache.oozie.coord.CoordELFunctions#coord_user
oozie.service.ELService.ext.functions.coord-action-start
now=org.apache.oozie.extensions.OozieELExtensions#ph2_now,
today=org.apache.oozie.extensions.OozieELExtensions#ph2_today,
yesterday=org.apache.oozie.extensions.OozieELExtensions#ph2_yesterday,
currentMonth=org.apache.oozie.extensions.OozieELExtensions#ph2_currentMonth,
lastMonth=org.apache.oozie.extensions.OozieELExtensions#ph2_lastMonth,
currentYear=org.apache.oozie.extensions.OozieELExtensions#ph2_currentYear,
lastYear=org.apache.oozie.extensions.OozieELExtensions#ph2_lastYear,
latest=org.apache.oozie.coord.CoordELFunctions#ph3_coord_latest,
future=org.apache.oozie.coord.CoordELFunctions#ph3_coord_future,
dataIn=org.apache.oozie.extensions.OozieELExtensions#ph3_dataIn,
instanceTime=org.apache.oozie.coord.CoordELFunctions#ph3_coord_nominalTime,
dateOffset=org.apache.oozie.coord.CoordELFunctions#ph3_coord_dateOffset,
formatTime=org.apache.oozie.coord.CoordELFunctions#ph3_coord_formatTime,
user=org.apache.oozie.coord.CoordELFunctions#coord_user
oozie.service.ELService.ext.functions.coord-job-submit-data
now=org.apache.oozie.extensions.OozieELExtensions#ph1_now_echo,
today=org.apache.oozie.extensions.OozieELExtensions#ph1_today_echo,
yesterday=org.apache.oozie.extensions.OozieELExtensions#ph1_yesterday_echo,
currentMonth=org.apache.oozie.extensions.OozieELExtensions#ph1_currentMonth_echo,
lastMonth=org.apache.oozie.extensions.OozieELExtensions#ph1_lastMonth_echo,
currentYear=org.apache.oozie.extensions.OozieELExtensions#ph1_currentYear_echo,
lastYear=org.apache.oozie.extensions.OozieELExtensions#ph1_lastYear_echo,
dataIn=org.apache.oozie.extensions.OozieELExtensions#ph1_dataIn_echo,
instanceTime=org.apache.oozie.coord.CoordELFunctions#ph1_coord_nominalTime_echo_wrap,
formatTime=org.apache.oozie.coord.CoordELFunctions#ph1_coord_formatTime_echo,
dateOffset=org.apache.oozie.coord.CoordELFunctions#ph1_coord_dateOffset_echo,
user=org.apache.oozie.coord.CoordELFunctions#coord_user
oozie.service.ELService.ext.functions.coord-job-submit-instances
now=org.apache.oozie.extensions.OozieELExtensions#ph1_now_echo,
today=org.apache.oozie.extensions.OozieELExtensions#ph1_today_echo,
yesterday=org.apache.oozie.extensions.OozieELExtensions#ph1_yesterday_echo,
currentMonth=org.apache.oozie.extensions.OozieELExtensions#ph1_currentMonth_echo,
lastMonth=org.apache.oozie.extensions.OozieELExtensions#ph1_lastMonth_echo,
currentYear=org.apache.oozie.extensions.OozieELExtensions#ph1_currentYear_echo,
lastYear=org.apache.oozie.extensions.OozieELExtensions#ph1_lastYear_echo,
formatTime=org.apache.oozie.coord.CoordELFunctions#ph1_coord_formatTime_echo,
latest=org.apache.oozie.coord.CoordELFunctions#ph2_coord_latest_echo,
future=org.apache.oozie.coord.CoordELFunctions#ph2_coord_future_echo
oozie.service.ELService.ext.functions.coord-sla-create
instanceTime=org.apache.oozie.coord.CoordELFunctions#ph2_coord_nominalTime,
user=org.apache.oozie.coord.CoordELFunctions#coord_user
oozie.service.ELService.ext.functions.coord-sla-submit
instanceTime=org.apache.oozie.coord.CoordELFunctions#ph1_coord_nominalTime_echo_fixed,
user=org.apache.oozie.coord.CoordELFunctions#coord_user
oozie.service.HadoopAccessorService.kerberos.enabled
false
oozie.service.HadoopAccessorService.supported.filesystems
*
-
Modify
Name
Value
oozie.service.SchemaService.wf.ext.schemas
shell-action-0.1.xsd,shell-action-0.2.xsd,shell-action-0.3.xsd,email-action-0.1.xsd,email-action-0.2.xsd,hive-action-0.2.xsd,hive-action-0.3.xsd,hive-action-0.4.xsd,hive-action-0.5.xsd,sqoop-action-0.2.xsd,sqoop-action-0.3.xsd,sqoop-action-0.4.xsd,ssh-action-0.1.xsd,ssh-action-0.2.xsd,distcp-action-0.1.xsd,distcp-action-0.2.xsd,oozie-sla-0.1.xsd,oozie-sla-0.2.xsd
oozie.services.ext
org.apache.oozie.service.JMSAccessorService,org.apache.oozie.service.PartitionDependencyManagerService,org.apache.oozie.service.HCatAccessorService
-
-
After modifying all properties on the Oozie Configs page, choose
Saveto updateoozie.site.xml, using the updated configurations.
-
-
Replace the content of
/usr/oozie/sharein HDFS. On the Oozie server host:-
Extract the Oozie sharelib into a
tmpfolder.mkdir -p /tmp/oozie_tmp; cp /usr/hdp/2.2.0.0-<$version>/oozie/oozie-sharelib.tar.gz /tmp/oozie_tmp; cd /tmp/oozie_tmp; tar xzvf oozie-sharelib.tar.gz; -
Back up the
/user/oozie/sharefolder in HDFS and then delete it. If you have any custom files in this folder, back them up separately and then add them to the/sharefolder after updating it.mkdir /tmp/oozie_tmp/oozie_share_backup; chmod 777 /tmp/oozie_tmp/oozie_share_backup;su -l<HDFS_USER>-c "hdfs dfs -copyToLocal /user/oozie/share /tmp/oozie_tmp/oozie_share_backup"; su -l<HDFS_USER>-c "hdfs dfs -rm -r /user/oozie/share";where <HDFS_USER> is the HDFS service user. For example, hdfs. -
Add the latest share libs that you extracted in step 1. After you have added the files, modify ownership and acl.
su -l<HDFS_USER>-c "hdfs dfs -copyFromLocal /tmp/oozie_tmp/share /user/oozie/."; su -l<HDFS_USER>-c "hdfs dfs -chown -R <OOZIE_USER>:<HADOOP_GROUP> /user/oozie"; su -l<HDFS_USER>-c "hdfs dfs -chmod -R 755 /user/oozie";where <HDFS_USER> is the HDFS service user. For example, hdfs.
-
-
Use the
Ambari Web UI>Servicesview to start the Oozie service. Make sure that ServiceCheck passes for Oozie.
-
-
-
Update WebHCat.
-
Modify the
webhcat-siteconfig type.Using
Ambari Web, navigate toServices>WebHCatand modify the following configuration:Action
Property Name
Property Value
Modify
templeton.storage.class
org.apache.hive.hcatalog.templeton.tool.ZooKeeperStorage
-
Expand
Advanced>webhcat-site.xml.Check if property
templeton.portexists. If not, then add it using the Custom webhcat-site panel. The default value for templeton.port = 50111. -
On each WebHCat host, update the Pig and Hive tar bundles, by updating the following files:
-
/apps/webhcat/pig.tar.gz -
/apps/webhcat/hive.tar.gz
- For example, to update a *.tar.gz file:
-
Move the file to a local directory.
su -l<HCAT_USER>-c "hadoop --config /etc/hadoop/conf fs -copyToLocal /apps/webhcat/*.tar.gz<local_backup_dir>" -
Remove the old file.
su -l<HCAT_USER>-c "hadoop --config /etc/hadoop/conf fs -rm /apps/webhcat/*.tar.gz" -
Copy the new file.
su -l<HCAT_USER>-c "hdfs --config /etc/hadoop/conf dfs -copyFromLocal /usr/hdp/2.2.0.0-<$version>/hive/hive.tar.gz /apps/webhcat/"; su -l<HCAT_USER>-c "hdfs --config /etc/hadoop/conf dfs -copyFromLocal /usr/hdp/2.2.0.0-<$version>/pig/pig.tar.gz /apps/webhcat/";where <HCAT_USER> is the HCatalog service user. For example, hcat.
-
-
On each WebHCat host, update
/app/webhcat/hadoop-streaming.jarfile.-
Move the file to a local directory.
su -l<HCAT_USER>-c "hadoop --config /etc/hadoop/conf fs -copyToLocal /apps/webhcat/hadoop-streaming*.jar <local_backup_dir>" -
Remove the old file.
su -l<HCAT_USER>-c "hadoop --config /etc/hadoop/conf fs -rm /apps/webhcat/hadoop-streaming*.jar" -
Copy the new hadoop-streaming.jar file.
su -l<HCAT_USER>-c "hdfs --config /etc/hadoop/conf dfs -copyFromLocal /usr/hdp/2.2.0.0-<$version>/hadoop-mapreduce/hadoop-streaming*.jar /apps/webhcat"where <HCAT_USER> is the HCatalog service user. For example, hcat.
-
-
-
Prepare Tez for work. Add the Tez service to your cluster using the Ambari Web UI, if Tez was not installed earlier.
Configure Tez.
cd /var/lib/ambari-server/resources/scripts/;
                  ./configs.sh set localhost <your-cluster-name> cluster-env "tez_tar_source" "/usr/hdp/current/tez-client/lib/tez.tar.gz";
                  ./configs.sh set localhost <your-cluster-name> cluster-env "tez_tar_destination_folder"
                  "hdfs:///hdp/apps/{{ hdp_stack_version }}/tez/"
If you use Tez as the Hive execution engine, and if the variable hive.server2.enabled.doAs is set to true, you must create a scratch directory on the NameNode host for the username that will run the HiveServer2 service. For example, use the following commands:
sudo su -c "hdfs -makedir /tmp/hive-<username>" sudo su -c "hdfs -chmod 777 /tmp/hive-<username>"where <username> is the name of the user that runs the HiveServer2 service. -
Using the
Ambari Web UI> Services > Hive, start the Hive service. -
If you use Tez as the Hive execution engine, and if the variable
hive.server2.enabled.doAsis set totrue, you must create a scratch directory on the NameNode host for the username that will run the HiveServer2 service. For example, use the following commands:sudo su -c "hdfs -makedir /tmp/hive-<username>"sudo su -c "hdfs -chmod 777 /tmp/hive-<username>"where <username> is the name of the user that runs the HiveServer2 service.
-
Using
Ambari Web > Services, re-start the remaining services. -
The upgrade is now fully functional but not yet finalized. Using the
finalizecommand removes the previous version of the NameNode and DataNode storage directories.The upgrade must be finalized before another upgrade can be performed.
To finalize the upgrade, execute the following command once, on the primary NameNode host in your HDP cluster:
sudo su -l<HDFS_USER>-c "hdfs dfsadmin -finalizeUpgrade"
Upgrading the HDP Stack from 1.3 to 2.2
The Stack is the coordinated set of Hadoop components that you have installed. Use the following instructions to upgrade a current, Ambari-installed and managed instance of a version 1.3 Stack to a version 2.2 Stack. This procedure causes the upgraded stack to be managed by Ambari.
If you are upgrading from any other 1.x version of the stack, you must upgrade to 1.3 or later before you can upgrade to 2.2. Upgrades from previous 1.x versions are not supported.
In preparation for future HDP 2.2 releases to support rolling upgrades, the HDP RPM
package version naming convention has changed to include the HDP 2.2 product version
in file and directory names. HDP 2.2 marks the first release where HDP rpms, debs,
and directories contain versions in the names to permit side-by-side installations
of later HDP releases. To transition between previous releases and HDP 2.2, Hortonworks
provides hdp-select, a script that symlinks your directories to hdp/current and lets you maintain using the same binary and configuration paths that you were
using before. The following instructions have you remove your old versions of HDP,
install hdp-select, and install HDP 2.2 to prepare for rolling upgrade.
Preparing the 1.3 Stack for the Upgrade to 2.2
To prepare for upgrading the HDP Stack, this section describes how to perform the following tasks:
-
Checkpoint user metadata and capture the HDFS operational state. This step supports rollback and restore of the original state of HDFS data, if necessary.
-
Backup Hive and Oozie metastore databases. This step supports rollback and restore of the original state of Hive and Oozie data, if necessary.
-
Stop all HDP and Ambari services.
Perform steps 1 through 8 on the NameNode host. In a highly-available NameNode configuration, you should execute the following procedure on the primary NameNode.
-
Stop all services except HDFS and ZooKeeper. Also stop any client programs that access HDFS.
-
If HDFS is in a non-finalized state from a prior upgrade operation, you must finalize HDFS before upgrading further. Finalizing HDFS will remove all links to the metadata of the prior HDFS version - do this only if you do not want to rollback to that prior HDFS version.
For example, as the HDFS user:
sudo -uhadoop dfsadmin -finalizeUpgradeYou can check the namenode directory to ensure that there is no snapshot of any prior HDFS upgrade. Specifically, examine the $dfs.namenode.name.dir (or $dfs.name.dir) on the NameNode. Make sure that only a ‘current’, not a ‘previous’ directory exists.
-
Create the following logs and other files.
Creating these logs lets you to check the integrity of the file system after upgrading.
-
Run
fsckwith the following flags and send the results to a log. The resulting file contains a complete block map of the file system. You use this log later to confirm the upgrade.sudo -u<HDFS_USER>hadoop fsck / -files -blocks -locations > dfs-old-fsck-1.log -
Optional: Capture the complete namespace of the filesystem. (The following command does a recursive listing of the root file system.)
sudo -u<HDFS_USER>hadoop dfs -lsr / > dfs-old-lsr-1.log -
Create a list of all the DataNodes in the cluster.
sudo -u<HDFS_USER>hadoop dfsadmin -report > dfs-old-report-1.log -
Optional: copy all or unrecoverable only data stored in HDFS to a local file system or to a backup instance of HDFS.
-
-
Save the namespace. You must be the HDFS service user to do this and you must put the cluster in Safe Mode.
As the HDFS user:
hadoop dfsadmin -safemode enterhadoop dfsadmin -saveNamespace -
Copy the following checkpoint files into a backup directory. You can find the directory by using the
Services Viewin the Ambari Web UI. SelectHDFS>Configs. In the Namenode section, look up the property NameNode Directories on your NameNode host.<dfs.name.dir>
/current -
Store the layoutVersion for the NameNode. Make a copy of the file at <dfs.name.dir>
/current/VERSIONwhere <dfs.name.dir> is the value of the config parameterNameNode directories. This file will be used later to verify that the layout version is upgraded. -
Stop HDFS. Make sure all services in the cluster are completely stopped.
-
If you are upgrading Hive and Oozie, back up the Hive database and the Oozie database on the Hive database host and Oozie database host machines, respectively.
-
Optional - Backup the Hive Metastore database.
Hive Metastore Database Backup and Restore
Database Type
Backup
Restore
MySQL
mysqldump $dbname > $outputfilename.sql For example: mysqldump hive > /tmp/mydir/backup_hive.sql
mysql $dbname < $inputfilename.sql For example: mysql hive < /tmp/mydir/backup_hive.sql
Postgres
sudo -u $username pg_dump $databasename > $outputfilename.sql For example: sudo -u postgres pg_dump hive > /tmp/mydir/backup_hive.sql
sudo -u $username psql $databasename < $inputfilename.sql For example: sudo -u postgres psql hive < /tmp/mydir/backup_hive.sql
Oracle
Connect to the Oracle database using sqlplus export the database: exp username/password@database full=yes file=output_file.dmp
Import the database: imp username/password@database ile=input_file.dmp
-
Optional - Backup the Oozie Metastore database.
Oozie Metastore Database Backup and Restore
Database Type
Backup
Restore
MySQL
mysqldump $dbname > $outputfilename.sql For example: mysqldump oozie > /tmp/mydir/backup_oozie.sql
mysql $dbname < $inputfilename.sql For example: mysql oozie < /tmp/mydir/backup_oozie.sql
Postgres
sudo -u $username pg_dump $databasename > $outputfilename.sql For example: sudo -u postgres pg_dump oozie > /tmp/mydir/backup_oozie.sql
sudo -u $username psql $databasename < $inputfilename.sql For example: sudo -u postgres psql oozie < /tmp/mydir/backup_oozie.sql
-
-
On every host in your cluster known to Ambari, stop all Ambari Agents.
ambari-agent stop
Upgrading the 1.3 Stack to 2.2
This stack upgrade involves removing the HDP 1.x version of MapReduce and replacing it with the HDP 2.x YARN and MapReduce2 components. This process is somewhat long and complex. To help you, a Python script is provided to automate some of the upgrade steps.
Prepare the 1.3 Stack for Upgrade to 2.2
-
Make sure that you completed the system preparation procedure; most importantly, save the namespace.
-
Stage the upgrade script:
-
Create an "Upgrade Folder", for example
/work/upgrade_hdp_2, on a host that can communicate with Ambari Server. The Ambari Server host would be a suitable candidate. -
Copy the upgrade script to the Upgrade Folder. The script is available here:
/var/lib/ambari-server/resources/scripts/UpgradeHelper_HDP2.pyon the Ambari Server host. -
Make sure that Python is available on the host and that the version is 2.6 or higher:
python --version
-
-
Start the Ambari Server only if it is stopped. On the Ambari Server host:
ambari-server status
If status is "stopped", then:ambari-server start -
Back up current configuration settings and the component host mappings from MapReduce:
-
Go to the Upgrade Folder.
-
Execute the
backup-configsaction:python UpgradeHelper_HDP2.py --hostname<HOSTNAME>--user<USERNAME>--password<PASSWORD>--clustername<CLUSTERNAME>backup-configsWhere
-
<HOSTNAME> is the name of the Ambari Server host
-
<USERNAME> is the admin user for Ambari Server
-
<PASSWORD> is the password for the admin user
-
<CLUSTERNAME> is the name of the cluster
This step produces a set of files named TYPE_TAG, where TYPE is the configuration type and TAG is the tag. These files contain copies of the various configuration settings for the current (pre-upgrade) cluster. You can use these files as a reference later.
-
-
Execute the
save-mr-mappingaction:python UpgradeHelper_HDP2.py --hostname<HOSTNAME>--user<USERNAME>--password<PASSWORD>--clustername<CLUSTERNAME>save-mr-mappingThis step produces a file named
mr_mappingthat stores the host level mapping of MapReduce components such as MapReduce JobTracker/TaskTracker/Client.
-
-
Delete all the MapReduce server components installed on the cluster.
-
If you are not already there, go to the Upgrade Folder.
-
Execute the
delete-mraction.python UpgradeHelper_HDP2.py --hostname<HOSTNAME>--user<USERNAME>--password<PASSWORD>--clustername<CLUSTERNAME>delete-mrOptionally, execute the delete script with the -n option to view, verify, and validate API calls, if necessary.
-
The script asks you to confirm that you have executed the
save-mr-mappingaction and that you have a file namedmr_mappingin the Upgrade Folder.
-
-
On the Ambari Server host, stop Ambari Server and confirm that it is stopped.
ambari-server stopambari-server status
Upgrade the 1.3 Stack to 2.2
-
Stop the Ambari Server only if it is started . On the Ambari Server host:
ambari-server status
If status is "started", then:ambari-server stop -
Make sure that the old version of MapReduce deleted successfully.
-
Update the stack version in the Ambari Server database. Use the command appropriate for a remote, or local repository, as follows:
ambari-server upgradestack HDP-2.2 -
Upgrade the HDP repository on all hosts and replace the old repo file with the new file:
The file you download is named
hdp.repo. To function properly in the system, it must be namedHDP.repo. Once you have completed the "mv" of the new repo file to the repos.d folder, make sure there is no file namedhdp.repoanywhere in your repos.d folder.-
For RHEL/CentOS/Oracle Linux 6:
wget -nv http://public-repo-1.hortonworks.com/HDP/centos6/2.x/GA/2.2.0.0/hdp.repo -O /etc/yum.repos.d/HDP.repo -
For SLES 11:
wget -nv http://public-repo-1.hortonworks.com/HDP/centos5/2.x/GA/2.2.0.0/hdp.repo -O /etc/yum.repos.d/HDP.repo -
For RHEL/CentOS/Oracle Linux 5: (DEPRECATED)
wget-nv http://public-repo-1.hortonworks.com/HDP-LABS/Projects/Champlain-Preview/2.2.0.0-9/centos5/hdp.repo -O /etc/yum.repos.d/HDP.repo
-
-
Back up the files in following directories on the Oozie server host and make sure that all files, including *site.xml files are copied.
mkdir oozie-conf-bakcp -R /etc/oozie/conf/* oozie-conf-bak -
Remove the old
/ooziedirectories on all Oozie server and client hosts-
rm -rf /etc/oozie/conf -
rm -rf /usr/lib/oozie/ -
rm -rf /var/lib/oozie/
-
-
Upgrade the stack on all Agent hosts. Skip any components your installation does not use:
-
For RHEL/CentOS/Oracle Linux:
-
On all hosts, clean the yum repository.
yum clean all -
Remove remaining MapReduce, and WebHCat, HCatalog, and Oozie components on all hosts. This command uninstalls these HDP 1.3 component bits. It leaves the user data and metadata, but removes your configurations.
yum erase hadoop-pipes hadoop-sbin hadoop-native "webhcat*" "hcatalog*" "oozie*" "hadoop*" "hadoop-libhdfs*" "hbase*" "hcatalog*" "hive*" "oozie*" "oozie-client*" "pig*" "sqoop*" "webhcat-tar-hive*" "webhcat-tar-pig*" "zookeeper*" -
Remove your old hdp.repo and hdp-utils repo files.
rm etc/yum/repos.d/hdp.repo hdp-utils.repo -
Install the following components:
yum install "hadoop_2_2_0_0_*" "oozie_2_2_0_0_*" "pig_2_2_0_0_*" "sqoop_2_2_0_0_*" "zookeeper_2_2_0_0_*" "hbase_2_2_0_0_*" "hive_2_2_0_0_*" -
Verify that the components were upgraded:
yum list installed | grep HDP-$old-stack-version-numberNo 1.3 components should appear in the returned list.
-
-
For SLES:
-
On all hosts, clean the zypper repository.
zypper clean --all -
Remove remaining MapReduce, and WebHCat, HCatalog, and Oozie components on all hosts. This command uninstalls these HDP 1.3 component bits. It leaves the user data and metadata, but removes your configurations.
zypper remove hadoop-pipes hadoop-sbin hadoop-native webhcat\* hcatalog\* oozie\* -
Remove your old hdp.repo and hdp-utils repo files.
rm etc/zypp/repos.d/hdp.repo hdp-utils.repo -
Install the following components:
zypper install "collectd*" "epel-release*" "gccxml*" "pig*" "hadoop*" "sqoop*" "zookeeper*"
                              "hbase*" "hive*" hdp_mon_nagios_addons
zypper install webhcat-tar-hive webhcat-tar-pigzypper install oozie oozie-client -
Verify that the components were upgraded.
rpm -qa | grep hadoop, rpm -qa | grep hive and rpm -qa | grep hcatalogNo 1.3 components should appear in the returned list.
-
If components were not upgraded, upgrade them as follows:
yast --update hadoop hcatalog hive
-
-
-
Symlink directories, using
hdp-select.Check that the
hdp-selectpackage installed:rpm -qa | grep hdp-select
You should see:hdp-select-2.2.0.0-2041.el6.noarch
If not, then run:yum install hdp-select
Runhdp-selectas root, on your NameNode(s) and all your DataNodes. In/usr/bin:hdp-select set all 2.2.0.0-<$version> -
On the Hive Metastore database host, stop the Hive Metastore service, if you have not done so already. Make sure that the Hive Metastore database is running.
-
Upgrade Hive v11 to v14 and upgrade the Hive metastore database schema, using the following instructions:
-
Set java home:
export JAVA_HOME=/path/to/java -
Copy old hive configurations to new conf dir:
cp -R /etc/hive/conf.server/* /etc/hive/conf/ -
<HIVE_HOME>
/bin/schematool -upgradeSchemaFrom 0.11.0 -dbType<databaseType> where <HIVE_HOME> is the Hive installation directory.For example, on the Hive Metastore host:
/usr/hdp/2.2.0.0-<$version>/hive/bin/schematool -upgradeSchemaFrom 0.11.0 -dbType<databaseType> where <$version> is the 2.2.0 build number and <databaseType> is derby, mysql, oracle, or postgres.
-
Complete Upgrade of the 1.3 Stack to 2.2
-
Start Ambari Server and Ambari Agents.
On the Server host:
ambari-server startOn all of the Agent hosts:
ambari-agent start -
Update the repository Base URLs in Ambari Server for the HDP-2.2 stack. Browse to
Ambari Web>Admin>Repositoriesand set the value of the HDP and HDP-UTILS repository Base URLs. For more information about viewing and editing repository Base URLs, see Viewing Cluster Stack Version and Repository URLs.For a remote, accessible, public repository, the HDP and HDP-UTILS Base URLs are the same as the baseurl=values in the HDP.repo file downloaded in Upgrade the Stack: Step 1 For a local repository, use the local repository Base URL that you configured for the HDP Stack. For links to download the HDP repository files for your version of the Stack, see HDP Stack Repositories.
-
Add YARN and MapReduce2 services:
-
If you are not already there, go to the Upgrade Folder.
-
Execute the add-yarn-mr2 action:
python UpgradeHelper_HDP2.py --hostname $HOSTNAME --user $USERNAME --password $PASSWORD
                        --clustername $CLUSTERNAME add-yarn-mr2
-
-
Update the respective configurations:
-
If you are not already there, go to the Upgrade Folder.
-
Execute the update-configs action:
python UpgradeHelper_HDP2.py --hostname $HOSTNAME --user$USERNAME--password$PASSWORD--clustername$CLUSTERNAMEupdate-configs
-
-
Install the YARN and MapReduce2 services:
-
If you are not already there, go to the Upgrade Folder.
-
Execute the install-yarn-mr2 action:
python UpgradeHelper_HDP2.py --hostname$HOSTNAME--user$USERNAME--password$PASSWORD--clustername$CLUSTERNAMEinstall-yarn-mr2
-
-
Using the Ambari Web UI, add the Tez service if if it has not been installed already. For more information about adding a service, see Adding a Service.
-
Using the Ambari Web UI, add any new services that you want to run on the HDP 2.2 stack. You must add a Service before editing configuration properties necessary to complete the upgrade.
-
Using the Ambari Web Services view, start the ZooKeeper service.
-
If you are upgrading from an HA NameNode configuration, start all JournalNodes. On each JournalNode host, run the following command as the HDFS user:
su -l<HDFS_USER>-c "/usr/hdp/2.2.0.0-<$version>/hadoop/sbin/hadoop-daemon.sh start journalnode"All JournalNodes must be running when performing the upgrade, rollback, or finalization operations. If any JournalNodes are down when running any such operation, the operation will fail.
-
Because the file system version has now changed you must start the NameNode manually. On the NameNode host, as the HDFS User:
su -l -c "export HADOOP_LIBEXEC_DIR=/usr/hdp/2.2.0.0-<$version>/hadoop/libexec && /usr/hdp/2.2.0.0-<$version>/hadoop/sbin/hadoop-daemon.sh start namenode -upgrade"To check if the Upgrade is in progress, check that the "
\previous" directory has been created in \NameNode and \JournalNode directories. The "\previous" directory contains a snapshot of the data before upgrade. -
Start all DataNodes.
su -l<HDFS_USER>-c "/usr/hdp/2.2.0.0-<$version>/hadoop/sbin/hadoop-daemon.sh --config /etc/hadoop/conf start datanode"The NameNode will send an upgrade command to DataNodes after receiving block reports.
-
Prepare the NameNode to work with Ambari:
-
Open the Ambari Web GUI. If it has been open throughout the process, do a hard reset on your browser to force a reload.
-
On the Services view, click HDFS to open the HDFS service.
-
Click View Host to open the NameNode host details page.
-
Use the drop-down menu to stop the NameNode.
-
On the Services view, restart the HDFS service. Make sure it passes the Service Check. It is now under Ambari's control.
-
-
After the DataNodes are started, HDFS exits safemode. To monitor the status, run the following command:
sudo su -l<HDFS_USER>-c "hdfs dfsadmin -safemode get"Depending on the size of your system, a response may not display for up to 10 minutes. When HDFS exits safemode, the following message displays:
Safe mode is OFF -
Make sure that the HDFS upgrade was successful. Execute step 3 in Preparing for the Upgrade to create new versions of the logs and reports. Substitute "
new" for "old" in the file names as necessary.-
Compare the old and new versions of the following:
-
dfs-old-fsck-1.logversusdfs-new-fsck-1.log.The files should be identical unless the hadoop fsck reporting format has changed in the new version.
-
dfs-old-lsr-1.logversusdfs-new-lsr-1.log.The files should be identical unless the format of hadoop fs -lsr reporting or the data structures have changed in the new version.
-
dfs-old-report-1.logversusfs-new-report-1.log.Make sure all DataNodes previously belonging to the cluster are up and running.
-
-
-
Update the configuration properties required for HDFS. Using Ambari Web, navigate to
Services > HDFS > Configsand add/modify the following configurations:-
Change the io.compression.codecs property to:
org.apache.hadoop.io.compress.GzipCodec,com.hadoop.compression.lzo.LzoCodec,org.apache.hadoop.io -
Add to core-site.xml, the following property:
<name>io.compression.codec.lzo.class</name>
                        <value>com.hadoop.compression.lzo.LzoCodec</value>
-
-
Using
Ambari Web>Services>Service Actions, start YARN. -
Using
Ambari Web>Services>Service Actions, start MapReduce2. -
Upgrade HBase.
-
Make sure that all HBase components - RegionServers and HBase Master - are stopped.
-
Using
Ambari Web>Services, start the ZooKeeper service. Wait until the ZK service is up and running. -
On the HBase Master host, make these configuration changes:
-
In
HBASE_CONFDIR/hbase-site.xml, set the propertydfs.client.read.shortcircuittofalse. -
In the configuration file, find the value of the
hbase.tmp.dirproperty and make sure that the directory exists and is readable and writeable for the HBase service user and group.chown -R <HBASE_USER>:<HADOOP_GROUP><HBASE.TMP.DIR> -
Go to the Upgrade Folder and check in the saved global configuration file named
global_<$TAG>for the value of the propertyhbase_pid_dirandhbase_log_dir. Make sure that the directories are readable and writeable for the HBase service user and group.chown -R <HBASE_USER>:<HADOOP_GROUP><hbase_pid_dir> chown -R <HBASE_USER>:<HADOOP_GROUP><hbase_log_dir>Do this on every host where a RegionServer is installed as well as on the HBase Master host.
-
Check for HFiles in V1 format. HBase 0.96.0 discontinues support for HFileV1. Before the actual upgrade, run the following command to check if there are HFiles in V1 format:
hbase upgrade -checkHFileV1 was a common format prior to HBase 0.94. You may see output similar to:Tables Processed: hdfs://localhost:41020/myHBase/.META. hdfs://localhost:41020/myHBase/usertable hdfs://localhost:41020/myHBase/TestTable hdfs://localhost:41020/myHBase/t Count of HFileV1: 2 HFileV1: hdfs://localhost:41020/myHBase/usertable/fa02dac1f38d03577bd0f7e666f12812/family/249450144068442524 hdfs://localhost:41020/myHBase/usertable/ecdd3eaee2d2fcf8184ac025555bb2af/family/249450144068442512 Count of corrupted files: 1 Corrupted Files: hdfs://localhost:41020/myHBase/usertable/fa02dac1f38d03577bd0f7e666f12812/family/1 Count of Regions with HFileV1: 2 Regions to Major Compact: hdfs://localhost:41020/myHBase/usertable/fa02dac1f38d03577bd0f7e666f12812 hdfs://localhost:41020/myHBase/usertable/ecdd3eaee2d2fcf8184ac025555bb2afWhen you run the upgrade check, if "Count of HFileV1" returns any files, start the hbase shell to use major compaction for regions that have HFileV1 format. For example in the sample output above, you must compact the
fa02dac1f38d03577bd0f7e666f12812andecdd3eaee2d2fcf8184ac025555bb2afregions. -
Upgrade HBase. As the HBase service user:
su -l <HBASE_USER> -c "hbase upgrade -execute"Make sure that the output contains the string "Successfully completed Znode upgrade".
-
Use the Services view to start the HBase service. Make sure that Service Check passes.
-
-
-
Upgrade Oozie.
-
Perform the following preparation steps on each oozie server host:
-
Copy
/etc/oozie/conffrom the template to the/confdirectory on each Oozie server and client. -
Create
/usr/lib/oozie/libext-upgrade22directory.mkdir /usr/lib/oozie/libext-upgrade22 -
Copy the JDBC jar of your Oozie database to both
/usr/lib/oozie/libext-upgrade22and/usr/hdp/2.2.0.0-2041/oozie/libtools.For example, if you are using MySQL, copy your
mysql-connector-java.jar. -
Copy these files to
/usr/lib/oozie/libext-upgrade22directorycp /usr/hdp/2.2.0.0-2041/hadoop/lib/hadoop-lzo-*.jar /usr/lib/oozie/libext-upgrade22cp /usr/share/HDP-oozie/ext-2.2.zip /usr/lib/oozie/libext-upgrade22 -
Grant read/write access to the Oozie user.
chmod -R 777 /usr/lib/oozie/libext-upgrade22
-
-
Upgrade steps:
-
On the Services view, make sure YARN and MapReduce2 are running.
-
Make sure that the Oozie service is stopped.
-
Upgrade Oozie. On the Oozie server host, as the Oozie service user:
su -l<OOZIE_USER>-c "/usr/lib/oozie/bin/ooziedb.sh upgrade -run"Make sure that the output contains the string "Oozie DB has been upgraded to Oozie version <OOZIE_build_version>.
-
Prepare the Oozie WAR file.
As the root user:
sudo su -l<OOZIE_USER>-c "/usr/hdp/2.2.0.0-2041/oozie/bin/oozie-setup.sh prepare-war -d /usr/lib/oozie/libext-upgrade22"Make sure that the output contains the string "New Oozie WAR file added".
-
Using Ambari Web UI
Services>Oozie>Configs, edit the following configuration properties:-
Add the following configuration properties in
oozie-site.xml.Oozie-site.xml - Properties to Add
Action
Property Name
Property Value
Add
oozie.service.URIHandlerService.uri.handlers
org.apache.oozie.dependency.FSURIHandler,org.apache.oozie.dependency.HCatURIHandler
Add
oozie.service.coord.push.check.requeue.interval
30000
Add
oozie.services
org.apache.oozie.service.SchedulerService, org.apache.oozie.service.InstrumentationService, org.apache.oozie.service.CallableQueueService, org.apache.oozie.service.UUIDService, org.apache.oozie.service.ELService, org.apache.oozie.service.AuthorizationService, org.apache.oozie.service.UserGroupInformationService, org.apache.oozie.service.HadoopAccessorService, org.apache.oozie.service.URIHandlerService, org.apache.oozie.service.MemoryLocksService, org.apache.oozie.service.DagXLogInfoService, org.apache.oozie.service.SchemaService, org.apache.oozie.service.LiteWorkflowAppService, org.apache.oozie.service.JPAService, org.apache.oozie.service.StoreService, org.apache.oozie.service.CoordinatorStoreService, org.apache.oozie.service.SLAStoreService, org.apache.oozie.service.DBLiteWorkflowStoreService, org.apache.oozie.service.CallbackService, org.apache.oozie.service.ActionService, org.apache.oozie.service.ActionCheckerService, org.apache.oozie.service.RecoveryService, org.apache.oozie.service.PurgeService, org.apache.oozie.service.CoordinatorEngineService, org.apache.oozie.service.BundleEngineService, org.apache.oozie.service.DagEngineService, org.apache.oozie.service.CoordMaterializeTriggerService, org.apache.oozie.service.StatusTransitService, org.apache.oozie.service.PauseTransitService, org.apache.oozie.service.GroupsService, org.apache.oozie.service.ProxyUserService,org.apache.oozie.service.XLogStreamingService,org.apache.oozie.service.JobsConcurrencyService
Add
oozie.services.ext
org.apache.oozie.service.PartitionDependencyManagerService,org.apache.oozie.service.HCatAccessorService
Add
oozie.service.SchemaService.wf.ext.schemas
shell-action-0.1.xsd,shell-action-0.2.xsd,shell-action-0.3.xsd,email-action-0.1.xsd,email-action-0.2.xsd,hive-action-0.2.xsd,hive-action-0.3.xsd,hive-action-0.4.xsd,hive-action-0.5.xsd,sqoop-action-0.2.xsd,sqoop-actio
Add
oozie.service.coord.check.maximum.frequency
false
Add
oozie.service.AuthorizationService.security.enabled
false
Add
oozie.service.HadoopAccessorService.kerberos.enabled
false
Add
oozie.authentication.simple.anonymous.allowed
true
Add
log4j.appender.oozie.layout.ConversionPattern
%d{ISO8601} %5p %c{1}:%L - SERVER[${oozie.instance.id}] %m%n
-
After modifying all properties on the Oozie Configs page, choose
Saveto updateoozie.site.xml, using the modified configurations.
-
-
Replace the content of
/usr/oozie/sharein HDFS. On the Oozie server host:-
Extract the Oozie sharelib into a
tmpfolder.mkdir -p /tmp/oozie_tmp cp /usr/lib/oozie/oozie-sharelib.tar.gz /tmp/oozie_tmp cd /tmp/oozie_tmp tar xzvf oozie-sharelib.tar.gz -
Back up the
/user/oozie/sharefolder in HDFS and then delete it. If you have any custom files in this folder back them up separately and then add them back after the share folder is updated.mkdir /tmp/oozie_tmp/oozie_share_backup chmod 777 /tmp/oozie_tmp/oozie_share_backupAs the Oozie user,
su -l<HDFS_USER>-c "hdfs dfs -copyToLocal /user/oozie/share /tmp/oozie_tmp/oozie_share_backup" su -l<HDFS_USER>-c "hdfs dfs -rm -r /user/oozie/share" -
Add the latest share libs that you extracted in step 1. After you have added the files, modify ownership and acl.
su -l<HDFS_USER>-c "hdfs dfs -copyFromLocal /tmp/oozie_tmp/share /user/oozie/." su -l<HDFS_USER>-c "hdfs dfs -chown -R <OOZIE_USER>:<HADOOP_GROUP> /user/oozie" su -l<HDFS_USER>-c "hdfs dfs -chmod -R 755 /user/oozie"
-
-
Use the Services view to start the Oozie service. Make sure that ServiceCheck passes for Oozie.
-
-
-
Update WebHCat.
-
Modify the
webhcat-siteconfig type.Using the Ambari web UI, navigate to
Services>WebHCatand modify the following configuration:WebHCat Properties to Modify
Action
Property Name
Property Value
Modify
templeton.storage.class
org.apache.hive.hcatalog.templeton.tool.ZooKeeperStorage
-
On each WebHCat host, update the Pig and Hive tar bundles, by updating the following files:
-
/apps/webhcat/pig.tar.gz -
/apps/webhcat/hive.tar.gz
For example, to update a *.tar.gz file:
-
Move the file to a local directory. As the WebHCat user,
su -l<HCAT_USER>-c "hadoop --config /etc/hadoop/conf fs -copyToLocal /apps/webhcat/*.tar.gz $<local_backup_dir>" -
Remove the old file.
su -l<HCAT_USER>-c "hadoop --config /etc/hadoop/conf fs -rm /apps/webhcat/*.tar.gz" -
Copy the new file.
su -l<HCAT_USER>-c "hdfs --config /etc/hadoop/conf dfs -copyFromLocal /usr/share/HDP-webhcat/*.tar.gz /apps/webhcat/"
-
-
On each WebHCat host, update
/app/webhcat/hadoop-streaming.jarfile.-
Move the file to a local directory.
su -l<HCAT_USER>-c "hadoop --config /etc/hadoop/conf fs -copyToLocal /apps/webhcat/hadoop-streaming*.jar $<local_backup_dir>" -
Remove the old file.
su -l<HCAT_USER>-c "hadoop --config /etc/hadoop/conf fs -rm /apps/webhcat/hadoop-streaming*.jar" -
Copy the new hadoop-streaming.jar file.
su -l<HCAT_USER>-c "hdfs --config /etc/hadoop/conf dfs -copyFromLocal /usr/lib/hadoop-mapreduce/hadoop-streaming*.jar /apps/webhcat"
-
-
-
Make sure Ganglia no longer attempts to monitor JobTracker.
-
Make sure Ganglia is stopped.
-
Log into the host where JobTracker was installed (and where ResourceManager is installed after the upgrade).
-
Backup the folder
/etc/ganglia/hdp/HDPJobTracker. -
Remove the folder
/etc/ganglia/hdp/HDPJobTracker. -
Remove the folder
$ganglia_runtime_dir/HDPJobTracker.
-
-
Use the Services view to start the remaining services back up.
-
The upgrade is now fully functional but not yet finalized. Using the
finalizecommand removes the previous version of the NameNode and DataNode storage directories.After the upgrade is finalized, the system cannot be rolled back. Usually this step is not taken until a thorough testing of the upgrade has been performed.
The upgrade must be finalized before another upgrade can be performed.
To finalize the upgrade, execute the following command once, on the primary NamaNode host in your HDP cluster, as the HDFS User:
sudo su -l<HDFS_USER>-c "hadoop dfsadmin -finalizeUpgrade"where <HDFS_USER> is the HDFS Service user (by default,hdfs).
Upgrading host server operating systems in an Ambari-managed Hadoop System
Ambari requires specific versions of the files for components that it uses. There are three steps you should take to make sure that these versions continue to be available:
-
Disable automatic OS updates
-
Do not update any HDP components such as MySQL, Ganglia, etc.
-
If you must perform an OS update, do a manual kernel update only.
Upgrading an older Ambari Server version to 1.2.5
This 12-step, manual procedure upgrades an Ambari Server from an older, 1.x version to version 1.2.5. Upgrading the Ambari Server version does not change the underlying Hadoop Stack version.
-
Stop the Ambari Server and all Ambari Agents.
-
On the Ambari Server host:
ambari-server stop -
On each Ambari Agent host:
ambari-agent stop
-
-
Get the new Ambari bits.
Using wget, fetch the repository file, then replace the old repository file with the new repository file on every host.
-
Fetch the new repository file:
-
For RHEL/CentOS 5/Oracle Linux 5:
wget http://public-repo-1.hortonworks.com/ambari/centos5/1.x/updates/1.2.5.17/ambari.repo -
For RHEL/CentOS 6/Oracle Linux 6:
wget http://public-repo-1.hortonworks.com/ambari/centos6/1.x/updates/1.2.5.17/ambari.repo -
For SLES 11:
wget http://public-repo-1.hortonworks.com/ambari/suse11/1.x/updates/1.2.5.17/ambari.repo
-
-
Replace the old repository file with the new repository file.
-
For RHEL/CentOS 5/Oracle Linux 5:
cp ambari.repo /etc/yum.repos.d/ambari.repo -
For RHEL/CentOS 6/Oracle Linux 6:
cp ambari.repo /etc/yum.repos.d/ambari.repo -
For SLES 11:
cp ambari.repo /etc/zypp/repos.d/ambari.repo
-
-
-
Upgrade Ambari Server.
On the Ambari Server host:
-
For RHEL/CentOS/Oracle Linux:
yum clean all yum upgrade ambari-server-1.2.5.17 ambari-log4j-1.2.5.17 -
For SLES:
zypper clean
                        zypper up ambari-server-1.2.5.17 ambari-log4j-1.2.5.17
-
-
Check for upgrade success.
-
As the process runs, the console should produce output similar, although not identical, to the following text:
Setting up Upgrade Process
Resolving Dependencies
--> Running transaction check
---> Package ambari-agent.x86_64 0:1.2.2.3-1 will be updated
---> Package ambari-agent.x86_64 0:1.2.2.4-1 will be updated ...
---> Package ambari-agent.x86_64 0:1.2.2.5-1 will be an update ...
After the process is complete, check each host to make sure the new 1.2.4 files have been installed.
rpm -qa | grep ambari -
If the upgrade fails, the console displays output similar to the following text:
Setting up Upgrade Process
No Packages marked for Update
-
-
On the Ambari Server host, check for a folder named
/etc/ambari-server/conf.save. If such a folder exists, rename it, using the following command:mv /etc/ambari-server/conf.save /etc/ambari-server/conf -
Upgrade the Ambari Server schema.
On the Ambari Server host:
ambari-server upgrade -
Upgrade the Ambari Agent on all hosts.
On each Ambari Agent host:
-
For RHEL/CentOS/Oracle Linux
yum upgrade ambari-agent ambari-log4j -
For SLES
zypper up ambari-agent ambari-log4j
-
-
On each Agent host, check for a folder named
/etc/ambari-agent/conf.save. If such a folder exists, rename it, using the following command:mv /etc/ambari-agent/conf.save /etc/ambari-agent/conf -
Upgrade the Nagios and Ganglia add-ons package and restart.
On the Nagios/Ganglia hosts:
-
For RHEL/CentOS/Oracle Linux:
yum upgrade hdp_mon_nagios_addons hdp_mon_ganglia_addons service httpd restart -
For SLES:
zypper up hdp_mon_nagios_addons hdp_mon_ganglia_addons
                        service apache2 restart
-
-
Start the Ambari Server and all Ambari Agents.
-
On the Ambari Server host:
ambari-server start -
On each Ambari Agent host:
ambari-agent start
-
-
Open
Ambari Web. Point your browser tohttp://<your.ambari.server>:8080Refresh your browser so that it loads the new version of the code. Hold the Shift key down while clicking the refresh button on the browser. If you have problems, clear your browser cache manually, then restart Ambari Server. Use the Ambari Admin name and password you have set up to log in.
-
Re-start the Ganglia, Nagios, and MapReduce services.
In Ambari Web:
-
Go to Services View, then choose each service.
-
Stop, then re-start each service, using the Management Header.
-
Troubleshooting an Ambari Server 1.x Upgrade
If upgrading Ambari Server 1.x fails, use the instructions in one of the following sections to fix the failed upgrade.
Upgrade Failure with PostgreSQL
If you installed Ambari server with a PostgreSQL database and upgrading Ambari Server using a remote or public repository failed, use the following steps to fix the upgrade.
-
Upgrade the database schema.
/var/lib/ambari-server/resources/upgrade/ddl/AmbariRCA-DDL-Postgres-UPGRADE.sql -
Check database consistency.
/var/lib/ambari-server/resources/upgrade/ddl/Ambari-DDL-Postgres-UPGRADE-1.3.0.Check.sqlwith the following parameter:dbname = ambari -
If you find an inconsistency, fix it using:
/var/lib/ambari-server/resources/upgrade/ddl/Ambari-DDL-Postgres-UPGRADE-1.3.0.Fix.sqlwith the following parameter:dbname = ambari
Upgrade Failure with Oracle
If you installed Ambari server with an Oracle database and upgrading Ambari Server
using a remote or public repository failed, run the following script to upgrade the
database schema.
/var/lib/ambari-server/resources/upgrade/ddl/AmbariRCA-DDL-Oracle-UPGRADE.sql
Upgrade Failure from a Local Repository
If you install and upgrade Ambari server using a local repository and upgrading Ambari Server using your local repository failed, find information necessary to fix the upgrade in the following locations:
-
Check for local repository version customized in
/var/lib/ambari-server/resources/stacks/HDPLocal. -
Check for the repository version used when creating the cluster, in
repos/repoinfo.xml. -
If local repository version is NOT the same as the NON-LOCAL repository version: Note the os, version, repoid and baseurl, found in
repos/repoinfo.xml.
Then, choose the fix appropriate for your database version.
Ambari Server with PostgreSQL
To fix a local Ambari/PostgreSQL upgrade:
-
Repair metadata information.
/var/lib/ambari-server/resources/upgrade/dml/Ambari-DML-Postgres-INSERT_METAINFO.sqlwith the following parameters:dbname = ambari metainfo_key = repo:/HDP/<version>/<os>/<repoid>:baseurl metainfo_value =<baseurl> -
Run the fix script.
/var/lib/ambari-server/resources/upgrade/dml/Ambari-DML-Postgres-UPGRADE_STACK.sqlwith the following parameters:dbname = ambari
Ambari Server with Oracle
To fix a local Ambari/PostgreSQL upgrade:
-
Repair metadata information.
/var/lib/ambari-server/resources/upgrade/dml/Ambari-DML-Oracle-INSERT_METAINFO.sqlwith the following parameters:argument #1 = repo:/HDP/<version>/<os>/<repoid>:baseurl argument #2 =<baseurl> -
Run the fix script.
/var/lib/ambari-server/resources/upgrade/dml/Ambari-DML-Oracle-UPGRADE_STACK.sql
Administering Ambari
Apache Ambari is a system to help you provision, manage and monitor Hadoop clusters.
This guide is intended for Cluster Operators and System Administrators responsible
for installing and maintaining Ambari and the Hadoop clusters managed by Ambari. Installing
Ambari creates a default user with "Admin Admin" privilege, with the following username/password:
admin/admin.
When you sign into Ambari as Ambari Admin, you can:
For specific information about provisioning an HDP cluster, see Install, Configure, and Deploy an HDP Cluster.
Terms and Definitions
The following basic terms help describe the key concepts associated with Ambari Administration.
|
Term |
Definition |
|---|---|
|
Ambari Admin |
Specific privilege granted to a user that enables the user to administer Ambari. The
default user |
|
Account |
User name, password and privileges. |
|
User |
Unique user in Ambari. |
|
User Type |
Local and LDAP. Local users are maintained in the Ambari database and authentication is performed against the Ambari database. LDAP users are imported (and synchronized) with an external LDAP (if configured). |
|
Group |
Unique group of users in Ambari. |
|
Group Type |
Local and LDAP. Local groups are maintained in the Ambari database. LDAP groups are imported (and synchronized) with an external LDAP (if configured). |
|
Principal |
User or group that can be authenticated by Ambari. |
|
Cluster |
Installation of a Hadoop cluster, based on a particular Stack, that is managed by Ambari. |
|
View |
Defines a user interface component that is available to Ambari. |
|
Resource |
Represents the resource available and managed in Ambari. Ambari supports two types of resources: cluster and view. An Ambari Admin assigns permissions for a resource for users and groups. |
|
Permissions |
Represents the permission that can be granted to a principal (user or group) on a particular resource. For example, cluster resources support Operator and Read-Only permissions. |
|
Privilege |
Represents the mapping of a principal to a permission and a resource.
For example: the user |
Logging in to Ambari
After installing Ambari, you can log in to Ambari as follows:
-
Enter the following URL in a web browser:
http://<your.ambari.server>:8080where <your.ambari.server> is the hostname for your Ambari server machine and8080is the default HTTP port. -
Enter the user account credentials for the default administrative user automatically created during install:
username/password = admin/admin -
The Ambari Administration web page displays. From this page you can Manage Users and Groups, Manage Views, and Create a Cluster.
About the Ambari Administration Interface
When you log in to the Ambari Administration interface with "Ambari Admin" privilege, a landing page displays links to the operations available. Plus, the operations are available from the left menu areas for clusters, views, users, and groups.
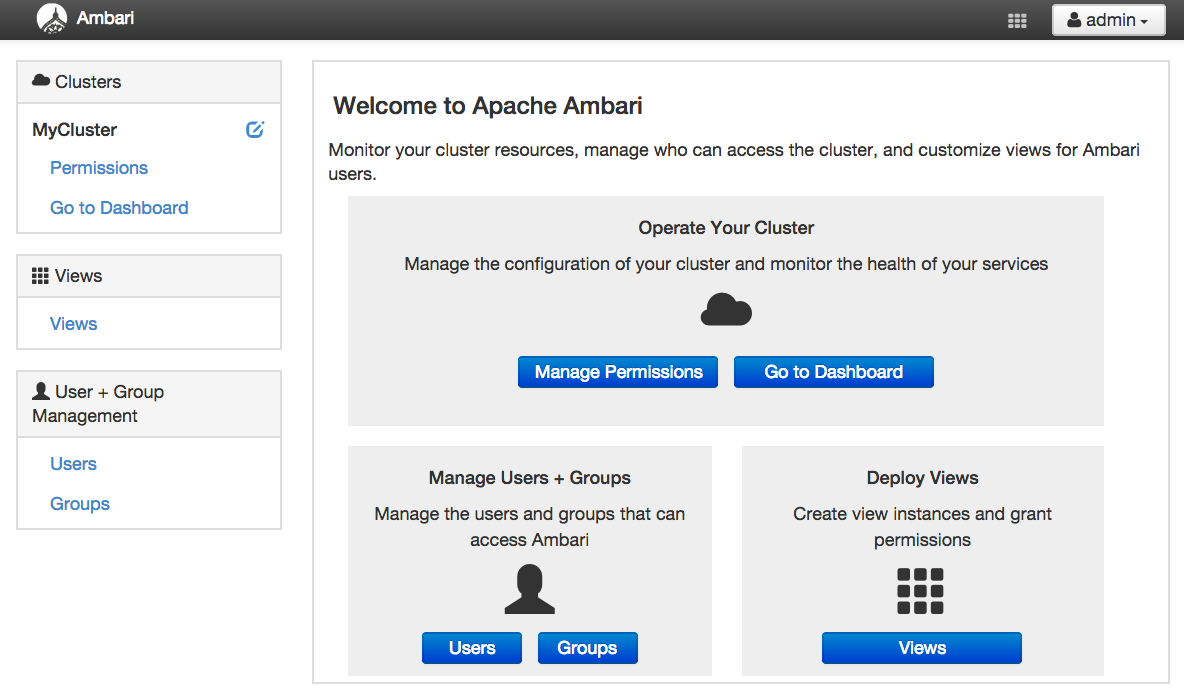
-
Clusters displays a link to a cluster (if created) and links to manage access permissions for that cluster. See Creating and Managing a Cluster for more information.
-
User and Group Management provides the ability create and edit users and groups. See Managing Users and Groups for more information.
-
Views lets you to create and edit instances of deployed Views and manage access permissions for those instances. See Managing Views for more information.
Changing the Administrator Account Password
During install and setup, the Cluster Installer wizard automatically creates a default
user with "Ambari Admin" privilege. You can change the password for this user (or
other Local users in the system) from the Ambari Administration interface. You can
change the password for the default admin user to create a unique administrator credential for your system.
To change the password for the default admin account:
-
Browse to the Users section.
-
Select the
adminuser. -
Click the Change Password button.
-
Enter the current
adminpassword and the new password twice. -
Click OK to save the new password.
Ambari Admin Tasks
An "Ambari Admin" has administrator (or super-user) privilege. When logged into Ambari with the "Ambari Admin" privilege, you can:
For more information about creating Ambari users locally and importing Ambari LDAP users, see Managing Users and Groups.
Creating a Cluster
As an Ambari Admin, you can launch the Cluster Install Wizard and create a cluster. To create a cluster, from the Ambari Administration interface:
-
Click
Install Cluster. The Cluster Install Wizard displays. -
Follow the steps in the wizard to install your cluster.
For more information about prerequisites and system requirements, see Installing HDP using Ambari.
Setting Cluster Permissions
After you create a cluster, users with Admin Admin privileges automatically get Operator
permission on the cluster. By default, no users have access to the cluster. You can
grant permissions on the cluster to other users and groups from the Ambari Administration
interface.
Ambari manages the following permissions for a cluster: Operator and Read-Only. Users and Groups with Operator permission are granted access to the cluster. Operator permission provides full control
of the following services:
-
Start
-
Stop
-
Restart
-
Add New
And The Following Configurations:
-
Modify
-
Revert
Users and Groups with Read-Only permission can only view, not modify, services and configurations.
Users with Ambari Admin privileges are implicitly granted Operator permission. Plus, Ambari Admin users have access to the Ambari Administration interface
which allows them to control permissions for the cluster.
To modify user and group permissions for a cluster:
-
As an Ambari Admin, access the Ambari Administration interface.
-
Click Permissions, displayed under the cluster name.
-
The form showing the permissions
OperatorandRead-Onlywith users and groups is displayed. -
Modify the users and groups mapped to each permission and save.
For more information about managing users and groups, see Managing Users and Groups.
Viewing the Cluster Dashboard
After you have created a cluster, select Clusters > Go to Dashboard to open the Dashboard view. For more information about using Ambari to monitor and
manage your cluster, see Monitoring and Managing your HDP Cluster with Ambari.
Renaming a Cluster
A user with Admin Admin privileges can rename a cluster, using the Ambari Administration
interface.
To rename a cluster:
-
In Clusters, click the Rename Cluster icon, next to the cluster name.
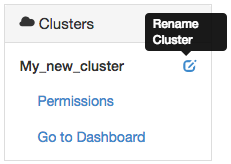
The cluster name becomes write-able.
-
Enter alphanumeric characters as a cluster name.
-
Click the check mark.
-
Confirm.
Managing Users and Groups
An "Ambari Admin" can create and manage users and groups available to Ambari. An Ambari Admin can also import user and group information into Ambari from external LDAP systems. This section describes the specific tasks you perform when managing users and groups in Ambari.
Users and Groups Overview
Ambari supports two types of users and groups: Local and LDAP. The following topics describe how Ambari Administration supports managing Local and LDAP users and groups.
Local and LDAP User and Group Types
Local users are stored in and authenticate against the Ambari database. LDAP users
have basic account information stored in the Ambari database. Unlike Local users,
LDAP users authenticate against an external LDAP system.
Local groups are stored in the Ambari database. LDAP groups have basic information
stored in the Ambari database, including group membership information. Unlike Local
groups, LDAP groups are imported and synchronized from an external LDAP system.
To use LDAP users and groups with Ambari, you must configure Ambari to authenticate
against an external LDAP system. For more information about running ambari-server
setup-ldap, see Configure Ambari to use LDAP Server. A new Ambari user or group, created either locally or by synchronizing against LDAP,
is granted no privileges by default. You, as an Ambari Admin, must explicitly grant
each user permissions to access clusters or views.
Ambari Admin Privileges
As an Ambari Admin, you can create new users, delete users, change user passwords and edit user settings. You can control certain privileges for Local and LDAP users. The following table lists the privileges available and those not available to the Ambari Admin for Local and LDAP Ambari users.
Ambari Administrator Privileges for Ambari Local and LDAP Users
|
Administrator User Privilege |
Local User |
LDAP User |
|---|---|---|
|
Change Password |
Available |
Not Available |
|
Set Ambari Admin Flag |
Available |
Available |
|
Change Group Membership |
Available |
Not Available |
|
Delete User |
Available |
Not Available |
|
Set Active / Inactive |
Available |
Available |
Creating a Local User
To create a local user:
-
Browse to Users.
-
Click Create Local User.
-
Enter a unique user name.
-
Enter a password, then confirm that password.
-
Click Save.
Setting User Status
User status indicates whether the user is active and should be allowed to log into Ambari or should be inactive and denied the ability to log in. By setting the Status flag as Active or Inactive, you can effectively "disable" user account access to Ambari while preserving the user account information related to permissions.
To set user Status:
-
On the Ambari Administration interface, browse to Users.
-
Click the user name of the user to modify.
-
Click the Status control to toggle between Active or Inactive.
-
Choose OK to confirm the change. The change is saved immediately.
Setting the Ambari Admin Flag
You can elevate one or more users to have Ambari administrative privileges, by setting
the Ambari Admin flag. You must be logged in as an account that is an Ambari Admin
to set or remove the Ambari Admin flag.
To set the Ambari Admin Flag:
-
Browse to the Users section.
-
Click the user name you wish to modify.
-
Click on the Ambari Admin control.
-
Switch Yes to set, or No to remove the Admin flag.
Changing the Password for a Local User
An Ambari Administrator can change local user passwords. LDAP passwords are not managed
by Ambari since LDAP users authenticate to external LDAP. Therefore, LDAP user passwords
cannot be changed from Ambari.
To change the password for a local user:
-
Browse to the user.
-
Click
Change password. -
Enter YOUR administrator password to confirm that you have privileges required to change a local user password.
-
Enter a password, then confirm that password.
-
Click Save.
Deleting a Local User
Deleting a local user removes the user account from the system, including all privileges associated with the user. You can reuse the name of a local user that has been deleted. To delete a local user:
-
Browse to the User.
-
Click
Delete User. -
Confirm.
Creating a Local Group
To create a local group:
-
Browse to Groups.
-
Click Create Local Group.
-
Enter a unique group name.
-
Click Save.
Managing Group Membership
You can manage group membership of Local groups by adding or removing users from groups.
Adding a User to a Group
To add a user to group:
-
Browse to Groups.
-
Click a name in the Group Name list.
-
Choose the
Local Memberscontrol to edit the member list. -
In the empty space, type the first character in an existing user name.
-
From the list of available user names, choose a user name.
-
Click the check mark to save the current, displayed members as group members.
Modifying Group Membership
To modify Local group membership:
-
In the Ambari Administration interface, browse to Groups.
-
Click the name of the Group to modify.
-
Choose the
Local Memberscontrol to edit the member list. -
Click in the Local Members text area to modify the current membership.
-
Click the
Xto remove a user. -
To save your changes, click the checkmark. To discard your changes, click the
x.
Deleting a Local Group
Deleting a local group removes all privileges associated with the group. To delete a local group:
-
Browse to the Group.
-
Click
Delete Group. -
Confirm. The group is deleted and the associated group membership information is removed.
Managing Views
The Ambari Views Framework offers a systematic way to plug in UI capabilities to surface
custom visualization, management and monitoring features in Ambari Web. The development
and use of Views allows you to extend and customize Ambari Web to meet your specific
needs.
A View extends Ambari to let third parties plug in new resource types along with APIs,
providers, and UIs to support them. A View is deployed into the Ambari Server and
Ambari Admins can create View instances and set the privileges on access to users
and groups.
The following sections cover the basics of Views and how to deploy and manage View
instances in Ambari:
Terminology
The following are Views terms and concepts you should be familiar with:
|
Term |
Description |
|---|---|
|
Views Framework |
The core framework that is used to develop a View. This is very similar to a Java Web App. |
|
View Definition |
Describes the View resources and core View properties such as name, version and any necessary configuration properties. On deployment, the View definition is read by Ambari. |
|
View Package |
Packages the View client and server assets (and dependencies) into a bundle that is ready to deploy into Ambari. |
|
View Deployment |
Deploying a View into Ambari. This makes the View available to Ambari Admins for creating instances. |
|
View Name |
Unique identifier for a View. A View can have one or more versions of a View. The name is defined in the View Definition (created by the View Developer) that is built into the View Package. |
|
View Version |
Specific version of a View. Multiple versions of a View (uniquely identified by View name) can be deployed into Ambari. |
|
View Instance |
Instantiation of a specific View version. Instances are created and configured by Ambari Admins and must have a unique View instance name. |
|
View Instance Name |
Unique identifier of a specific instance of View. |
|
Framework Services |
View context, instance data, configuration properties and events are available from the Views Framework. |
Basic Concepts
Views are basically Web applications that can be “plugged into” Ambari. Just like a typical web application, a View can include server-side resources and client-side assets. Server-side resources, which are written in Java, can integrate with external systems (such as cluster services) and expose REST end-points that are used by the view. Client-side assets, such as HTML/JavaScript/CSS, provide the UI for the view that is rendered in the Ambari Web interface.
Ambari Views FrameworkAmbari exposes the Views Framework as the basis for View development. The Framework provides the following:
-
Method for describing and packaging a View
-
Method for deploying a View
-
Framework services for a View to integrate with Ambari
-
Method for managing View versions, instances, and permissions
The Views Framework is separate from Views themselves. The Framework is a core feature
of Ambari and Views build on that Framework. Although Ambari does include some Views
out-of-the-box, the feature of Ambari is the Framework to enable the development,
deployment and creation of views.
The development and delivery of a View follows this process flow:
-
Develop the View (similar to how you would build a Web application)
-
Package the View (similar to a WAR)
-
Deploy the View into Ambari (using the Ambari Administration interface)
-
Create and configure instances of the View (performed by Ambari Admins)
Considering the above, it is important to understand the different personas involved. The following table describes the three personas:
|
Persona |
Description |
|---|---|
|
View Developer |
Person who builds the front-end and back-end of a View and uses the Framework services available during development. The Developer created the View, resulting in a View Package that is delivered to an Ambari Admin. |
|
Ambari Admin |
Ambari user that has Ambari Admin privilege and uses the Views Management section of the Ambari Administration interface to create and managing instances of Views. Ambari Admin also deploys the View Packages delivered by the View Developer. |
|
View User |
Ambari user that has access to one or more Views in Ambari Web. Basically, this is the end user. |
After Views are developed, views are identified by unique a view name. Each View can have one or more View versions. Each View name + version combination is deployed as a single View package. Once a View package is deployed, the Ambari Admin can create View instances, where each instance is identified by a unique View instance name. The Ambari Admin can then set access permissions for each View instance.
Ambari Views Versions and InstancesDeploying a View
Deploying a View involves obtaining the View Package and making the View available
to the Ambari Server. Each View deployed has a unique name. Multiple versions of a
View can be deployed at the same time. You can configure multiple versions of a View
for your users, depending on their roles, and deploy these versions at the same time.
For more information about building Views, see the Apache Ambari Wiki page.
-
Obtain the View package. For example,
files-0.1.0.jar. -
On the Ambari Server host, browse to the views directory.
cd /var/lib/ambari-server/resources/views -
Copy the View package into place.
-
Restart Ambari Server.
ambari-server restart -
The View is extracted, registered with Ambari, and displays in the Ambari Administration interface as available to create instances.
Creating View Instances
To create a View instance:
-
Browse to a View and expand.
-
Click the “Create Instance” button.
-
Provide the following information:
Item
Required
Description
View Version
Yes
Select the version of the View to instantiate.
Instance Name
Yes
Must be unique for a given View.
Display Label
Yes
Readable display name used for the View instance when shown in Ambari Web.
Description
Yes
Readable description used for the View instance when shown in Ambari Web.
Visible
No
Designates whether the View is visible or not visible to the end-user in Ambari web. Use this property to temporarily hide a view in Ambari Web from users.
Properties
Maybe
Depends on the View. If the View requires certain configuration properties, you are prompted to provide the required information.
Setting View Permissions
After a view instance has been created, an Ambari Admin can set which users and groups
can access the view by setting the Use permission. By default, after view instance
creation, no permissions are set on a view.
To set permissions on a view:
-
Browse to a view and expand. For example, browse to the Slider or Jobs view.
-
Click on the view instance you want to modify.
-
In the Permissions section, click the Users or Groups control.
-
Modify the user and group lists as appropriate.
-
Click the check mark to save changes.
Additional Information
To learn more about developing views and the views framework itself, refer to the following resources:
|
Resource |
Description |
Link |
|---|---|---|
|
Views Wiki |
Learn about the Views Framework and Framework services available to views developers. |
https://cwiki.apache.org/confluence/display/AMBARI/Viewsche.org/confluence/display/AMBARI/Views |
|
Views API |
Covers the Views REST API and associated framework Java classes. |
https://github.com/apache/ambari/blob/trunk/ambari-views/docs/index.md |
|
Views Examples |
Code for example views that hover different areas of the framework and framework services. |
https://github.com/apache/ambari/tree/trunk/ambari-views/examples |
|
View Contributions |
Views that are being developed and contributed to the Ambari community.[4] |
Ambari Security Guide
This section describes how to set up strong authentication for Hadoop users and hosts in an Ambari-installed HDP cluster, and provides information on advanced security options for Ambari.
Preparing Kerberos for Hadoop
This section describes how to set up the Kerberos components in your Hadoop cluster.
Kerberos Overview
Establishing identity with strong authentication is the basis for secure access in Hadoop. Users need to be able to reliably “identify” themselves and then have that identity propagated throughout the Hadoop cluster. Once this is done those users can access resources (such as files or directories) or interact with the cluster (like running MapReduce jobs). As well, Hadoop cluster resources themselves (such as Hosts and Services) need to authenticate with each other to avoid potential malicious systems “posing as” part of the cluster to gain access to data.
To create that secure communication among its various components, Hadoop uses Kerberos. Kerberos is a third party authentication mechanism, in which users and services that users want to access rely on a third party - the Kerberos server - to authenticate each to the other. The Kerberos server itself is known as the Key Distribution Center, or KDC. At a high level, it has three parts:
-
A database of the users and services (known as principals) that it knows about and their respective Kerberos passwords
-
An authentication server (AS) which performs the initial authentication and issues a Ticket Granting Ticket (TGT)
-
A Ticket Granting Server (TGS) that issues subsequent service tickets based on the initial TGT
A user principal requests authentication from the AS. The AS returns a TGT that is encrypted using the user principal's Kerberos password, which is known only to the user principal and the AS. The user principal decrypts the TGT locally using its Kerberos password, and from that point forward, until the ticket expires, the user principal can use the TGT to get service tickets from the TGS. Service tickets are what allow a principal to access various services.
Because cluster resources (hosts or services) cannot provide a password each time to decrypt the TGT, they use a special file, called a keytab, which contains the resource principal's authentication credentials.
The set of hosts, users, and services over which the Kerberos server has control is called a realm.
Kerberos terminology
|
Term |
Description |
|---|---|
|
Key Distribution Center, or KDC |
The trusted source for authentication in a Kerberos-enabled environment. |
|
Kerberos KDC Server |
The machine, or server, that serves as the Key Distribution Center. |
|
Kerberos Client |
Any machine in the cluster that authenticates against the KDC. |
|
Principal |
The unique name of a user or service that authenticates against the KDC. |
|
Keytab |
A file that includes one or more principals and their keys. |
|
Realm |
The Kerberos network that includes a KDC and a number of Clients. |
Installing and Configuring the KDC
To use Kerberos with Hadoop you can either use an existing KDC or install a new one just for Hadoop's use. The following gives a very high level description of the installation process. To get more information see RHEL documentation, CentOS documentation, or SLES documentation.
-
To install a new version of the server:
For RHEL/CentOS/Oracle Linuxyum install krb5-server krb5-libs krb5-auth-dialog krb5-workstationFor SLES 11zypper install krb5 krb5-server krb5-clientFor UBUNTU 12apt-get install krb5 krb5-server krb5-client -
When the server is installed use a text editor to edit the configuration file, located by default here:
/etc/krb5.confChange the
[realms]section of this file by replacing the default “kerberos.example.com” setting for thekdcandadmin_serverproperties with the Fully Qualified Domain Name of the KDC server. In the following example, “kerberos.example.com” has been replaced with “my.kdc.server”.[realms] EXAMPLE.COM = { kdc = my.kdc.server admin_server = my.kdc.server }
Creating the Kerberos Database
Use the utility kdb5_util to create the Kerberos database.
For RHEL/CentOS/Oracle Linux 6
/usr/sbin/kdb5_util create -s
For SLES 11
kdb5_util create -s
For UBUNTU 12
kdb5_util create -s
Starting the KDC
Start the KDC.For RHEL/CentOS/Oracle Linux 5 (DEPRECATED)
/etc/rc.d/init.d/krb5kdc start
            /etc/rc.d/init.d/kadmin start
For SLES 11
rckrb5kdc start
            rckadmind start
For UBUNTU 12
rckrb5kdc start
            rckadmind start
Installing and Configuring the Kerberos Clients
-
To install the Kerberos clients, on every server in the cluster:
For RHEL/CentOS/Oracle Linuxyum install krb5-workstationFor SLES 11zypper install krb5-clientFor UBUNTU 12apt-get install krb5-client -
Copy the
krb5.conffile you modified in Installing and Configuring the KDC to all the servers in the cluster.
Creating Service Principals and Keytab Files for HDP 2.x
Each service and sub-service in Hadoop must have its own principal. A principal name in a given realm consists of a primary name and an instance name, which in this case is the FQDN of the host that runs that service. As services do not log in with a password to acquire their tickets, their principal's authentication credentials are stored in a keytab file, which is extracted from the Kerberos database and stored locally with the service principal on the service component host.
First you must create the principal, using mandatory naming conventions.
Then you must create the keytab file with that principal's information and copy the file to the keytab directory on the appropriate service host.
-
Open the
kadmin.localutility on the KDC machine/usr/sbin/kadmin.local -
Create the service principals:
$kadmin.local
                  addprinc -randkey $primary_name/$fully.qualified.domain.name @EXAMPLE.COM
The
-randkeyoption is used to generate the password.Notice in the example that each service principal's primary name has appended to it the instance name, the FQDN of the host on which it runs. This provides a unique principal name for services that run on multiple hosts, like DataNodes and NodeManagers. The addition of the host name serves to distinguish, for example, a request from DataNode A from a request from DataNode B. This is important for the following reasons:
-
If the Kerberos credentials for one DataNode are compromised, it does not automatically lead to all DataNodes being compromised
-
If multiple DataNodes have exactly the same principal and are simultaneously connecting to the NameNode, and if the Kerberos authenticator being sent happens to have same timestamps, then the authentication would be rejected as a replay request.
The principal name must match the values in the table below:
Service Principals
Service
Component
Mandatory Principal Name
HDFS
NameNode
nn/$FQDN
HDFS
NameNode HTTP
HTTP/$FQDN
HDFS
SecondaryNameNode
nn/$FQDN
HDFS
SecondaryNameNode HTTP
HTTP/$FQDN
HDFS
DataNode
dn/$FQDN
MR2
History Server
jhs/$FQDN
MR2
History Server HTTP
HTTP/$FQDN
YARN
ResourceManager
rm/$FQDN
YARN
NodeManager
nm/$FQDN
YARN
Application Timeline Server
yarn/$FQDN
Oozie
Oozie Server
oozie/$FQDN
Oozie
Oozie HTTP
HTTP/$FQDN
Hive
Hive Metastore HiveServer2
hive/$FQDN
Hive
WebHCat
HTTP/$FQDN
HBase
MasterServer
hbase/$FQDN
HBase
RegionServer
hbase/$FQDN
ZooKeeper
ZooKeeper
zookeeper/$FQDN
Nagios Server
Nagios
nagios/$FQDN
JournalNode ServerOnly required if you are setting up NameNode HA.
JournalNode
jn/$FQDN
For example, to create the principal for a DataNode service, issue the following command:
$kadmin.local addprinc -randkey dn/ $DataNode-Host @EXAMPLE.COM -
-
In addition you must create four special principals for Ambari's own use.
These principals do not have the FQDN appended to the primary name:
Ambari Principals
User
Mandatory Principal Name
Ambari UserThis principal is used with the JAAS configuration. See Setting up JAAS for Ambari for more information.
ambari
Ambari Smoke Test User
ambari-qa
Ambari HDFS User
hdfs
Ambari HBase User
hbase
-
After the principals are created in the database, you can extract the related keytab files for transfer to the appropriate host:
$kadmin.local
                  xst -norandkey -k $keytab_file_name $primary_name /fully.qualified.domain.name@EXAMPLE.COM
You must use the mandatory names for the <$keytab_file_name> variable shown in the preceding table.
-
Extract the keytab file information:
$kadmin xst -k $keytab_file_name-temp1$primary_name /fully.qualified.domain.name@EXAMPLE.COM xst -k $keytab_file_name-temp2$primary_name /fully.qualified.domain.name@EXAMPLE.COM -
Write the keytab to a file.
                        $kutil
                        kutil: rkt $keytab_file_name-temp1
                        kutil: rkt $keytab_file_name-temp2
                        kutil: wkt $keytab_file_name
                        kutil: clear
Service Keytab File Names
Component
Principal Name
Mandatory Keytab File Name
NameNode
nn/$FQDN
nn.service.keytab
NameNode HTTP
HTTP/$FQDN
spnego.service.keytab
SecondaryNameNode
nn/$FQDN
nn.service.keytab
SecondaryNameNode HTTP
HTTP/$FQDN
spnego.service.keytab
DataNode
dn/$FQDN
dn.service.keytab
MR2 History Server
jhs/$FQDN
jhs.service.keytab
MR2 History Server HTTP
HTTP/$FQDN
spnego.service.keytab
YARN
rm/$FQDN
rm.service.keytab
YARN
nm/$FQDN
nm.service.keytab
Oozie Server
oozie/$FQDN
oozie.service.keytab
Oozie HTTP
HTTP/$FQDN
spnego.service.keytab
Hive Metastore HiveServer2
hive/$FQDN
hive.service.keytab
WebHCat
HTTP/$FQDN
spnego.service.keytab
HBase Master Server
hbase/$FQDN
hbase.service.keytab
HBase RegionServer
hbase/$FQDN
hbase.service.keytab
ZooKeeper
zookeeper/$FQDN
zk.service.keytab
Nagios Server
nagios/$FQDN
nagios.service.keytab
Journal Server
*Only required if you are setting up NameNode HA.jn/$FQDN
jn.service.keytab
Ambari User
This principal is used with the JAAS configuration. See Setting up JAAS for Ambari for more information.ambari
ambari.keytab
Ambari Smoke Test User
ambari-qa
smokeuser.headless.keytab
Ambari HDFS User
hdfs
hdfs.headless.keytab
Ambari HBase User
hbase
hbase.headless.keytab
Application Timeline Server
yarn/$FQDN
yarn.service.keytab
For example, to create the keytab files for NameNode HTTP, issue the following command:
$kadmin.local xst -norandkey -k spnego.service.keytab HTTP/<namenode-host> -
-
When the keytab files have been created, on each host create a directory for them and set appropriate permissions.
mkdir -p /etc/security/keytabs/ chown root:hadoop /etc/security/keytabs chmod 750 /etc/security/keytabs -
Copy the appropriate keytab file to each host. If a host runs more than one component (for example, both NodeManager and DataNode), copy keytabs for both components. The Ambari Smoke Test User, the Ambari HDFS User, and the Ambari HBase User keytabs should be copied to the all hosts on the cluster.
If you have customized service user names, replace the default values below with your appropriate service user, group, and keytab names.
-
Set appropriate permissions for the keytabs.
If you have customized service user names, replace the default values below with your appropriate service user, group, and keytab names.
-
Optionally, if you have Set up JAAS on the Ambari server host:
chown ambari:ambari /etc/security/keytabs/ambari.keytab chmod 400 /etc/security/keytabs/ambari.keytab -
On the HDFS NameNode and SecondaryNameNode hosts:
chown hdfs:hadoop /etc/security/keytabs/nn.service.keytab chmod 400 /etc/security/keytabs/nn.service.keytab chown root:hadoop /etc/security/keytabs/spnego.service.keytab chmod 440 /etc/security/keytabs/spnego.service.keytab -
On the HDFS NameNode host, for the Ambari Test Users:
chown ambari-qa:hadoop /etc/security/keytabs/smokeuser.headless.keytab chmod 440 /etc/security/keytabs/smokeuser.headless.keytab chown hdfs:hadoop /etc/security/keytabs/hdfs.headless.keytab chmod 440 /etc/security/keytabs/hdfs.headless.keytab chown hbase:hadoop /etc/security/keytabs/hbase.headless.keytab chmod 440 /etc/security/keytabs/hbase.headless.keytab -
On each host that runs an HDFS DataNode:
chown hdfs:hadoop /etc/security/keytabs/dn.service.keytab chmod 400 /etc/security/keytabs/dn.service.keytab -
On the host that runs the MR2 History Server:
chown mapred:hadoop /etc/security/keytabs/jhs.service.keytab chmod 400 /etc/security/keytabs/jhs.service.keytab chown root:hadoop /etc/security/keytabs/spnego.service.keytab chmod 440 /etc/security/keytabs/spnego.service.keytab -
On the host that runs the YARN ResourceManager:
chown yarn:hadoop /etc/security/keytabs/rm.service.keytab chmod 400 /etc/security/keytabs/rm.service.keytab -
On each host that runs a YARN NodeManager:
chown yarn:hadoop /etc/security/keytabs/nm.service.keytab chmod 400 /etc/security/keytabs/nm.service.keytab -
On the host that runs the Oozie Server:
chown oozie:hadoop /etc/security/keytabs/oozie.service.keytab chmod 400 /etc/security/keytabs/oozie.service.keytab chown root:hadoop /etc/security/keytabs/spnego.service.keytab chmod 440 /etc/security/keytabs/spnego.service.keytab -
On the host that runs the Hive Metastore, HiveServer2 and WebHCat:
chown hive:hadoop /etc/security/keytabs/hive.service.keytab chmod 400 /etc/security/keytabs/hive.service.keytab chown root:hadoop /etc/security/keytabs/spnego.service.keytab chmod 440 /etc/security/keytabs/spnego.service.keytab -
On hosts that run the HBase MasterServer, RegionServer and ZooKeeper:
chown hbase:hadoop /etc/security/keytabs/hbase.service.keytab chmod 400 /etc/security/keytabs/hbase.service.keytab chown zookeeper:hadoop /etc/security/keytabs/zk.service.keytab chmod 400 /etc/security/keytabs/zk.service.keytab -
On the host that runs the Nagios server:
chown nagios:nagios /etc/security/keytabs/nagios.service.keytab chmod 400 /etc/security/keytabs/nagios.service.keytab -
On each host that runs a JournalNode, if you are setting up NameNode HA:
chown hdfs:hadoop /etc/security/keytabs/jn.service.keytab
                        chmod 400 /etc/security/keytabs/jn.service.keytab
-
-
Verify that the correct keytab files and principals are associated with the correct service using the
klistcommand. For example, on the NameNode:klist –k -t /etc/security/keytabs/nn.service.keytabDo this on each respective service in your cluster.
Creating Service Principals and Keytab Files for HDP 1.x
Each service and sub-service in Hadoop must have its own principal. A principal name in a given realm consists of a primary name and an instance name, which in this case is the FQDN of the host that runs that service. As services do not log in with a password to acquire their tickets, their principal's authentication credentials are stored in a keytab file, which is extracted from the Kerberos database and stored locally with the service principal on the service component host.
First, you must create the principal, using mandatory naming conventions. Then you must create the keytab file with that principal's information and copy the file to the keytab directory on the appropriate service host.
-
Open the
kadmin.localutility on the KDC machine/usr/sbin/kadmin.local -
Create the service principals:
$kadmin.local
                  addprinc -randkey $primary_name / $fully.qualified.domain.name @EXAMPLE.COM
The
-randkeyoption is used to generate the password.Notice in the example that each service principal's primary name has appended to it the instance name, the FQDN of the host on which it runs. This provides a unique principal name for services that run on multiple hosts, like DataNodes and TaskTrackers. The addition of the host name serves to distinguish, for example, a request from DataNode A from a request from DataNode B. This is important for the following reasons:
-
If the Kerberos credentials for one DataNode are compromised, it does not automatically lead to all DataNodes being compromised
-
If multiple DataNodes have exactly the same principal and are simultaneously connecting to the NameNode, and if the Kerberos authenticator being sent happens to have same time stamp, then the authentication would be rejected as a replay request.
The principal name must match the following values:
Service Principals
Service
Component
Mandatory Principal Name
HDFS
NameNode
nn/$FQDN
HDFS
NameNode HTTP
HTTP/$FQDN
HDFS
SecondaryNameNode
nn/$FQDN
HDFS
SecondaryNameNode HTTP
HTTP/$FQDN
HDFS
DataNode
dn/$FQDN
MapReduce
JobTracker
jt/$FQDN
MapReduce
TaskTracker
tt/$FQDN
Oozie
Oozie Server
oozie/$FQDN
Oozie
Oozie HTTP
HTTP/$FQDN
Hive
Hive Metastore HiveServer2
hive/$FQDN
Hive
WebHCat
HTTP/$FQDN
HBase
MasterServer
hbase/$FQDN
HBase
RegionServer
hbase/$FQDN
ZooKeeper
ZooKeeper
zookeeper/$FQDN
Nagios Server
Nagios
nagios/$FQDN
For example : To create the principal for a DataNode service, issue the following command:
$kadmin.local addprinc -randkey dn/$DataNode-Host@EXAMPLE.COM -
-
In addition you must create four special principals for Ambari's own use.
You do NOT need to append the FQDN to the primary name:
Ambari Principals
User
Default Principal Name
Ambari UserThis principal is used with the JAAS configuration. See Setting Up JAAS for Ambari for more information.
ambari
Ambari Smoke Test User
ambari-qa
Ambari HDFS User
hdfs
Ambari HBase User
hbase
-
After the principals are created in the database, you can extract the related keytab files for transfer to the appropriate host:
$kadmin.local xst -norandkey -k $keytab_file_name $primary_name/fully.qualified.domain.name@EXAMPLE.COMYou must use the mandatory names for the <keytab_file_name> variable shown in the following table. Adjust the principal names if necessary.
Service Keytab File Names
Component
Principal Name
Mandatory Keytab File Name
NameNode
nn/$FQDN
nn.service.keytab
NameNode HTTP
HTTP/$FQDN
spnego.service.keytab
SecondaryNameNode
nn/$FQDN
nn.service.keytab
SecondaryNameNode HTTP
HTTP/$FQDN
spnego.service.keytab
DataNode
dn/$FQDN
dn.service.keytab
JobTracker
jt/$FQDN
jt.service.keytab
TaskTracker
tt/$FQDN
tt.service.keytab
Oozie Server
oozie/$FQDN
oozie.service.keytab
Oozie HTTP
HTTP/$FQDN
spnego.service.keytab
Hive Metastore HiveServer2
hive/$FQDN
hive.service.keytab
WebHCat
HTTP/$FQDN
spnego.service.keytab
HBase Master Server
hbase/$FQDN
hbase.service.keytab
HBase RegionServer
hbase/$FQDN
hbase.service.keytab
ZooKeeper
zookeeper/$FQDN
zk.service.keytab
Nagios Server
nagios/$FQDN
nagios.service.keytab
Ambari UserThis principal is used with the JAAS configuration. See Setting Up JAAS for Ambari for more information.
ambari
ambari.keytab
Ambari Smoke Test User
ambari-qa
smokeuser.headless.keytab
Ambari HDFS User
hdfs
hdfs.headless.keytab
Ambari HBase User
hbase
hbase.headless.keytab
For example : To create the keytab files for NameNode HTTP, issue this command:
xst -norandkey -k spnego.service.keytab HTTP/<namenode-host> -
When the keytab files have been created, on each host create a directory for them and set appropriate permissions.
mkdir -p /etc/security/keytabs/ chown root:hadoop /etc/security/keytabs chmod 750 /etc/security/keytabs -
Copy the appropriate keytab file to each host. If a host runs more than one component (for example, both TaskTracker and DataNode), copy keytabs for both components. The Ambari Smoke Test User, the Ambari HDFS User, and the Ambari HBase User keytabs should be copied to all hosts.
-
Set appropriate permissions for the keytabs.
If you have customized service user names, replace the default values below with your appropriate service user, group, and keytab names.
-
Optionally, if you have Set up JAAS for Ambari on the Ambari server host:
chown ambari:ambari /etc/security/keytabs/ambari.keytab chmod 400 /etc/security/keytabs/ambari.keytab -
On the HDFS NameNode and SecondaryNameNode hosts:
chown hdfs:hadoop /etc/security/keytabs/nn.service.keytab chmod 400 /etc/security/keytabs/nn.service.keytab chown root:hadoop /etc/security/keytabs/spnego.service.keytab chmod 440 /etc/security/keytabs/spnego.service.keytab -
On the HDFS NameNode host, for the Ambari Test Users:
chown ambari-qa:hadoop /etc/security/keytabs/smokeuser.headless.keytab chmod 440 /etc/security/keytabs/smokeuser.headless.keytab chown hdfs:hadoop /etc/security/keytabs/hdfs.headless.keytab chmod 440 /etc/security/keytabs/hdfs.headless.keytab chown hbase:hadoop /etc/security/keytabs/hbase.headless.keytab chmod 440 /etc/security/keytabs/hbase.headless.keytab -
On each host that runs an HDFS DataNode:
chown hdfs:hadoop /etc/security/keytabs/dn.service.keytab chmod 400 /etc/security/keytabs/dn.service.keytab -
On the host that runs the MapReduce JobTracker:
chown mapred:hadoop /etc/security/keytabs/jt.service.keytab chmod 400 /etc/security/keytabs/jt.service.keytab -
On each host that runs a MapReduce TaskTracker:
chown mapred:hadoop /etc/security/keytabs/tt.service.keytab chmod 400 /etc/security/keytabs/tt.service.keytab -
On the host that runs the Oozie Server:
chown oozie:hadoop /etc/security/keytabs/oozie.service.keytab chmod 400 /etc/security/keytabs/oozie.service.keytab chown root:hadoop /etc/security/keytabs/spnego.service.keytab chmod 440 /etc/security/keytabs/spnego.service.keytab -
On the host that runs the Hive Metastore, HiveServer2 and WebHCat:
chown hive:hadoop /etc/security/keytabs/hive.service.keytab chmod 400 /etc/security/keytabs/hive.service.keytab chown root:hadoop /etc/security/keytabs/spnego.service.keytab chmod 440 /etc/security/keytabs/spnego.service.keytab -
On hosts that run the HBase MasterServer, RegionServer and ZooKeeper:
chown hbase:hadoop /etc/security/keytabs/hbase.service.keytab chmod 400 /etc/security/keytabs/hbase.service.keytab chown zookeeper:hadoop /etc/security/keytabs/zk.service.keytab chmod 400 /etc/security/keytabs/zk.service.keytab -
On the host that runs the Nagios server:
chown nagios:nagios /etc/security/keytabs/nagios.service.keytab
                        chmod 400 /etc/security/keytabs/nagios.service.keytab
-
-
Verify that the correct keytab files and principals are associated with the correct service using the
klistcommand. For example, on the NameNode:klist –k -t /etc/security/keytabs/nn.service.keytab .Do this on each respective service in your cluster.
Setting Up Hadoop Users
This section provides information on setting up Hadoop users for Kerberos.
Overview
Hadoop determines group file ownership and access control based on each user's group memberships. To configure Hadoop for use with Kerberos and Ambari you must create a mapping between service principals and these UNIX user names.
A user is mapped to the groups in which it belongs using an implementation of the GroupMappingServiceProviderinterface. The implementation is pluggable and is configured in core-site.xml.
By default Hadoop uses ShellBasedUnixGroupsMapping, which is an implementation of GroupMappingServiceProvider. It fetches the group membership for a user name by executing a UNIX shell command.
In secure clusters, since the user names are actually Kerberos principals, ShellBasedUnixGroupsMapping will work only if the Kerberos principals map to valid UNIX user names. Hadoop provides
a feature that lets administrators specify mapping rules to map a Kerberos principal
to a local UNIX user name.
Creating Mappings Between Principals and UNIX User names
Hadoop uses a rule-based system to create mappings between service principals and
their related UNIX user names. The rules are specified in the core-site.xml configuration file as the value to the optional key hadoop.security.auth_to_local.
The default rule is simply named DEFAULT. It translates all principals in your default domain to their first component. For
example, myusername@APACHE.ORG and myusername/admin@APACHE.ORG both become myusername, assuming your default domain is APACHE.ORG.
Use the following instructions to configure the mappings between principals and UNIX user names:
Creating Rules
-
Simple Rules
To make a simple map between principal names and UNIX users, you create a straightforward substitution rule. For example, to map the ResourceManager(rm) and NodeManager(nm) principals in the EXAMPLE.COM realm to the UNIX $YARN_USER user and the NameNode(nn) and DataNode(dn) principals to the UNIX $HDFS_USER user, you would make this the value for the
hadoop.security.auth_to_localkey incore-site.xml.RULE:[2:$1@$0]([jt]t@.*EXAMPLE.COM)s/.*/ $YARN_USER / RULE:[2:$1@$0]([nd]n@.*EXAMPLE.COM)s/.*/ $HDFS_USER / DEFAULT -
Complex Rules
To accommodate more complex translations, you create a hierarchical set of rules to add to the default. Each rule is divided into three parts: base, filter, and substitution.
-
The Base:
The base begins with the number of components in the principal name (excluding the realm), followed by a colon, and the pattern for building the user name from the sections of the principal name. In the pattern section
$0translates to the realm,$1translates to the first component and$2to the second component.For example:
[1:$1@$0]translatesmyusername@APACHE.ORGtomyusername@APACHE.ORG[2:$1]translatesmyusername/admin@APACHE.ORGtomyusername[2:$1%$2]translatesmyusername/admin@APACHE.ORGtomyusername%admin -
The Filter:
The filter consists of a regex in a parentheses that must match the generated string for the rule to apply.
For example:
(.*%admin)matches any string that ends in%admin(.*@SOME.DOMAIN)matches any string that ends in@SOME.DOMAIN -
The Substitution:
The substitution is a sed rule that translates a regex into a fixed string.
For example:
s/@ACME\.COM//removes the first instance of@SOME.DOMAIN.s/@[A-Z]*\.COM//removes the first instance of@followed by a name followed byCOM.s/X/Y/greplaces all of theXin the name withY
-
Examples
-
If your default realm was
APACHE.ORG, but you also wanted to take all principals fromACME.COMthat had a single componentjoe@ACME.COM, you would create this rule:RULE:[1:$1@$0](.*@ACME\.COM)s/@.*// DEFAULT -
To also translate names with a second component, you would use these rules:
RULE:[1:$1@$0](.*@ACME\.COM)s/@.*// RULE:[2:$1@$0](.*@ACME\.COM)s/@.*// DEFAULT -
To treat all principals from
APACHE.ORGwith the extension/adminasadmin, your rules would look like this:RULE[2:$1%$2@$0](.*%admin@APACHE\.ORG)s/.*/admin/ DEFAULT
Setting up Ambari for Kerberos
To turn on Kerberos-based security in the Ambari Web GUI you must:
-
Have already set up Kerberos for your cluster. For more information, see Preparing Kerberos for Hadoop.
-
Go to the
Admintab. -
Select
Security. -
Click
Enable Securityand follow the steps in theEnable Security Wizard.
Setting up JAAS for Ambari
If you want to set up Java Authentication and Authorization Services (JAAS) configurations for Ambari to provide independent, secure access to native Hadoop GUIs such as the NameName UI, use the Apache community documentation topic Create the JAAS Configuration Files to set up your configurations. Then, do the following:
-
Log into the Ambari server host.
Ambari Server should not be running when you do this. Edit configuration files before you start Ambari Server the first time or, stop the Ambari Server, edit the files, then re-start Ambari Server.
-
Run the following, specific setup-security command and answer the prompts:
ambari-server setup-security-
Select 5 for
Setup Ambari kerberos JAAS configuration. -
Enter the Kerberos principal name for the Ambari server you set up earlier.
-
Enter the path to the keytab for the Ambari principal.
-
Restart Ambari Server:
ambari-server restart
-
Deploying JCE Policy Archives on the Ambari Server
On a secure cluster having no internet access, you must deploy the Java Cryptography Extension (JCE) security policy.jar files on the Ambari Server, before setting up your Ambari server with a custom JDK.
When you enable security, Ambari distributes the JCE.jars to all appropriate hosts in your cluster.
To obtain and deploy the JCE.jar files appropriate for the JDK version in your cluster on your Ambari-server host,
-
Download the archive from one of the following locations
For JDK 1.6 : http://www.oracle.com/technetwork/java/javase/downloads/jce-6-download-429243.html
For JDK 1.7 : http://www.oracle.com/technetwork/java/javase/downloads/jce-7-download-432124.html
-
Save the archive in a temporary location.
-
Copy the archive to
/var/lib/ambari-server/resourceson the Ambari server.
Advanced Security Options for Ambari
This section describes several security options for an Ambari-monitored-and-managed Hadoop cluster.
Setting Up Ambari for LDAP or Active Directory Authentication
By default Ambari uses an internal database as the user store for authentication and authorization. If you want to configure LDAP or Active Directory (AD) external authentication, you need to collect the following information and run a setup command.
Also, you must synchronize your LDAP users and groups into the Ambari DB to be able to manage authorization and permissions against those users and groups.
Setting Up LDAP User Authentication
The following table details the properties and values you need to know to set up LDAP authentication.
Ambari Server LDAP Properties
|
Property |
Values |
Description |
|---|---|---|
|
authentication.ldap.primaryUrl |
server:port |
The hostname and port for the LDAP or AD server. Example: my.ldap.server:389 |
|
authentication.ldap.secondaryUrl |
server:port |
The hostname and port for the secondary LDAP or AD server. Example: my.secondary.ldap.server:389 This is an optional value. |
|
authentication.ldap.useSSL |
true or false |
If true, use SSL when connecting to the LDAP or AD server. |
|
authentication.ldap.usernameAttribute |
[LDAP attribute] |
The attribute for username. Example: uid |
|
authentication.ldap.baseDn |
[Distinguished Name] |
The root Distinguished Name to search in the directory for users. Example: ou=people,dc=hadoop,dc=apache,dc=org |
|
authentication.ldap.bindAnonymously |
true or false |
If true, bind to the LDAP or AD server anonymously |
|
authentication.ldap.managerDn |
[Full Distinguished Name] |
If Bind anonymous is set to false, the Distinguished Name (“DN”) for the manager. Example: uid=hdfs,ou=people,dc=hadoop,dc=apache,dc=org |
|
authentication.ldap.managerPassword |
[password] |
If Bind anonymous is set to false, the password for the manager |
|
authentication.ldap.userObjectClass |
[LDAP Object Class] |
The object class that is used for users. Example: organizationalPerson |
|
authentication.ldap.groupObjectClass |
[LDAP Object Class] |
The object class that is used for groups. Example: groupOfUniqueNames |
|
authentication.ldap.groupMembershipAttr |
[LDAP attribute] |
The attribute for group membership. Example: uniqueMember |
|
authentication.ldap.groupNamingAttr |
[LDAP attribute] |
The attribute for group name. |
Configure Ambari to use LDAP Server
If the LDAPS server certificate is signed by a trusted Certificate Authority, there
is no need to import the certificate into Ambari so this section does not apply to
you. If the LDAPS server certificate is self-signed, or is signed by an unrecognized
certificate authority such as an internal certificate authority, you must import the
certificate and create a keystore file. The following example creates a keystore file
at /keys/ldaps-keystore.jks, but you can create it anywhere in the file system:
Run the LDAP setup command on the Ambari server and answer the prompts, using the
information you collected above:
-
mkdir /keys -
$JAVA_HOME/bin/keytool -import -trustcacerts -alias root -file $PATH_TO_YOUR_LDAPS_CERT -keystore /keys/ldaps-keystore.jks -
Set a password when prompted. You will use this during ambari-server setup-ldap.
ambari-server setup-ldap
-
At the
Primary URL*prompt, enter the server URL and port you collected above. Prompts marked with an asterisk are required values. -
At the
Secondary URLprompt, enter the secondary server URL and port. This value is optional. -
At the
Use SSL*prompt, enter your selection. If using LDAPS, entertrue. -
At the
User name attribute*prompt, enter your selection. The default value isuid. -
At the
Base DN*prompt, enter your selection. -
At the
Bind anonymously*prompt, enter your selection. -
At the
Manager DN*prompt, enter your selection if you have setbind.Anonymouslyto false. -
At the
Enter the Manager Password*prompt, enter the password for your LDAP manager. -
At the Enter the
userObjectClass*prompt, enter the object class that is used for users. -
At the Enter the
groupObjectClass*prompt, enter the object class that is used for groups. -
At the Enter the
groupMembershipAttr*prompt, enter the attribute for group membership. -
At the Enter the
groupNamingAttr*prompt, enter the attribute for group name. -
If you set
Use SSL*= true in step 3, the following prompt appears:Do you want to provide custom TrustStore for Ambari?Consider the following options and respond as appropriate.
-
More secure option: If using a self-signed certificate that you do not want imported to the existing JDK keystore, enter
y.For example, you want this certificate used only by Ambari, not by any other applications run by JDK on the same host.
If you choose this option, additional prompts appear. Respond to the additional prompts as follows:
-
At the
TrustStore typeprompt, enterjks. -
At the
Path to TrustStore fileprompt, enter/keys/ldaps-keystore.jks(or the actual path to your keystore file). -
At the
Password for TrustStoreprompt, enter the password that you defined for the keystore.
-
-
Less secure option: If using a self-signed certificate that you want to import and store in the existing, default JDK keystore, enter
n.-
Convert the SSL certificate to X.509 format, if necessary, by executing the following command:
openssl x509 -in slapd.pem -out<slapd.crt>Where <slapd.crt> is the path to the X.509 certificate.
-
Import the SSL certificate to the existing keystore, for example the default jre certificates storage, using the following instruction:
/usr/jdk64/jdk1.7.0_45/bin/keytool -import -trustcacerts -file slapd.crt -keystore
                              /usr/jdk64/jdk1.7.0_45/jre/lib/security/cacerts
Where Ambari is set up to use JDK 1.7. Therefore, the certificate must be imported in the JDK 7 keystore.
-
-
-
Review your settings and if they are correct, select
y. -
Start or restart the Server
ambari-server restartInitially the users you have enabled all have Ambari User privileges. Ambari Users can read metrics, view service status and configuration, and browse job information. For these new users to be able to start or stop services, modify configurations, and run smoke tests, they need to be Admins. To make this change, as an Ambari Admin, use
Manage Ambari > Users > Edit. For instructions, see Managing Users and Groups.
Synchronizing LDAP Users and Groups
Run the LDAP synchronize command and answer the prompts to initiate the sync:ambari-server sync-ldap [option]
The utility provides three options for synchronization:
-
Specific set of users and groups, or
-
Synchronize the existing users and groups in Ambari with LDAP, or
-
All users and groups
Specific Set of Users and Groups
ambari-server sync-ldap --users users.txt --groups groups.txt
Use this option to synchronize a specific set of users and groups from LDAP into Ambari.
Provide the command a text file of comma-separated users and groups, and those LDAP
entities will be imported and synchronized with Ambari.
Existing Users and Groups
ambari-server sync-ldap --existing
After you have performed a synchronization of a specific set of users and groups, you use this option to synchronize only those entities that are in Ambari with LDAP.
Users will be removed from Ambari if they no longer exist in LDAP, and group membership
in Ambari will be updated to match LDAP.
All Users and Groups
ambari-server sync-ldap --all
This will import all entities with matching LDAP user and group object classes into
Ambari.
Optional: Encrypt Database and LDAP Passwords
By default the passwords to access the Ambari database and the LDAP server are stored in a plain text configuration file. To have those passwords encrypted, you need to run a special setup command.
Ambari Server should not be running when you do this: either make the edits before you start Ambari Server the first time or bring the server down to make the edits.
-
On the Ambari Server, run the special setup command and answer the prompts:
ambari-server setup-security-
Select
4forEncrypt passwords stored in ambari.properties file. -
Provide a master key for encrypting the passwords. You are prompted to enter the key twice for accuracy.
If your passwords are encrypted, you need access to the master key to start Ambari Server.
-
You have three options for maintaining the master key:
-
At the
Persistprompt, selecty. This stores the key in a file on the server. -
Create an environment variable AMBARI_SECURITY_MASTER_KEY and set it to the key.
-
Provide the key manually at the prompt on server start up.
-
-
Start or restart the Server
ambari-server restart
-
Reset Encryption
There may be situations in which you want to:
-
Change the current master key, either because the key has been forgotten or because you want to change the current key as a part of a security routine.
Ambari Server should not be running when you do this.
Remove Encryption Entirely
To reset Ambari database and LDAP passwords to a completely unencrypted state:
-
On the Ambari host, open
/etc/ambari-server/conf/ambari.propertieswith a text editor and set this propertysecurity.passwords.encryption.enabled=false -
Delete
/var/lib/ambari-server/keys/credentials.jceks -
Delete
/var/lib/ambari-server/keys/master -
You must now reset the database password and, if necessary, the LDAP password. Run ambari-server setup and ambari-server setup-ldap again.
Change the Current Master Key
To change the master key:
-
If you know the current master key or if the current master key has been persisted:
-
Re-run the encryption setup command and follow the prompts.
ambari-server setup-security-
Select
4forEncrypt passwords stored in ambari.properties file. -
Enter the current master key when prompted if necessary (if it is not persisted or set as an environment variable).
-
At the
Do you want to reset Master Keyprompt, enteryes. -
At the prompt, enter the new master key and confirm.
-
-
-
If you do not know the current master key:
Optional: Set Up Security for Ambari
There are four ways you can increase the security settings for your Ambari server installation.
Set Up HTTPS for Ambari Server
If you want to limit access to the Ambari Server to HTTPS connections, you need to provide a certificate. While it is possible to use a self-signed certificate for initial trials, they are not suitable for production environments. After your certificate is in place, you must run a special setup command.
Ambari Server should not be running when you do this. Either make these changes before you start Ambari the first time, or bring the server down before running the setup command.
-
Log into the Ambari Server host.
-
Locate your certificate. If you want to create a temporary self-signed certificate, use this as an example:
openssl genrsa -out $wserver.key 2048
                  openssl req -new -key $wserver.key -out $wserver.csr
                  openssl x509 -req -days 365 -in $wserver.csr -signkey $wserver.key -out $wserver.crt
Where
$wserveris the Ambari Server host name.The certificate you use must be PEM-encoded, not DER-encoded. If you attempt to use a DER-encoded certificate, you see the following error:
unable to load certificate
                  140109766494024:error:0906D06C:PEM routines:PEM_read_bio:no start line:pem_lib.c
                  :698:Expecting: TRUSTED CERTIFICATE
You can convert a DER-encoded certificate to a PEM-encoded certificate using the following command:
openssl x509 -in cert.crt -inform der -outform pem -out cert.pemwhere
cert.crtis the DER-encoded certificate andcert.pemis the resulting PEM-encoded certificate. -
Run the special setup command and answer the prompts
ambari-server setup-security-
Select
1forEnable HTTPS for Ambari server. -
Respond
ytoDo you want to configure HTTPS ? -
Select the port you want to use for SSL. The default port number is 8443.
-
Provide the path to your certificate and your private key. For example, put your certificate and private key in
/etc/ambari-server/certswith root as the owner or the non-root user you designated during Ambari Server setup for the ambari-server daemon. -
Provide the password for the private key.
-
Start or restart the Server
ambari-server restart
-
Set Up HTTPS for Ganglia
If you want Ganglia to use HTTPS instead of the default HTTP to communicate with Ambari Server, use the following instructions.
The servers should not be running when you do this: either make the edits before you start Ambari Server the first time or bring the servers down to make the edits.
-
Set up the Ganglia server.
-
Log into the Ganglia server host.
-
Create a self-signed certificate on the Ganglia server host. For example:
openssl genrsa -out $gserver.key 2048
                        openssl req -new -key $gserver.key -out $gserver.csr
                        openssl x509 -req -days 365 -in $gserver.csr -signkey $gserver.key -out $gserver.crt
Where
$gserveris the Ganglia server host name. -
Install SSL on the Ganglia server host.
yum install mod_ssl -
Edit the SSL configuration file on the Ganglia server host.
-
Using a text editor, open:
/etc/httpd/conf.d/ssl.conf -
Add lines setting the certificate and key file names to the files you created earlier in this procedure. For example:
SSLCertificateFile $gserver.crt
                              SSLCertificateKeyFile $gserver.key
-
-
Disable HTTP access (optional).
-
Using a text editor, open:
/etc/httpd/conf/httpd.conf -
Comment out the port 80 listener:
# Listen 80
-
-
Restart the
httpdservice on the Ganglia server host.service httpd restart
-
-
Set up and restart the Ambari Server.
-
Log into the Ambari Server.
-
Run the special setup command and answer the prompts.
ambari-server setup-security-
Select
2forEnable HTTPS for Ganglia service. -
Respond
ytoDo you want to configure HTTPS for Ganglia service. -
Enter your TrustStore type. Your options are
jks,jceks, orpks12. -
Enter the path to your TrustStore file.
-
Enter the password for your TrustStore and then re-enter to confirm. The password must be at least 6 characters long.
-
Enter the path to the Ganglia server certificate file.
-
-
Start or restart the Server
ambari-server restart
-
Set Up HTTPS for Nagios
If you want Nagios to use HTTPS instead of HTTP (the default), use the following instructions.
The servers should not be running when you do this: either make the edits before you start Ambari Server the first time or bring the servers down to make the edits.
-
Set up the Nagios server.
-
Log into the Nagios server host.
-
Create a self-signed certificate on the Nagios server host. For example:
openssl genrsa -out $nserver.key 2048
                        openssl req -new -key $nserver.key -out $nserver.csr
                        openssl x509 -req -days 365 -in $nserver.csr -signkey $nserver.key -out $nserver.crt
Where
$nserveris the Nagios server host name. -
Install SSL on the Nagios server host.
yum install mod_ssl -
Edit the SSL configuration file on the Nagios server host.
-
Using a text editor, open:
/etc/httpd/conf.d/ssl.conf -
Add lines setting the certificate and key file names to the files you created previously in this procedure. For example:
SSLCertificateFile $nserver.crt
                              SSLCertificateKeyFile $nserver.key
-
-
Disable HTTP access (optional)
-
Using a text editor, open:
/etc/httpd/conf/httpd.conf -
Comment out the port 80 listener:
# Listen 80
-
-
Restart the
httpdservice on the Nagios server host.service httpd restart
-
-
Set up and restart the Ambari Server.
-
Log into the Ambari Server.
-
Run the special setup command and answer the prompts.
ambari-server setup-security-
Select
2forEnable HTTPS for Nagios service. -
Respond
ytoDo you want to configure HTTPS for Nagios?. -
Enter your TrustStore type. Your options are
jks,jceks, orpks12. -
Enter the path to your TrustStore file.
-
Enter the password for your TrustStore and then re-enter to confirm. The password must be at least 6 characters long.
-
Enter the path to the Nagios server certificate file.
-
-
Start or restart the Server
ambari-server restart
-
Optional: Set Up Two-Way SSL Between Ambari Server and Ambari Agents
Two-way SSL provides a way to encrypt communication between Ambari Server and Ambari Agents. By default Ambari ships with Two-way SSL disabled. To enable Two-way SSL:
Ambari Server should not be running when you do this: either make the edits before you start Ambari Server the first time or bring the server down to make the edits.
-
On the Ambari Server host, open
/etc/ambari-server/conf/ambari.propertieswith a text editor. -
Add the following property:
security.server.two_way_ssl = true -
Start or restart the Ambari Server.
ambari-server restart
The Agent certificates are downloaded automatically during Agent Registration.
Optional: Configure Ciphers and Protocols for Ambari Server
Ambari provides control of ciphers and protocols that are exposed via Ambari Server.
-
To disable specific ciphers, you can optionally add a list of the following format to ambari.properties. If you specify multiple ciphers, separate each cipher using a vertical bar |.
security.server.disabled.ciphers=TLS_ECDHE_RSA_WITH_3DES_EDE_CBC_SHA -
To disable specific protocols, you can optionally add a list of the following format to ambari.properties. If you specify multiple protocols, separate each protocol using a vertical bar |.
security.server.disabled.protocols=SSL|SSLv2|SSLv3
Troubleshooting Ambari Deployments
Introduction
The first step in troubleshooting any problem in an Ambari-deploying Hadoop cluster is Reviewing the Ambari Log Files.
Find a recommended solution to a troubleshooting problem in one of the following sections:
Reviewing Ambari Log Files
Find files that log activity on an Ambari host in the following locations:
-
Ambari Server logs
<your.Ambari.server.host>/var/log/ambari-server/ambari-server.log -
Ambari Agent logs
<your.Ambari.agent.host>/var/log/ambari-agent/ambari-agent.log -
Ambari Action logs
<your.Ambari.agent.host>/var/lib/ambari-agent/data/This location contains logs for all tasks executed on an Ambari agent host. Each log name includes:
-
commands-N.txt - the command file corresponding to a specific task.
-
output-N.txt - the output from the command execution.
-
errors-N.txt - error messages.
-
Resolving Ambari Installer Problems
Try the recommended solution for each of the following problems:
Problem: Browser crashed before Install Wizard completes
Your browser crashes or you accidentally close your browser before the Install Wizard completes.
Solution
The response to a browser closure depends on where you are in the process:
-
The browser closes before you press the
Deploybutton.Re-launch the same browser and continue the install process. Using a different browser forces you to re-start the entire process.
-
The browser closes after you press
Deploy, while or after theInstall, Start, and Testscreen opens.Re-launch the same browser and continue the process, or log in again, using a different browser. When the
Install, Start, and Testdisplays, proceed.
Problem: Install Wizard reports that the cluster install has failed
The Install, Start, and Test screen reports that the cluster install has failed.
Solution
The response to a report of install failure depends on the cause of the failure:
-
The failure is due to intermittent network connection errors during software package installs.
Use the
Retrybutton on theInstall, Start, and Testscreen. -
The failure is due to misconfiguration or other setup errors.
-
Use the left navigation bar to go back to the appropriate screen. For example,
Customize Services. -
Make your changes.
-
Continue in the normal way.
-
-
The failure occurs during the start/test sequence.
-
Click
NextandComplete,then proceed to theMonitoring Dashboard. -
Use the
Services Viewto make your changes. -
Re-start the service using
Service Actions.
-
-
The failure is due to something else.
-
Open an SSH connection to the Ambari Server host.
-
Clear the database. At the command line, type:
ambari-server reset -
Clear your browser cache.
-
Re-run the Install Wizard.
-
Problem: Ambari Agents May Fail to Register with Ambari Server.
When deploying HDP using Ambari 1.4.x or later on RHEL CentOS 6.5, click the “Failed” link on the Confirm Hosts page in the Cluster Install wizard to display the Agent logs. The following log entry indicates the SSL connection between the Agent and Server failed during registration:
            INFO 2014-04-02 04:25:22,669 NetUtil.py:55 - Failed to connect to https://{ambari-server}:8440/cert/ca
            due to [Errno 1] _ssl.c:492: error:100AE081:elliptic curve routines:EC_GROUP_new_by_curve_name:unknown
            group
For more detailed information about this OpenSSL issue, see https://bugzilla.redhat.com/show_bug.cgi?id=1025598
Solution:
In certain recent Linux distributions, such as RHEL/Centos/Oracle Linux 6.x, the default
value of nproc is lower than the value required to deploy the HBase service successfully. If you
are deploying HBase, change the value of nproc:
-
Check the OpenSSL library version installed on your host(s):
rpm -qa | grepopenssl openssl-1.0.1e-15.el6.x86_64 -
If the output reads
openssl-1.0.1e-15.x86_64 (1.0.1 build 15),you must upgrade the OpenSSL library. To upgrade the OpenSSL library, run the following command:yum upgrade openssl -
Verify you have the newer version of OpenSSL (1.0.1 build 16):
rpm -qa | grep opensslopenssl-1.0.1e-16.el6.x86_64 -
Restart Ambari Agent(s) and click
Retry -> Failedin the wizard user interface.
Problem: The “yum install ambari-server” Command Fails
You are unable to get the initial install command to run.
Solution:
You may have incompatible versions of some software components in your environment. See Meet Minimum System Requirements in Installing HDP Using Ambari for more information, then make any necessary changes.
Problem: HDFS Smoke Test Fails
If your DataNodes are incorrectly configured, the smoke tests fail and you get this error message in the DataNode logs:
            DisallowedDataNodeException
            org.apache.hadoop.hdfs.server.protocol.
            DisallowedDatanodeException
Solution:
-
Make sure that reverse DNS look-up is properly configured for all nodes in your cluster.
-
Make sure you have the correct FQDNs when specifying the hosts for your cluster. Do not use IP addresses - they are not supported.
-
Restart the installation process.
Problem: yum Fails on Free Disk Space Check
If you boot your Hadoop DataNodes with/as a ramdisk, you must disable the free space check for yum before doing the install. If you do not disable the free space check, yum will fail with the following error:
            Fail: Execution of '/usr/bin/yum -d 0 -e 0 -y install unzip' returned 1. Error Downloading
            Packages: unzip-6.0-1.el6.x86_64: Insufficient space in download directory /var/cache/yum/x86_64/6/base/packages
            * free   0
            * needed 149 k
Solution:
To disable free space check, update the DataNode image with a directive in /etc/yum.conf:
diskspacecheck=0
Problem: A service with a customized service user is not appearing properly in Ambari Web
You are unable to monitor or manage a service in Ambari Web when you have created
a customized service user name with a hyphen, for example, hdfs-user.
Solution
Hyphenated service user names are not supported. You must re-run the Ambari Install Wizard and create a different name.
Resolving Cluster Deployment Problems
Try the recommended solution for each of the following problems:.
Problem: Trouble Starting Ambari on System Reboot
If you reboot your cluster, you must restart the Ambari Server and all the Ambari Agents manually.
Solution:
Log in to each machine in your cluster separately:
-
On the Ambari Server host machine:
ambari-server start -
On each host in your cluster:
ambari-agent start
Problem: Metrics and Host information display incorrectly in Ambari Web
Charts appear incorrectly or not at all despite being available in the native Ganglia interface or Host health status is displayed incorrectly.
Solution:
All the hosts in your cluster and the machine from which you browse to Ambari Web must be in sync with each other. The easiest way to assure this is to enable NTP.
Problem: On SUSE 11 Ambari Agent crashes within the first 24 hours
SUSE 11 ships with Python version 2.6.0-8.12.2 which contains a known defect that causes this crash.
Solution:
Upgrade to Python version 2.6.8-0.15.1.
Problem: Attempting to Start HBase REST server causes either REST server or Ambari Web to fail
As an option you can start the HBase REST server manually after the install process is complete. It can be started on any host that has the HBase Master or the Region Server installed. If you install the REST server on the same host as the Ambari server, the http ports will conflict.
Solution
In starting the REST server, use the -p option to set a custom port.
Use the following command to start the REST server.
/usr/lib/hbase/bin/hbase-daemon.sh start rest -p <custom_port_number>
Problem: Multiple Ambari Agent processes are running, causing re-register
On a cluster host ps aux | grep ambari-agent shows more than one agent process running. This causes Ambari Server to get incorrect
ids from the host and forces Agent to restart and re-register.
Solution
On the affected host, kill the processes and restart.
-
Kill the Agent processes and remove the Agent PID files found here:
/var/run/ambari-agent/ambari-agent.pid. -
Restart the Agent process:
ambari-agent start
Problem: Some graphs do not show a complete hour of data until the cluster has been running for an hour
When you start a cluster for the first time, some graphs, such as Services View > HDFS and Services View > MapReduce, do not plot a complete hour of data. Instead, they show data only for the length
of time the service has been running. Other graphs display the run of a complete hour.
Solution
Let the cluster run. After an hour all graphs will show a complete hour of data.
Problem: Ambari stops MySQL database during deployment, causing Ambari Server to crash.
The Hive Service uses MySQL Server by default. If you choose MySQL server as the database on the Ambari Server host as the managed server for Hive, Ambari stops this database during deployment and crashes.
Solution
If you plan to use the default MySQL Server setup for Hive and use MySQL Server for Ambari - make sure that the two MySQL Server instances are different.
If you plan to use the same MySQL Server for Hive and Ambari - make sure to choose the existing database option for Hive.
Problem: Service Fails with Unknown Host Exception
JVM networkaddress.cache negative.ttl default setting of 10 (never cache) may result in DNS failure. Long, or multiple queries running on the JVM may fail. Occurs in Java 6,7, and 8.
Solution
Appropriate values for networkaddress.cache negative ttl depend on various system factors, including network traffic, cluster size, and resource availability. You can set Java VM options in an Ambari-installed cluster using the following procedure:
-
Edit the template for hadoop-env.sh file. Ambari deploys the template file on your cluster in the following location:
/var/lib/ambari-server/resources/stacks/<stack.Name>/<stack.Version>/hooks/before-START/templates/hadoop-env.sh.j2where <stack.Name> and <stack.Version> refer to your specific stack name and version.
-
Change the following line in the template to add options to all Hadoop processes, then save the file.
export HADOOP_OPTS="-Djava.net.preferIPv4Stack=true ${HADOOP_OPTS}" -
Restart Ambari server.
ambari-server restart -
Restart affected services, using the Ambari Web UI.
Problem: Cluster Install Fails with Groupmod Error
The cluster fails to install with an error related to running groupmod. This can occur in environments where groups are managed in LDAP, and not on local
Linux machines.
You may see an error message similar to the following one:
            Fail: Execution of 'groupmod hadoop' returned 10. groupmod: group 'hadoop' does not
            exist in /etc/group
Solution
When installing the cluster using the Cluster Installer Wizard, at the Customize Services step, select the Misc tab and choose the Skip group modifications during install option.
Problem: Host registration fails during Agent bootstrap on SLES due to timeout.
When using SLES and performing host registration using SSH, the Agent bootstrap may
fail due to timeout when running the setupAgent.py script. The host on which the timeout occurs will show the following process hanging:
            c6401.ambari.apache.org:/etc/ # ps -ef | grep zypper
            root     18318 18317  5 03:15 pts/1    00:00:00 zypper -q search -s --match-exact
            ambari-agent
Solution
-
If you have a repository registered that is prompting to accept keys, via user interaction, you may see the hang and timeout. In this case, run
zypper refreshand confirm all repository keys are accepted for the zypper command to work without user interaction. -
Another alternative is to perform manual Agent setup and not use SSH for host registration. This option does not require that Ambari call zypper without user interaction.
Problem: Host Check Fails if Transparent Huge Pages (THP) is not disabled.
When installing Ambari on CentOS6.x using the Cluster Installer Wizard at the Host Checks step, one or more host checks may fail if you have not disabled Transparent Huge Pages on all hosts.
Host Checks will warn you when a failure occurs.
Solution
Disable THP. On all hosts,
-
Add the following command to your
/etc/rc.localfile:if test -f /sys/kernel/mm/transparent_hugepage/defrag; then echo never > /sys/kernel/mm/transparent_hugepage/defrag fi -
To confirm, reboot the host then run the following command:
$ cat /sys/kernel/mm/transparent_hugepage/enabled
                  always madvise [never]
Resolving General Problems
Problem: Hive developers may encounter an exception error message during Hive Service Check
MySQL is the default database used by the Hive metastore. Depending on several factors, such as the version and configuration of MySQL, a Hive developer may see an exception message similar to the following one:
An exception was thrown while adding/validating classes) : Specified key was too long;
            max key length is 767 bytes
Solution
Administrators can resolve this issue by altering the Hive metastore database to use
the Latin1 character set, as shown in the following example:
mysql> ALTER DATABASE <metastore.database.name> character set latin1;
Problem: API calls for PUT, POST, DELETE respond with a "400 - Bad Request"
Removing a registered host not added to a cluster. curl command and REST API calls require a header element.
Solution
Starting with Ambari 1.4.2, you must include the "X-Requested-By" header with the REST API calls.
For example, if using curl, include the -H "X-Requested-By: ambari" option.
curl -u admin:admin -H "X-Requested-By: ambari" -X DELETE http://<ambari-host>:8080/api/v1/hosts/host1
Problem: Enabling NameNode HA wizard fails on the "Initialize JournalNode" step.
After upgrading to Ambari 1.6.1 and attempting to enable NameNode HA in a HDP 2.x Stack-based cluster, the HA wizard fails to complete with an error during the "Initialize JournalNode" step. This failure situation can also occur if your cluster was created using a Blueprint.
Solution
Using the Ambari REST API, you need to create JournalNode and ZKFC service components. This API can also be called prior to launching the NameNode HA wizard to avoid the wizard failing.
            curl --user admin:admin -H  "X-Requested-By: ambari" -i -X POST -d '{"components":[{"ServiceComponentInfo":{"component_name":"JOURNALNODE"}},{"ServiceComponentInfo":{"component_name":"ZKFC"}}]}'

http://<ambari.server>:8080/api/v1/clusters/<c1.name>/services?ServiceInfo/service_name=HDFS
Replace <ambari.server> and <c1.name> with your Ambari Server hostname and cluster name respectively.
Problem: When using HDP 1.3 Stack, alerts do not clear on TaskTracker decommission/recommission.
After decommissioning a TaskTracker, a host alert is shown as critical for the TaskTracker detecting the web UI is inaccessible. As part of decommissioning MapReduce shuts down the TaskTracker web UI but not the process.
Solution
After decommissioning, the user must also stop the TaskTracker via Ambari. Now, on a recommission, the TaskTracker will be in the state, ready to start. When started, the TaskTracker web UI will come back up, and the alert will be dismissed.
Ambari Reference Guide
Installing Ambari Agents Manually
Download the Ambari Repo
Select the OS family running on your installation host.
RHEL/CentOS/Oracle Linux 6
On a server host that has Internet access, use a command line editor to perform the following steps:
-
Log in to your host as
root. For example, type:ssh <username>@<fqdn>sudo su -where<username>is your user name and<fqdn>is the fully qualified domain name of your server host. -
Download the Ambari repository file to a directory on your installation host.
wget -nv http://public-repo-1.hortonworks.com/ambari/centos6/1.x/updates/1.7.0/ambari.repo -O /etc/yum.repos.d/ambari.repo -
Confirm that the repository is configured by checking the repo list.
yum repolistYou should see values similar to the following for Ambari repositories in the list.Version values vary, depending on the installation.
repo id
repo name
status
AMBARI.1.7.0-1.x
Ambari 1.x
5
base
CentOS-6 - Base
6,518
extras
CentOS-6 - Extras
15
updates
CentOS-6 - Updates
209
-
Install the Ambari bits. This also installs the default PostgreSQL Ambari database.
yum install ambari-server -
Enter
ywhen prompted to to confirm transaction and dependency checks.A successful installation displays output similar to the following:
Installing : postgresql-libs-8.4.20-1.el6_5.x86_64
                           1/4
                           Installing : postgresql-8.4.20-1.el6_5.x86_64
                           2/4
                           Installing : postgresql-server-8.4.20-1.el6_5.x86_64
                           3/4
                           Installing : ambari-server-1.7.0-135.noarch
                           4/4
                           Verifying  : postgresql-server-8.4.20-1.el6_5.x86_64
                           1/4
                           Verifying  : postgresql-libs-8.4.20-1.el6_5.x86_64
                           2/4
                           Verifying  : ambari-server-1.7.0-135.noarch
                           3/4
                           Verifying  : postgresql-8.4.20-1.el6_5.x86_64
                           4/4

                           Installed:
                           ambari-server.noarch 0:1.7.0-135

                           Dependency Installed:
                           postgresql.x86_64 0:8.4.20-1.el6_5             postgresql-libs.x86_64 0:8.4.20-1.el6_5
                           postgresql-server.x86_64 0:8.4.20-1.el6_5

                           Complete!
SLES 11
On a server host that has Internet access, use a command line editor to perform the following steps:
-
Log in to your host as
root. For example, type:ssh <username>@<fqdn>sudo su -where<username>is your user name and<fqdn>is the fully qualified domain name of your server host. -
Download the Ambari repository file to a directory on your installation host.
wget -nv http://public-repo-1.hortonworks.com/ambari/suse11/1.x/updates/1.7.0/ambari.repo -O /etc/zypp/repos.d/ambari.repo -
Confirm the downloaded repository is configured by checking the repo list.
zypper reposYou should see the Ambari repositories in the list.Version values vary, depending on the installation.
Alias
Name
Enabled
Refresh
AMBARI.1.7.0-1.x
Ambari 1.x
Yes
No
http-demeter.uni-regensburg.de-c997c8f9
SUSE-Linux-Enterprise-Software-Development-Kit-11-SP1 11.1.1-1.57
Yes
Yes
opensuse
OpenSuse
Yes
Yes
-
Install the Ambari bits. This also installs PostgreSQL.
zypper install ambari-server -
Enter
ywhen prompted to to confirm transaction and dependency checks.A successful installation displays output similar to the following: Retrieving package postgresql-libs-8.3.5-1.12.x86_64 (1/4), 172.0 KiB (571.0 KiB unpacked) Retrieving: postgresql-libs-8.3.5-1.12.x86_64.rpm [done (47.3 KiB/s)] Installing: postgresql-libs-8.3.5-1.12 [done] Retrieving package postgresql-8.3.5-1.12.x86_64 (2/4), 1.0 MiB (4.2 MiB unpacked) Retrieving: postgresql-8.3.5-1.12.x86_64.rpm [done (148.8 KiB/s)] Installing: postgresql-8.3.5-1.12 [done] Retrieving package postgresql-server-8.3.5-1.12.x86_64 (3/4), 3.0 MiB (12.6 MiB unpacked) Retrieving: postgresql-server-8.3.5-1.12.x86_64.rpm [done (452.5 KiB/s)] Installing: postgresql-server-8.3.5-1.12 [done] Updating etc/sysconfig/postgresql... Retrieving package ambari-server-1.7.0-135.noarch (4/4), 99.0 MiB (126.3 MiB unpacked) Retrieving: ambari-server-1.7.0-135.noarch.rpm [done (3.0 MiB/s)] Installing: ambari-server-1.7.0-135 [done] ambari-server 0:off 1:off 2:off 3:on 4:off 5:on 6:off
UBUNTU 12
On a server host that has Internet access, use a command line editor to perform the following steps:
-
Log in to your host as
root. For example, type:ssh <username>@<fqdn>sudo su -where<username>is your user name and<fqdn>is the fully qualified domain name of your server host. -
Download the Ambari repository file to a directory on your installation host.
wget -nv http://public-repo-1.hortonworks.com/ambari/ubuntu12/1.x/updates/1.7.0/ambari.list -O /etc/apt/sources.list.d/ambari.list apt-key adv --recv-keys --keyserver keyserver.ubuntu.com B9733A7A07513CAD apt-get update -
Confirm that Ambari packages downloaded successfully by checking the package name list.
apt-cache pkgnamesYou should see the Ambari packages in the list.Version values vary, depending on the installation.
Alias
Name
AMBARI-dev-2.x
Ambari 2.x
-
Install the Ambari bits. This also installs PostgreSQL.
apt-get install ambari-server
RHEL/CentOS/ORACLE Linux 5 (DEPRECATED)
On a server host that has Internet access, use a command line editor to perform the following steps:
-
Log in to your host as
root. For example, type:ssh <username>@<fqdn>sudo su -where<username>is your user name and<fqdn>is the fully qualified domain name of your server host. -
Download the Ambari repository file to a directory on your installation host.
wget -nv http://public-repo-1.hortonworks.com/ambari/centos5/1.x/updates/1.7.0/ambari.repo -O /etc/yum.repos.d/ambari.repo -
Confirm the repository is configured by checking the repo list.
yum repolistYou should see the Ambari repositories in the list.AMBARI.1.7.0-1.x | 951 B 00:00 AMBARI.1.7.0-1.x/primary | 1.6 kB 00:00 AMBARI.1.7.0-1.x 5/5 epel | 3.7 kB 00:00 epel/primary_db | 3.9 MB 00:01repo Id
repo Name
status
AMBARI.1.7.0-1.x
Ambari 1.x
5
base
CentOS-5 - Base
3,667
epel
Extra Packages for Enterprise Linux 5 - x86_64
7,614
puppet
Puppet
433
updates
CentOS-5 - Updates
118
-
Install the Ambari bits. This also installs PostgreSQL.
yum install ambari-server
Install the Ambari Agents Manually
Use the instructions specific to the OS family running on your agent hosts.
RHEL/CentOS/Oracle Linux 6
-
Install the Ambari Agent on every host in your cluster.
yum install ambari-agent -
Using a text editor, configure the Ambari Agent by editing the
ambari-agent.inifile as shown in the following example:vi /etc/ambari-agent/conf/ambari-agent.ini [server] hostname=<your.ambari.server.hostname>url_port=8440 secured_url_port=8441 -
Start the agent on every host in your cluster.
ambari-agent startThe agent registers with the Server on start.
SLES 11
-
Install the Ambari Agent on every host in your cluster.
zypper install ambari-agent -
Configure the Ambari Agent by editing the
ambari-agent.inifile as shown in the following example:vi /etc/ambari-agent/conf/ambari-agent.ini [server]hostname=<your.ambari.server.hostname>url_port=8440secured_url_port=8441 -
Start the agent on every host in your cluster.
ambari-agent startThe agent registers with the Server on start.
UBUNTU 12
-
Install the Ambari Agent on every host in your cluster.
apt-get install ambari-agent -
Configure the Ambari Agent by editing the
ambari-agent.inifile as shown in the following example:vi /etc/ambari-agent/conf/ambari-agent.ini [server]hostname=<your.ambari.server.hostname>url_port=8440secured_url_port=8441 -
Start the agent on every host in your cluster.
ambari-agent startThe agent registers with the Server on start.
RHEL/CentOS/Oracle Linux 5 (DEPRECATED)
-
Install the Ambari Agent on every host in your cluster.
yum install ambari-agent -
Using a text editor, configure the Ambari Agent by editing the
ambari-agent.inifile as shown in the following example:vi /etc/ambari-agent/conf/ambari-agent.ini [server] hostname=<your.ambari.server.hostname>url_port=8440 secured_url_port=8441 -
Start the agent on every host in your cluster.
ambari-agent startThe agent registers with the Server on start.
Customizing HDP Services
You can override the default service settings established by the Ambari install wizard. For information about customizing service settings for your HDP Stack version, see one of the following topics:
Customizing Services for a HDP 2.x Stack
Generally, you can customize services for the HDP 2.x Stack by overriding default
settings that appear in Services > Configs for each Service in the Ambari Web GUI.
Defining Service Users and Groups for HDP 2.x
The individual services in Hadoop run under the ownership of their respective Unix
accounts. These accounts are known as service users. These service users belong to
a special Unix group. "Smoke Test" is a service user dedicated specifically for running
smoke tests on components during installation using the Services View of the Ambari Web GUI. You can also run service checks as the "Smoke Test" user
on-demand after installation. You can customize any of these users and groups using
the Misc tab during the Customize Services installation step.
If you choose to customize names, Ambari checks to see if these custom accounts already exist. If they do not exist, Ambari creates them. The default accounts are always created during installation whether or not custom accounts are specified. These default accounts are not used and can be removed post-install.
Service Users
|
Service* |
Component |
Default User Account |
|---|---|---|
|
Knox |
Knox Gateway |
knox |
|
Kafka |
Kafka Broker |
kafka |
|
HDFS |
NameNode SecondaryNameNode DataNode |
hdfs |
|
YARN |
NodeManager ResourceManager |
yarn |
|
MapReduce2 |
HistoryServer |
mapred |
|
Tez |
Tez clients |
tez (Tez is available with HDP 2.1 or 2.2 Stack.) |
|
HBase |
MasterServer RegionServer |
hbase |
|
Hive |
Hive Metastore, HiveServer2 |
hive |
|
HCat |
HCatalog Client |
hcat |
|
WebHCat |
WebHCat Server |
hcat |
|
Falcon |
Falcon Server |
falcon (Falcon is available with HDP 2.1 or 2.2 Stack.) |
|
Storm |
Masters (Nimbus, DRPC Server, Storm REST API, Server, Storm UI Server) Slaves (Supervisors, Logviewers) |
storm (Storm is available with HDP 2.1 or 2.2 Stack.) |
|
Oozie |
Oozie Server |
oozie |
|
Ganglia |
Ganglia Server Ganglia Monitors |
nobody |
|
Ganglia |
RRDTool (with Ganglia Server) |
rrdcahed (Created as part of installing RRDTool, which is used to store metrics data collected by Ganglia.) |
|
Ganglia |
Apache HTTP Server |
apache (Created as part of installing Apache HTTP Server, which is used to serve the Ganglia web UI.) |
|
PostgreSQL |
PostgreSQL (with Ambari Server) |
postgres (Created as part of installing the default PostgreSQL database with Ambari Server. If you are not using the Ambari PostgreSQL database, this user is not needed.) |
|
Nagios |
Nagios Server |
nagios (If you plan to use an existing user account named “nagios”, that “nagios” account must either be in a group named “nagios” or you must customize the Nagios Group.) |
|
ZooKeeper |
ZooKeeper |
zookeeper |
*For all components, the Smoke Test user performs smoke tests against cluster services as part of the install process. It also can perform these on-demand, from the Ambari Web UI. The default user account for the smoke test user is ambari-qa.
Service Group
|
Service |
Components |
Default Group Account |
|---|---|---|
|
All |
All |
hadoop |
|
Nagios |
Nagios Server |
nagios |
|
Ganglia |
Ganglia Server Ganglia Monitor |
nobody |
|
Knox |
Knox Gateway |
knox |
Setting Properties That Depend on Service Usernames/Groups
Some properties must be set to match specific service user names or service groups.
If you have set up non-default, customized service user names for the HDFS or HBase
service or the Hadoop group name, you must edit the following properties, using Services > Service.Name > Configs > Advanced hdfs-ste:
HDFS Settings: Advanced
|
Property Name |
Value |
|---|---|
|
dfs.permissions.superusergroup |
The same as the HDFS username. The default is "hdfs" |
|
dfs.cluster.administrators |
A single space followed by the HDFS username. |
|
dfs.block.local-path-access.user |
The HBase username. The default is "hbase". |
MapReduce Settings: Advanced
|
Property Name |
Value |
|---|---|
|
mapreduce.cluster.administrators |
A single space followed by the Hadoop group name. |
Customizing Services for a HDP 1.x Stack
Generally, you can customize services for the HDP 1.x Stack by overriding default settings that appear in the Management Header for each Service in the Ambari Web GUI.
Defining Service Users and Groups for HDP 1.x
The individual services in Hadoop run under the ownership of their respective Unix
accounts. These accounts are known as service users. These service users belong to
a special Unix group. "Smoke Test" is a service user dedicated specifically for running
smoke tests on components during installation using the Services View of the Ambari Web GUI. You can also run service checks as the "Smoke Test" user
on-demand after installation. You can customize any of these users and groups using
the Misc tab during the Customize Services installation step.
If you choose to customize names, Ambari checks to see if these custom accounts already exist. If they do not exist, Ambari creates them. The default accounts are always created during installation whether or not custom accounts are specified. These default accounts are not used and can be removed post-install.
Service Users
|
Service |
Component |
Default User Account |
|---|---|---|
|
HDFS |
NameNode SecondaryNameNode DataNode |
hdfs |
|
MapReduce |
JobTracker HistoryServer TaskTracker |
mapred |
|
Hive |
Hive Metastore HiveServer2 |
hive |
|
HCat |
HCatalog Server |
hcat |
|
WebHCat |
WebHCat Server |
hcat |
|
Oozie |
Oozie Server |
oozie |
|
HBase |
MasterServer RegionServer |
hbase |
|
ZooKeeper |
ZooKeeper |
zookeeper |
|
Ganglia |
Ganglia Server Ganglia Collectors |
nobody |
|
Nagios |
Nagios Server |
nagios |
|
Smoke Test |
All |
ambari-qa |
Service Group
|
Service |
Components |
Default Group Account |
|---|---|---|
|
All |
All |
hadoop |
Setting Properties That Depend on Service Usernames/Groups
Some properties must be set to match specific service user names or service groups.
If you have set up non-default, customized service user names for the HDFS or HBase
service or the Hadoop group name, you must edit the following properties, using Services > Service.Name > Configs > Advanced:
HDFS Settings: Advanced
|
Property Name |
Value |
|---|---|
|
dfs.permissions.supergroup |
The same as the HDFS username. The default is "hdfs" |
|
dfs.cluster.administrators |
A single space followed by the HDFS username. |
|
dfs.block.local-path-access.user |
The HBase username. The default is "hbase". |
MapReduce Settings: Advanced
|
Property Name |
Value |
|---|---|
|
mapreduce.tasktracker.group |
The Hadoop group name. The default is "hadoop". |
|
mapreduce.cluster.administrators |
A single space followed by the Hadoop group name. |
Recommended Memory Configurations for the MapReduce Service
The following recommendations can help you determine appropriate memory configurations based on your usage scenario:
-
Make sure that there is enough memory for all of the processes. Remember that system processes take around 10% of the available memory.
-
For co-deploying an HBase RegionServer and MapReduce service on the same node, reduce the RegionServer's heap size (use the
HBase Settings > RegionServer > HBase Region Servers maximum Java heap sizeproperty to modify the RegionServer heap size). -
For co-deploying an HBase RegionServer and the MapReduce service on the same node, or for memory intensive MapReduce applications, modify the map and reduce slots as suggested in the following example:
EXAMPLE: For co-deploying an HBase RegionServer and the MapReduce service on a machine with 16GB of available memory, the following would be a recommended configuration:
2 GB: system processes
8 GB: MapReduce slots. 6 Map + 2 Reduce slots per 1 GB task
4 GB: HBase RegionServer
1 GB: TaskTracker
1 GB: DataNode
To change the number of Map and Reduce slots based on the memory requirements of your application, use the following properties:
MapReduce Settings: TaskTracker : Number of Map slots per node
MapReduce Settings: TaskTracker : Number of Reduce slots per node
Using Custom Host Names
You can customize the agent registration host name and the public host name used for each host in Ambari. Use this capability when "hostname" does not return the public network host name for your machines.
How to Customize the name of a host
How to Customize the name of a host
-
At the
Install Optionsstep in the Cluster Installer wizard, selectPerform Manual Registration for Ambari Agents. -
Install the Ambari Agents manually on each host, as described in Install the Ambari Agents Manually.
-
To echo the customized name of the host to which the Ambari agent registers, for every host, create a script like the following example, named
/var/lib/ambari-agent/hostname.sh. Be sure tochmodthe script so it is executable by the Agent.#!/bin/sh echo<ambari_hostname>where <ambari_hostname> is the host name to use for Agent registration.
-
Open
/etc/ambari-agent/conf/ambari-agent.inion every host, using a text editor. -
Add to the
[agent]section the following line:hostname_script=/var/lib/ambari-agent/hostname.shwhere
/var/lib/ambari-agent/hostname.shis the name of your custom echo script. -
To generate a public host name for every host, create a script like the following example, named
var/lib/ambari-agent/public_hostname.shto show the name for that host in the UI. Be sure tochmodthe script so it is executable by the Agent.#!/bin/sh<hostname>-fwhere <hostname> is the host name to use for Agent registration.
-
Open
/etc/ambari-agent/conf/ambari-agent.inion every host, using a text editor. -
Add to the
[agent]section the following line:public_hostname_script=/var/lib/ambari-agent/public_hostname.sh
-
If applicable, add the host names to
/etc/hostson every host. -
Restart the Agent on every host for these changes to take effect.
ambari-agent restart
Moving the Ambari Server
To transfer an Ambari Server that uses the default, PostgreSQL database to a new host, use the following instructions:
-
Back up all current data - from the original Ambari Server and MapReduce databases.
-
Update all Agents - to point to the new Ambari Server.
-
Install the New Server - on a new host and populate databases with information from original Server.
Back up Current Data
-
Stop the original Ambari Server.
ambari-server stop -
Create a directory to hold the database backups.
cd /tmp mkdir dbdumps cd dbdumps/ -
Create the database backups.
pg_dump -U<AMBARI.SERVER.USERNAME>ambari > ambari.sql Password:<AMBARI.SERVER.PASSWORD>pg_dump -U<MAPRED.USERNAME>ambarirca > ambarirca.sql Password:<MAPRED.PASSWORD>where <AMBARI.SERVER.USERNAME>, <MAPRED.USERNAME>, <AMBARI.SERVER.PASSWORD>, and <MAPRED.PASSWORD> are the user names and passwords that you set up during installation. Default values are:
ambari-server/bigdataandmapred/mapred.
Update Agents
-
On each agent host, stop the agent.
ambari-agent stop -
Remove old agent certificates.
rm /var/lib/ambari-agent/keys/* -
Using a text editor, edit
/etc/ambari-agent/conf/ambari-agent.inito point to the new host.[server] hostname= <NEW FULLY.QUALIFIED.DOMAIN.NAME> url_port=8440 secured_url_port=8441
Install the New Server and Populate the Databases
-
Install the Server on the new host.
-
Stop the Server so that you can copy the old database data to the new Server.
ambari-server stop -
Restart the PostgreSQL instance.
service postgresql restart -
Open the PostgreSQL interactive terminal.
su - postgres psql -
Using the interactive terminal, drop the databases created by the fresh install.
drop database ambari; drop database ambarirca; -
Check to make sure the databases have been dropped.
/listThe databases should not be listed.
-
Create new databases to hold the transferred data.
create database ambari; create database ambarirca; -
Exit the interactive terminal.
^d -
Copy the saved data from Back up Current Data to the new Server.
cd /tmp scp -i <ssh-key> root@<original.Ambari.Server>/tmp/dbdumps/*.sql/tmppsql -d ambari -f /tmp/ambari.sql psql -d ambarirca -f /tmp/ambarirca.sql -
Start the new Server.
<exit to root>ambari-server start -
On each Agent host, start the Agent.
ambari-agent start -
Open Ambari Web. Point your browser to:
<new.Ambari.Server>
:8080 -
Go to
Services > MapReduceand use the Management Header to Stop and Start the MapReduce service. -
Start other services as necessary.
The new Server is ready to use.
Configuring LZO Compression
LZO is a lossless data compression library that favors speed over compression ratio. Ambari does not install nor enable LZO Compression by default. To enable LZO compression in your HDP cluster, you must Configure core-site.xml for LZO.
Optionally, you can implement LZO to optimize Hive queries in your cluster for speed. For more information about using LZO compression with Hive, see Running Compression with Hive Queries.
Configure core-site.xml for LZO
-
Browse to
Ambari Web > Services > HDFS > Configs, then expandAdvanced core-site. -
Find the
io.compression.codecsproperty key. -
Append to the
io.compression.codecsproperty key, the following value:com.hadoop.compression.lzo.LzoCodec -
Add a description of the config modification, then choose Save.
-
Expand the
Custom core-site.xmlsection. -
Select
Add Property. -
Add to
Custom core-site.xmlthe following property key and valueProperty Key
Property Value
io.compression.codec.lzo.class
com.hadoop.compression.lzo.LzoCodec
-
Choose
Save. -
Add a description of the config modification, then choose Save.
-
Restart the HDFS, MapReduce2 and YARN services.
Running Compression with Hive Queries
Running Compression with Hive Queries requires creating LZO files. To create LZO files, use one of the following procedures:
Create LZO Files
-
Create LZO files as the output of the Hive query.
-
Use
lzocommand utility or your custom Java to generatelzo.indexfor the.lzofiles.
Hive Query Parameters
Prefix the query string with these parameters:
SET mapreduce.output.fileoutputformat.compress.codec=com.hadoop.compression.lzo.LzoCodec
SET hive.exec.compress.output=true
SET mapreduce.output.fileoutputformat.compress=trueFor example:
hive -e "SET mapreduce.output.fileoutputformat.compress.codec=com.hadoop.compression.lzo.LzoCodec;SET
hive.exec.compress.output=true;SET mapreduce.output.fileoutputformat.compress=true;"
Write Custom Java to Create LZO Files
-
Create text files as the output of the Hive query.
-
Write custom Java code to
-
convert Hive query generated text files to
.lzofiles -
generate
lzo.indexfiles for the.lzofiles
-
Hive Query Parameters
Prefix the query string with these parameters:
SET hive.exec.compress.output=false
SET mapreduce.output.fileoutputformat.compress=falseFor example:
hive -e "SET hive.exec.compress.output=false;SET mapreduce.output.fileoutputformat.compress=false;<query-string>"
Using Non-Default Databases
Use the following instructions to prepare a non-default database for Ambari, Hive/HCatalog,
or Oozie. You must complete these instructions before you set up the Ambari Server
by running ambari-server setup.
Using Non-Default Databases - Ambari
The following sections describe how to use Ambari with an existing database, other than the embedded PostgreSQL database instance that Ambari Server uses by default.
Using Ambari with Oracle
To set up Oracle for use with Ambari:
-
On the Ambari Server host, install the appropriate
JDBC.jarfile.-
Download the Oracle JDBC (OJDBC) driver from http://www.oracle.com/technetwork/database/features/jdbc/index-091264.html.
-
Select
Oracle Database 11g Release 2 - ojdbc6.jar. -
Copy the .jar file to the Java share directory.
cp ojdbc6.jar /usr/share/java -
Make sure the .jar file has the appropriate permissions - 644.
-
-
Create a user for Ambari and grant that user appropriate permissions.
For example, using the Oracle database admin utility, run the following commands:
# sqlplus sys/root as sysdba CREATE USER <AMBARIUSER> IDENTIFIED BY <AMBARIPASSWORD> default tablespace “USERS” temporary tablespace “TEMP”; GRANT unlimited tablespace to <AMBARIUSER>; GRANT create session to <AMBARIUSER>; GRANT create TABLE to <AMBARIUSER>; GRANT create SEQUENCE to <AMBARIUSER>; QUIT;Where <AMBARIUSER> is the Ambari user name and <AMBARIPASSWORD> is the Ambari user password.
-
Load the Ambari Server database schema.
-
You must pre-load the Ambari database schema into your Oracle database using the schema script.
sqlplus<AMBARIUSER>/<AMBARIPASSWORD>< Ambari-DDL-Oracle-CREATE.sql -
Find the Ambari-DDL-Oracle-CREATE.sql file in the
/var/lib/ambari-server/resources/directory of the Ambari Server host after you have installed Ambari Server.
-
-
When setting up the Ambari Server, select
Advanced Database Configuration > Option [2] Oracleand respond to the prompts using the username/password credentials you created in step 2.
Using Ambari with MySQL
To set up MySQL for use with Ambari:
-
On the Ambari Server host, install the connector.
-
Install the connector
RHEL/CentOS/Oracle Linux
yum install mysql-connector-javaSLES
zypper install mysql-connector-javaapt-get install mysql-connector-java -
Confirm that
.jaris in the Java share directory.ls /usr/share/java/mysql-connector-java.jar -
Make sure the .jar file has the appropriate permissions - 644.
-
-
Create a user for Ambari and grant it permissions.
-
For example, using the MySQL database admin utility:
# mysql -u root -p CREATE USER '<AMBARIUSER>'@'%' IDENTIFIED BY '<AMBARIPASSWORD>'; GRANT ALL PRIVILEGES ON *.* TO '<AMBARIUSER>'@'%'; CREATE USER '<AMBARIUSER>'@'localhost' IDENTIFIED BY '<AMBARIPASSWORD>'; GRANT ALL PRIVILEGES ON *.* TO '<AMBARIUSER>'@'localhost'; CREATE USER'<AMBARIUSER>'@'<AMBARISERVERFQDN>' IDENTIFIED BY '<AMBARIPASSWORD>'; GRANT ALL PRIVILEGES ON *.* TO '<AMBARIUSER>'@'<AMBARISERVERFQDN>'; FLUSH PRIVILEGES; -
Where <AMBARIUSER> is the Ambari user name, <AMBARIPASSWORD> is the Ambari user password and <AMBARISERVERFQDN> is the Fully Qualified Domain Name of the Ambari Server host.
-
-
Load the Ambari Server database schema.
-
You must pre-load the Ambari database schema into your MySQL database using the schema script.
mysql -u<AMBARIUSER>-p CREATE DATABASE<AMBARIDATABASE>; USE<AMBARIDATABASE>; SOURCE Ambari-DDL-MySQL-CREATE.sql; -
Where <AMBARIUSER> is the Ambari user name and <AMBARIDATABASE> is the Ambari database name.
Find the
Ambari-DDL-MySQL-CREATE.sqlfile in the/var/lib/ambari-server/resources/directory of the Ambari Server host after you have installed Ambari Server.
-
-
When setting up the Ambari Server, select
Advanced Database Configuration > Option [3] MySQLand enter the credentials you defined in Step 2. for user name, password and database name.
Using Ambari with PostgreSQL
To set up PostgreSQL for use with Ambari:
-
Create a user for Ambari and grant it permissions.
-
Using the PostgreSQL database admin utility:
# sudo -u postgres psql CREATE DATABASE<AMBARIDATABASE>; CREATE USER<AMBARIUSER>WITH PASSWORD ‘<AMBARIPASSWORD>’; GRANT ALL PRIVILEGES ON DATABASE<AMBARIDATABASE>TO<AMBARIUSER>; \connect<AMBARIDATABASE>; CREATE SCHEMA<AMBARISCHEMA>AUTHORIZATION<AMBARIUSER>; ALTER SCHEMA<AMBARISCHEMA>OWNER TO<AMBARIUSER>; ALTER ROLE<AMBARIUSER>SET search_path to ‘<AMBARISCHEMA>’, 'public'; -
Where <AMBARIUSER> is the Ambari user name <AMBARIPASSWORD> is the Ambari user password, <AMBARIDATABASE> is the Ambari database name and <AMBARISCHEMA>
-
-
Load the Ambari Server database schema.
-
You must pre-load the Ambari database schema into your PostgreSQL database using the schema script.
# psql -U<AMBARIUSER>-d<AMBARIDATABASE>\connect<AMBARIDATABASE>; \i Ambari-DDL-Postgres-CREATE.sql; -
Find the
Ambari-DDL-Postgres-CREATE.sqlfile in the/var/lib/ambari-server/resources/directory of the Ambari Server host after you have installed Ambari Server.
-
-
When setting up the Ambari Server, select
Advanced Database Configuration > Option[4] PostgreSQLand enter the credentials you defined in Step 2. for user name, password, and database name.
Troubleshooting Ambari
Use these topics to help troubleshoot any issues you might have installing Ambari with an existing Oracle database.
Problem: Ambari Server Fails to Start: No Driver
Check /var/log/ambari-server/ambari-server.log for the following error:
ExceptionDescription:Configurationerror.Class[oracle.jdbc.driver.OracleDriver] not
found.
The Oracle JDBC.jar file cannot be found.
Solution
Make sure the file is in the appropriate directory on the Ambari server and re-run
ambari-server setup. Review the load database procedure appropriate for your database type in Using Non-Default Databases - Ambari.
Problem: Ambari Server Fails to Start: No Connection
Check /var/log/ambari-server/ambari-server.log for the following error:
The Network Adapter could not establish the connection Error Code: 17002
Ambari Server cannot connect to the database.
Solution
Confirm that the database host is reachable from the Ambari Server and is correctly
configured by reading /etc/ambari-server/conf/ambari.properties.
server.jdbc.url=jdbc:oracle:thin:@oracle.database.hostname:1521/ambaridb
server.jdbc.rca.url=jdbc:oracle:thin:@oracle.database.hostname:1521/ambari
Problem: Ambari Server Fails to Start: Bad Username
Check /var/log/ambari-server/ambari-server.log for the following error:
Internal Exception: java.sql.SQLException:ORA01017: invalid username/password; logon
denied
You are using an invalid username/password.
Solution
Confirm the user account is set up in the database and has the correct privileges. See Step 3 above.
Problem: Ambari Server Fails to Start: No Schema
Check /var/log/ambari-server/ambari-server.log for the following error:
Internal Exception: java.sql.SQLSyntaxErrorException: ORA00942: table or view does
not exist
The schema has not been loaded.
Solution
Confirm you have loaded the database schema. Review the load database schema procedure appropriate for your database type in Using Non-Default Databases - Ambari.
Using Non-Default Databases - Hive
The following sections describe how to use Hive with an existing database, other than the MySQL database instance that Ambari installs by default.
Using Hive with Oracle
To set up Oracle for use with Hive:
-
On the Ambari Server host, stage the appropriate JDBC driver file for later deployment.
-
Download the Oracle JDBC (OJDBC) driver from http://www.oracle.com/technetwork/database/features/jdbc/index-091264.html.
-
Select
Oracle Database 11g Release 2 - ojdbc6.jarand download the file. -
Make sure the .jar file has the appropriate permissions - 644.
-
Execute the following command, adding the path to the downloaded .jar file:
ambari-server setup --jdbc-db=oracle --jdbc-driver=/path/to/downloaded/ojdbc6.jar
-
-
Create a user for Hive and grant it permissions.
-
Using the Oracle database admin utility:
# sqlplus sys/root as sysdba CREATE USER<HIVEUSER>IDENTIFIED BY<HIVEPASSWORD>; GRANT SELECT_CATALOG_ROLE TO<HIVEUSER>; GRANT CONNECT, RESOURCE TO<HIVEUSER>; QUIT; -
Where <HIVEUSER> is the Hive user name and <HIVEPASSWORD> is the Hive user password.
-
-
Load the Hive database schema.
-
For a HDP 2.2 Stack
-
For a HDP 2.1 Stack
You must pre-load the Hive database schema into your Oracle database using the schema script, as follows: sqlplus <HIVEUSER>/<HIVEPASSWORD> < hive-schema-0.13.0.oracle.sql
Find the
hive-schema-0.13.0.oracle.sqlfile in the/var/lib/ambari-server/resources/stacks/HDP/2.1/services/HIVE/etc/directory of the Ambari Server host after you have installed Ambari Server. -
For a HDP 2.0 Stack
You must pre-load the Hive database schema into your Oracle database using the schema script, as follows: sqlplus <HIVEUSER>/<HIVEPASSWORD> < hive-schema-0.12.0.oracle.sql
Find the
hive-schema-0.12.0.oracle.sqlfile in the/var/lib/ambari-server/resources/stacks/HDP/2.0.6/services/HIVE/etc/directory of the Ambari Server host after you have installed Ambari Server. -
For a HDP 1.3 Stack
You must pre-load the Hive database schema into your Oracle database using the schema script, as follows: sqlplus <HIVEUSER>/<HIVEPASSWORD> < hive-schema-0.10.0.oracle.sql
Find the
hive-schema-0.10.0.oracle.sqlfile in the/var/lib/ambari-server/resources/stacks/HDP/1.3.2/services/HIVE/etc/directory of the Ambari Server host after you have installed Ambari Server.
-
Using Hive with MySQL
To set up MySQL for use with Hive:
-
On the Ambari Server host, stage the appropriate MySQL connector for later deployment.
-
Install the connector.
RHEL/CentOS/Oracle Linux
yum install mysql-connector-java*SLES
zypper install mysql-connector-java*UBUNTU
apt-get install mysql-connector-java* -
Confirm that
mysql-connector-java.jaris in the Java share directory.ls /usr/share/java/mysql-connector-java.jar -
Make sure the .jar file has the appropriate permissions - 644.
-
Execute the following command:
ambari-server setup --jdbc-db=mysql --jdbc-driver=/usr/share/java/mysql-connector-java.jar
-
-
Create a user for Hive and grant it permissions.
-
Using the MySQL database admin utility:
# mysql -u root -p CREATE USER ‘<HIVEUSER>’@’localhost’ IDENTIFIED BY ‘<HIVEPASSWORD>’; GRANT ALL PRIVILEGES ON *.* TO '<HIVEUSER>'@'localhost'; CREATE USER ‘<HIVEUSER>’@’%’ IDENTIFIED BY ‘<HIVEPASSWORD>’; GRANT ALL PRIVILEGES ON *.* TO '<HIVEUSER>'@'%'; CREATE USER '<HIVEUSER>'@'<HIVEMETASTOREFQDN>'IDENTIFIED BY '<HIVEPASSWORD>'; GRANT ALL PRIVILEGES ON *.* TO '<HIVEUSER>'@'<HIVEMETASTOREFQDN>'; FLUSH PRIVILEGES; -
Where <HIVEUSER> is the Hive user name, <HIVEPASSWORD> is the Hive user password and <HIVEMETASTOREFQDN> is the Fully Qualified Domain Name of the Hive Metastore host.
-
-
Create the Hive database.
The Hive database must be created before loading the Hive database schema.
# mysql -u root -p CREATE DATABASE<HIVEDATABASE>
Where <HIVEDATABASE> is the Hive database name. -
Load the Hive database schema.
-
For a HDP 2.2 Stack:
-
For a HDP 2.1 Stack:
You must pre-load the Hive database schema into your MySQL database using the schema script, as follows.
mysql -u root -p<HIVEDATABASE>hive-schema-0.13.0.mysql.sqlFind the
hive-schema-0.13.0.mysql.sqlfile in the/var/lib/ambari-server/resources/stacks/HDP/2.1/services/HIVE/etc/directory of the Ambari Server host after you have installed Ambari Server.
-
Using Hive with PostgreSQL
To set up PostgreSQL for use with Hive:
-
On the Ambari Server host, stage the appropriate PostgreSQL connector for later deployment.
-
Install the connector.
RHEL/CentOS/Oracle Linux
yum install postgresql-jdbc*SLES
zypper install -y postgresql-jdbc -
Copy the connector.jar file to the Java share directory.
cp /usr/share/pgsql/postgresql-*.jdbc3.jar /usr/share/java/postgresql-jdbc.jar -
Confirm that .jar is in the Java share directory.
ls /usr/share/java/postgresql-jdbc.jar -
Change the access mode of the.jar file to 644.
chmod 644 /usr/share/java/postgresql-jdbc.jar
-
Execute the following command:
ambari-server setup --jdbc-db=postgres--jdbc-driver=/usr/share/java/postgresql-connector-java.jar
-
-
Create a user for Hive and grant it permissions.
-
Using the PostgreSQL database admin utility:
echo "CREATE DATABASE <HIVEDATABASE>;" | psql -U postgres echo "CREATE USER<HIVEUSER>WITH PASSWORD '<HIVEPASSWORD>';" | psql -U postgres echo "GRANT ALL PRIVILEGES ON DATABASE<HIVEDATABASE>TO<HIVEUSER>;" | psql -U postgres -
Where <HIVEUSER> is the Hive user name, <HIVEPASSWORD> is the Hive user password and <HIVEDATABASE> is the Hive database name.
-
-
Load the Hive database schema.
-
For a HDP 2.2 Stack:
-
For a HDP 2.1 Stack:
You must pre-load the Hive database schema into your PostgreSQL database using the schema script, as follows:
# psql -U<HIVEUSER>-d<HIVEDATABASE>\connect<HIVEDATABASE>; \i hive-schema-0.13.0.postgres.sql;Find the
hive-schema-0.13.0.postgres.sqlfile in the/var/lib/ambari-server/resources/stacks/HDP/2.1/services/HIVE/etc/directory of the Ambari Server host after you have installed Ambari Server. -
For a HDP 2.0 Stack:
You must pre-load the Hive database schema into your PostgreSQL database using the schema script, as follows:
# sudo -u postgres psql \connect<HIVEDATABASE>; \i hive-schema-0.12.0.postgres.sql;Find the
hive-schema-0.12.0.postgres.sqlfile in the/var/lib/ambari-server/resources/stacks/HDP/2.0.6/services/HIVE/etc/directory of the Ambari Server host after you have installed Ambari Server. -
For a HDP 1.3 Stack:
You must pre-load the Hive database schema into your PostgreSQL database using the schema script, as follows:
# sudo -u postgres psql \connect<HIVEDATABASE>; \i hive-schema-0.10.0.postgres.sql;Find the
hive-schema-0.10.0.postgres.sqlfile in the/var/lib/ambari-server/resources/stacks/HDP/1.3.2/services/HIVE/etc/directory of the Ambari Server host after you have installed Ambari Server.
-
Troubleshooting Hive
Use these entries to help you troubleshoot any issues you might have installing Hive with non-default databases.
Problem: Hive Metastore Install Fails Using Oracle
Check the install log:
cp /usr/share/java/${jdbc_jar_name} ${target}] has failures: true
The Oracle JDBC.jar file cannot be found.
Solution
Make sure the file is in the appropriate directory on the Hive Metastore server and click Retry.
Problem: Install Warning when "Hive Check Execute" Fails Using Oracle
Check the install log:
java.sql.SQLSyntaxErrorException: ORA-01754:
a table may contain only one column of type LONG
The Hive Metastore schema was not properly loaded into the database.
Solution
Ignore the warning, and complete the install. Check your database to confirm the Hive
Metastore schema is loaded. In the Ambari Web GUI, browse to Services > Hive. Choose Service Actions > Service Check to check that the schema is correctly in place.
Problem: Hive Check Execute may fail after completing an Ambari upgrade to version 1.4.2
For secure and non-secure clusters, with Hive security authorization enabled, the Hive service check may fail. Hive security authorization may not be configured properly.
Solution
Two workarounds are possible. Using Ambari Web, in HiveConfigsAdvanced:
-
Disable
hive.security.authorization, by setting thehive.security.authorization.enabledvalue to false.or
-
Properly configure Hive security authorization. For example, set the following properties:
For more information about configuring Hive security, see Metastore Server Security in Hive Authorization and the HCatalog document Storage Based Authorization.
Hive Security Authorization Settings
Property
Value
hive.security.authorization.manager
org.apache.hadoop.hive.ql.security.authorization.StorageBasedAuthorizationProvider
hive.security.metastore.authorization.manager
org.apache.hadoop.hive.ql.security.authorization.StorageBasedAuthorizationProvider
hive.security.authenticator.manager
org.apache.hadoop.hive.ql.security.ProxyUserAuthenticator
Metastore Server Security Hive Authorization Storage Based Authorization
Using Non-Default Databases - Oozie
The following sections describe how to use Oozie with an existing database, other than the Derby database instance that Ambari installs by default.
Using Oozie with Oracle
To set up Oracle for use with Oozie:
-
On the Ambari Server host, stage the appropriate JDBC driver file for later deployment.
-
Download the Oracle JDBC (OJDBC) driver from http://www.oracle.com/technetwork/database/features/jdbc/index-091264.html.
-
Select Oracle Database 11g Release 2 - ojdbc6.jar.
-
Make sure the .jar file has the appropriate permissions - 644.
-
Execute the following command, adding the path to the downloaded.jar file:
ambari-server setup --jdbc-db=oracle --jdbc-driver=/path/to/downloaded/ojdbc6.jar
-
-
Create a user for Oozie and grant it permissions.
Using the Oracle database admin utility, run the following commands:
# sqlplus sys/root as sysdba CREATE USER<OOZIEUSER>IDENTIFIED BY<OOZIEPASSWORD>; GRANT ALL PRIVILEGES TO<OOZIEUSER>; QUIT;Where <OOZIEUSER> is the Oozie user name and <OOZIEPASSWORD> is the Oozie user password.
Using Oozie with MySQL
To set up MySQL for use with Oozie:
-
On the Ambari Server host, stage the appropriate MySQL connector for later deployment.
-
Install the connector.
RHEL/CentOS/Oracle Linux
yum install mysql-connector-java*SLES
zypper install mysql-connector-java*UBUNTU
apt-get install mysql-connector-java* -
Confirm that
mysql-connector-java.jaris in the Java share directory.ls /usr/share/java/mysql-connector-java.jar -
Make sure the .jar file has the appropriate permissions - 644.
-
Execute the following command:
ambari-server setup --jdbc-db=mysql --jdbc-driver=/usr/share/java/mysql-connector-java.jar
-
-
Create a user for Oozie and grant it permissions.
-
Using the MySQL database admin utility:
# mysql -u root -p CREATE USER ‘<OOZIEUSER>’@’%’ IDENTIFIED BY ‘<OOZIEPASSWORD>’; GRANT ALL PRIVILEGES ON *.* TO '<OOZIEUSER>'@'%'; FLUSH PRIVILEGES; -
Where <OOZIEUSER> is the Oozie user name and <OOZIEPASSWORD> is the Oozie user password.
-
-
Create the Oozie database.
-
The Oozie database must be created prior.
# mysql -u root -p CREATE DATABASE<OOZIEDATABASE> -
Where <OOZIEDATABASE> is the Oozie database name.
-
Using Oozie with PostgreSQL
To set up PostgreSQL for use with Oozie:
-
On the Ambari Server host, stage the appropriate PostgreSQL connector for later deployment.
-
Install the connector.
RHEL/CentOS/Oracle Linux
yum install postgresql-jdbcSLES
zypper install -y postgresql-jdbcUBUNTU
apt-get install -y postgresql-jdbc -
Copy the connector.jar file to the Java share directory.
cp /usr/share/pgsql/postgresql-*.jdbc3.jar /usr/share/java/postgresql-jdbc.jar -
Confirm that .jar is in the Java share directory.
ls /usr/share/java/postgresql-jdbc.jar -
Change the access mode of the .jar file to 644.
chmod 644 /usr/share/java/postgresql-jdbc.jar -
Execute the following command:
ambari-server setup --jdbc-db=postgres --jdbc-driver=/usr/share/java/postgresql-connector-java.jar
-
-
Create a user for Oozie and grant it permissions.
-
Using the PostgreSQL database admin utility:
echo "CREATE DATABASE<OOZIEDATABASE>;" | psql -U postgres echo "CREATE USER<OOZIEUSER>WITH PASSWORD '<OOZIEPASSWORD>';" | psql -U postgres echo "GRANT ALL PRIVILEGES ON DATABASE<OOZIEDATABASE>TO<OOZIEUSER>;" | psql -U postgres -
Where <OOZIEUSER> is the Oozie user name, <OOZIEPASSWORD> is the Oozie user password and <OOZIEDATABASE> is the Oozieozie database name.
-
Troubleshooting Oozie
Use these entries to help you troubleshoot any issues you might have installing Oozie with non-default databases.
Problem: Oozie Server Install Fails Using MySQL
Check the install log:
cp /usr/share/java/mysql-connector-java.jar
usr/lib/oozie/libext/mysql-connector-java.jar
has failures: true
The MySQL JDBC.jar file cannot be found.
Solution
Make sure the file is in the appropriate directory on the Oozie server and click Retry.
Problem: Oozie Server Install Fails Using Oracle or MySQL
Check the install log:
Exec[exec cd /var/tmp/oozie &&
/usr/lib/oozie/bin/ooziedb.sh create -sqlfile oozie.sql -run ]
has failures: true
Oozie was unable to connect to the database or was unable to successfully setup the schema for Oozie.
Solution
Check the database connection settings provided during the Customize Services step in the install wizard by browsing back to Customize Services > Oozie. After confirming and adjusting your database settings, proceed forward with the
install wizard.
If the Install Oozie Server wizard continues to fail, get more information by connecting directly to the Oozie server and executing the following command as <OOZIEUSER>:
su oozie /usr/lib/oozie/bin/ooziedb.sh create -sqlfile oozie.sql -run
Setting up an Internet Proxy Server for Ambari
If you plan to use the public repositories for installing the Stack, Ambari Server must have Internet access to confirm access to the repositories and validate the repositories. If your machine requires use of a proxy server for Internet access, you must configure Ambari Server to use the proxy server.
How To Set Up an Internet Proxy Server for Ambari
How To Set Up an Internet Proxy Server for Ambari
-
On the Ambari Server host, add proxy settings to the following script:
/var/lib/ambari-server/ambari-env.sh.-Dhttp.proxyHost=<yourProxyHost>-Dhttp.proxyPort=<yourProxyPort> -
Optionally, to prevent some host names from accessing the proxy server, define the list of excluded hosts, as follows:
-Dhttp.nonProxyHosts=<pipe|separated|list|of|hosts> -
If your proxy server requires authentication, add the user name and password, as follows:
-Dhttp.proxyUser=<username>-Dhttp.proxyPassword=<password> -
Restart the Ambari Server to pick up this change.
Configuring Network Port Numbers
This chapter lists port number assignments required to maintain communication between Ambari Server, Ambari Agents, Ambari Web UI, Ganglia, and Nagios components.
-
Optional: Changing the Default Ambari Server Port
For more information about configuring port numbers for Stack components, see Configuring Ports in the HDP Stack documentation.
Default Network Port Numbers - Ambari
The following table lists the default ports used by Ambari Server and Ambari Agent services.
|
Service |
Servers |
Default Ports Used |
Protocol |
Description |
Need End User Access? |
Configuration Parameters |
|---|---|---|---|---|---|---|
|
Ambari Server |
Ambari Server host |
8080 See Optional: Change the Ambari Server Port for instructions on changing the default port. |
http See Optional: Set Up HTTPS for Ambari Server for instructions on enabling HTTPS. |
Interface to Ambari Web and Ambari REST API |
No |
|
|
Ambari Server |
Ambari Server host |
8440 |
https |
Handshake Port for Ambari Agents to Ambari Server |
No |
|
|
Ambari Server |
Ambari Server host |
8441 |
https |
Registration and Heartbeat Port for Ambari Agents to Ambari Server |
No |
|
|
Ambari Agent |
All hosts running Ambari Agents |
8670 You can change the Ambari Agent ping port in the Ambari Agent configuration. If you change the port, you must restart Nagios after making the change. |
tcp |
Ping port used for Nagios Server to check the health of the Ambari Agent |
No |
Ganglia Ports
The following table lists the default ports used by the various Ganglia services.
|
Service |
Servers |
Default Ports Used |
Protocol |
Description |
Need End User Access? |
Configuration Parameters |
|---|---|---|---|---|---|---|
|
Ganglia Server |
Ganglia server host |
8660/61/62/63 |
For metric (gmond) collectors |
No |
||
|
Ganglia Monitor |
All Slave Node hosts |
8660 |
For monitoring (gmond) agents |
No |
||
|
Ganglia Server |
Ganglia server host |
8651 |
For ganglia gmetad |
|||
|
Ganglia Web |
Ganglia server host |
httpSee Optional: Set Up HTTPS for Ganglia for instructions on enabling HTTPS. |
Nagios Ports
The following table lists the default port used by the Nagios server.
|
Service |
Servers |
Default Ports Used |
Protocol |
Description |
Need End User Access? |
Configuration Parameters |
|---|---|---|---|---|---|---|
|
Nagios Server |
Nagios server host |
80 |
httpSee Optional: Set Up HTTPS for Nagios for instructions on enabling HTTPS. |
Nagios Web UI |
No |
Optional: Changing the Default Ambari Server Port
By default, Ambari Server uses port 8080 to access the Ambari Web UI and the REST API. To change the port number, you must edit the Ambari properties file.
Ambari Server should not be running when you change port numbers. Edit ambari.properties before you start Ambari Server the first time or stop Ambari Server before editing
properties.
-
On the Ambari Server host, open
/etc/ambari-server/conf/ambari.propertieswith a text editor. -
Add the client API port property and set it to your desired port value:
client.api.port=<port_number> -
Start or re-start the Ambari Server. Ambari Server now accesses Ambari Web via the newly configured port:
http://<your.ambari.server>:<port_number>
Changing the JDK Version on an Existing Cluster
During your initial Ambari Server Setup, you selected the JDK to use or provided a path to a custom JDK already installed on your hosts. After setting up your cluster, you may change the JDK version using the following procedure.
How to change the JDK Version for an Existing Cluster
How to change the JDK Version for an Existing Cluster
-
Re-run Ambari Server Setup.
ambari-server setup -
At the prompt to change the JDK, Enter y.
Do you want to change Oracle JDK [y/n] (n)?y -
At the prompt to choose a JDK, Enter
1to change the JDK to v1.7.[1] - Oracle JDK 1.7[2] - Oracle JDK 1.6 [3] - Custom JDK Enter choice: 3If you choose Oracle JDK 1.7 or Oracle JDK 1.6, the JDK you choose downloads and installs automatically.
-
If you choose
Custom JDK, verify or add the custom JDK path on all hosts in the cluster. -
After setup completes, you must restart each component for the new JDK to be used by the Hadoop services.
Using the Ambari Web UI, do the following tasks:
-
Restart each component
-
Restart each host
-
Restart all services
-
For more information about managing services in your cluster, see Monitoring and Managing Services.
Configuring NameNode High Availability
Ambari sets up active and standby NameNode hosts on a new cluster, by default. Configuring NameNode High Availability (HA) sets the standby NameNode to handle the active NameNode workload in the event that the active NameNode fails.
Following topics describe:
How To Set Up NameNode High Availability
-
Check to make sure you have at least three hosts in your cluster and are running at least three ZooKeeper servers.
-
In Ambari Web, select
Services > HDFS > Summary. Select Service Actions and choose Enable NameNode HA. -
The Enable HA Wizard launches. This wizard describes the set of automated and manual steps you must take to set up NameNode high availability.
-
Get Started : This step gives you an overview of the process and allows you to select a Nameservice ID. You use this Nameservice ID instead of the NameNode FQDN once HA has been set up. Click
Nextto proceed.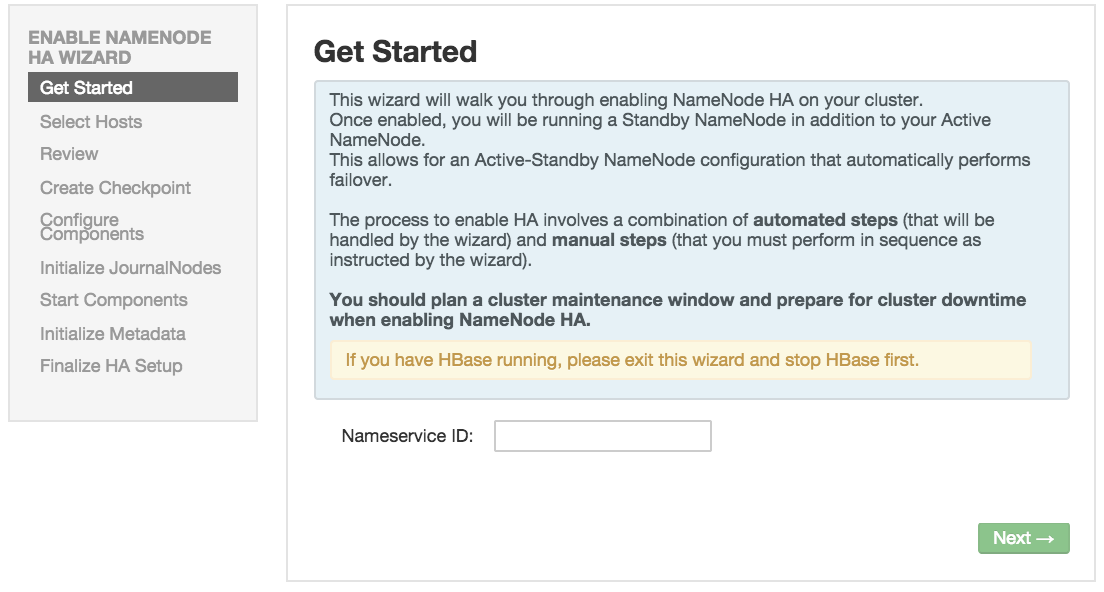
-
Select Hosts : Select a host for the additional NameNode and the JournalNodes. The wizard suggest options that you can adjust using the drop-down lists. Click
Nextto proceed.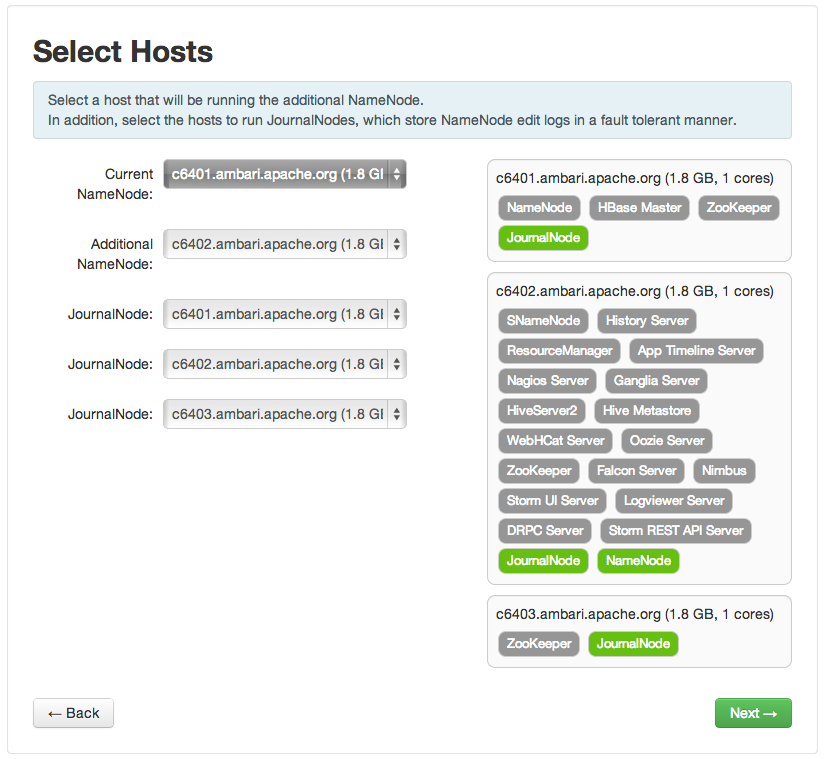
-
Review : Confirm your host selections and click
Next.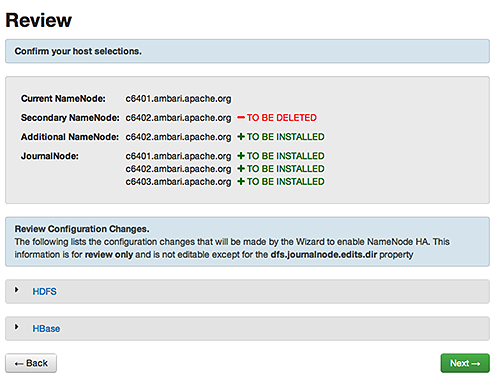
-
Create Checkpoints : Follow the instructions in the step. You need to log in to your current NameNode host to run the commands to put your NameNode into safe mode and create a checkpoint. When Ambari detects success, the message on the bottom of the window changes. Click
Next.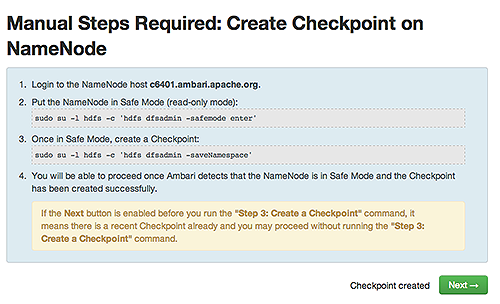
-
Configure Components : The wizard configures your components, displaying progress bars to let you track the steps. Click
Nextto continue.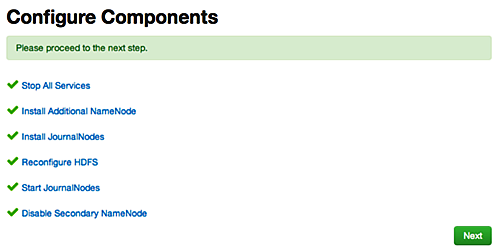
-
Initialize JournalNodes : Follow the instructions in the step. You need to login to your current NameNode host to run the command to initialize the JournalNodes. When Ambari detects success, the message on the bottom of the window changes. Click Next.
After upgrading to Ambari 1.6.1, or using a Blueprint to install your cluster, initializing JournalNodes may fail. For information about how to work around this issue, see the the following topic in the Ambari Troubleshooting Guide:
Enabling NameNode HA wizard fails at the Initialize JournalNode step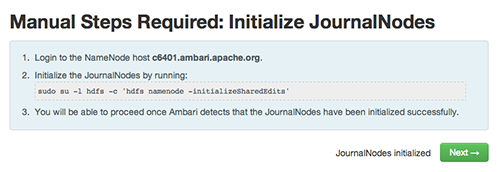
-
Start Components : The wizard starts the ZooKeeper servers and the NameNode, displaying progress bars to let you track the steps. Click
Nextto continue.
-
Initialize Metadata : Follow the instructions in the step. For this step you must log in to both the current NameNode and the additional NameNode. Make sure you are logged in to the correct host for each command. Click
Nextwhen you have completed the two commands. A Confirmation pop-up window displays, reminding you to do both steps. ClickOKto confirm.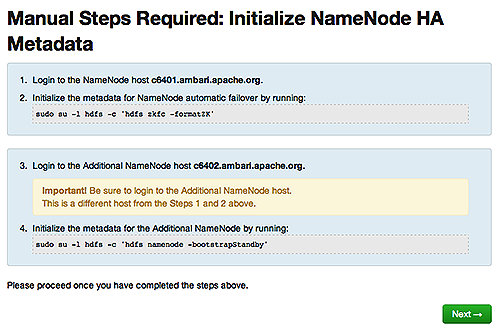
-
Finalize HA Setup : The wizard the setup, displaying progress bars to let you track the steps. Click
Doneto finish the wizard. After the Ambari Web GUI reloads, you may see some alert notifications. Wait a few minutes until the services come back up. If necessary, restart any components using Ambari Web.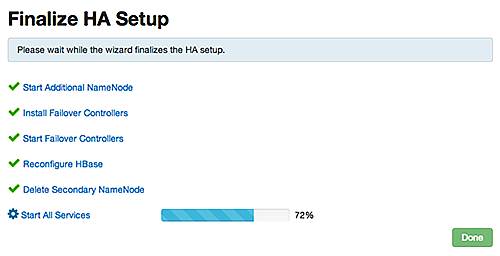
-
If you are using Hive, you must manually change the Hive Metastore FS root to point to the Nameservice URI instead of the NameNode URI. You created the Nameservice ID in the Get Started step.
-
Check the current FS root. On the Hive host:
hive --config /etc/hive/conf.server --service metatool -listFSRootThe output looks similar to the following:
Listing FS Roots... hdfs://<namenode-host>/apps/hive/warehouse -
Use this command to change the FS root:
$ hive --config /etc/hive/conf.server --service metatool -updateLocation<new-location><old-location>$ hive --config /etc/hive/conf.server --service metatool -updateLocation hdfs://mycluster/apps/hive/warehouse hdfs://c6401.ambari.apache.org/apps/hive/warehouseThe output looks similar to the following:
Successfully updated the following locations...Updated X records in SDS table
-
-
If you are using Oozie, you must use the Nameservice ID instead of the NameNode URI in your workflow files. For example, where the Nameservice ID is
mycluster:<workflow-app xmlns="uri:oozie:workflow:0.2" name="map-reduce-wf"> <start to="mr-node"/> <action name="mr-node"> <map-reduce> <job-tracker><jobTracker></job-tracker> <name-node>hdfs://mycluster</name-node> -
If you are using Hue, to enable NameNode HighAvailability, you must use httpfs instead of webhdfs to communicate with name nodes inside the cluster. After successfully setting up NameNode High Availability:
-
Install an httpfs server on any node in the cluster:
yum install hadoop-httpfs -
Ensure that Hue hosts and groups use the httpfs server.
For example, on the httpfs server host, add to httpfs-site.xml the following lines:
<property> <name>httpfs.proxyuser.hue.hosts</name> <value>*</value> </property> <property> <name>httpfs.proxyuser.hue.groups</name> <value>*</value> </property> -
Ensure that groups and hosts in the cluster use the httpfs server. For example, use Services > HDFS > Configs to add the following properties and values to
core-site.xml.Property
Value
hadoop.proxyuser.httpfs.groups
*
hadoop.proxyuser.httpfs.hosts
*
-
Using Ambari, in
Services >HDFSrestart the HDFS service in your cluster. -
On the Hue host, configure Hue to use the httpfs server by editing hue.ini to include the following line:
webhdfs_url=http://<fqdn.of.httpfs.server>:14000/webhdfs/v1/ -
Restart the Hue service.
-
-
Adjust the ZooKeeper Failover Controller retries setting for your environment.
-
Browse to
Services > HDFS > Configs >core-site. -
Set
ha.failover-controller.active-standby-elector.zk.op.retries=120
-
How to Roll Back NameNode HA
To roll back NameNode HA to the previous non-HA state use the following step-by-step manual process, depending on your installation.
Stop HBase
-
From Ambari Web, go to the Services view and select HBase.
-
Choose
Service Actions > Stop. -
Wait until HBase has stopped completely before continuing.
Checkpoint the Active NameNode
If HDFS has been in use after you enabled NameNode HA, but you wish to revert back to a non-HA state, you must checkpoint the HDFS state before proceeding with the rollback.
If the Enable NameNode HA wizard failed and you need to revert back, you can skip this step and move on to
Stop All Services.
-
If Kerberos security has not been enabled on the cluster:
On the Active NameNode host, execute the following commands to save the namespace. You must be the HDFS service user to do this.
sudo su -l<HDFS_USER>-c 'hdfs dfsadmin -safemode enter'sudo su -l<HDFS_USER>-c 'hdfs dfsadmin -saveNamespace' -
If Kerberos security has been enabled on the cluster:
sudo su -l<HDFS_USER>-c 'kinit -kt /etc/security/keytabs/nn.service.keytab nn/<HDFS_USER>@<HDFS_USER>;hdfs dfsadmin -safemode enter' sudo su -l<HDFS_USER>-c 'kinit -kt /etc/security/keytabs/nn.service.keytab nn/<HDFS_USER>@<HDFS_USER>;hdfs dfsadmin -saveNamespace'Where <HDFS_USER> is the HDFS service user; for example hdfs, <HOSTNAME> is the Active NameNode hostname, and <REALM> is your Kerberos realm.
Stop All Services
Browse to Ambari Web > Services, then choose Stop All in the Services navigation panel. You must wait until all the services are completely
stopped.
Prepare the Ambari Server Host for Rollback
Log into the Ambari server host and set the following environment variables to prepare for the rollback procedure:
|
Variable |
Value |
|---|---|
|
export AMBARI_USER=AMBARI_USERNAME |
Substitute the value of the administrative user for Ambari Web. The default value is admin. |
|
export AMBARI_PW=AMBARI_PASSWORD |
Substitute the value of the administrative password for Ambari Web. The default value is admin. |
|
export AMBARI_PORT=AMBARI_PORT |
Substitute the Ambari Web port. The default value is 8080. |
|
export AMBARI_PROTO=AMBARI_PROTOCOL |
Substitute the value of the protocol for connecting to Ambari Web. Options are http or https. The default value is http. |
|
export CLUSTER_NAME=CLUSTER_NAME |
Substitute the name of your cluster, set during the Ambari Install Wizard process. For example: mycluster. |
|
export NAMENODE_HOSTNAME=NN_HOSTNAME |
Substitute the FQDN of the host for the non-HA NameNode. For example: nn01.mycompany.com. |
|
export ADDITIONAL_NAMENODE_HOSTNAME=ANN_HOSTNAME |
Substitute the FQDN of the host for the additional NameNode in your HA setup. |
|
export SECONDARY_NAMENODE_HOSTNAME=SNN_HOSTNAME |
Substitute the FQDN of the host for the standby NameNode for the non-HA setup. |
|
export JOURNALNODE1_HOSTNAME=JOUR1_HOSTNAME |
Substitute the FQDN of the host for the first Journal Node. |
|
export JOURNALNODE2_HOSTNAME=JOUR2_HOSTNAME |
Substitute the FQDN of the host for the second Journal Node. |
|
export JOURNALNODE3_HOSTNAME=JOUR3_HOSTNAME |
Substitute the FQDN of the host for the third Journal Node. |
Double check that these environment variables are set correctly.
Restore the HBase Configuration
If you have installed HBase, you may need to restore a configuration to its pre-HA state.
-
To check if your current HBase configuration needs to be restored, on the Ambari Server host:
/var/lib/ambari-server/resources/scripts/configs.sh -u<AMBARI_USER>-p<AMBARI_PW>-port<AMBARI_PORT>get localhost<CLUSTER_NAME>hbase-siteWhere the environment variables you set up in Prepare the Ambari Server Host for Rollback substitute for the variable names.
Look for the configuration property
hbase.rootdir. If the value is set to the NameService ID you set up using theEnable NameNode HAwizard, you need to revert thehbase-siteconfiguration set up back to non-HA values. If it points instead to a specific NameNode host, it does not need to be rolled back and you can go on to Delete ZooKeeper Failover Controllers.For example:
"hbase.rootdir":"hdfs://<name-service-id>:8020/apps/hbase/data"The hbase.rootdir property points to the NameService ID and the value needs to be rolled back"hbase.rootdir":"hdfs://<nn01.mycompany.com>:8020/apps/hbase/data"The hbase.rootdir property points to a specific NameNode host and not a NameService ID. This does not need to be rolled back. -
If you need to roll back the
hbase.rootdirvalue, on the Ambari Server host, use theconfig.shscript to make the necessary change:/var/lib/ambari-server/resources/scripts/configs.sh -u<AMBARI_USER>-p<AMBARI_PW>-port<AMBARI_PORT>set localhost<CLUSTER_NAME>hbase-site hbase.rootdir hdfs://<NAMENODE_HOSTNAME>:8020/apps/hbase/dataWhere the environment variables you set up in Prepare the Ambari Server Host for Rollback substitute for the variable names.
-
Verify that the
hbase.rootdirproperty has been restored properly. On the Ambari Server host:/var/lib/ambari-server/resources/scripts/configs.sh -u<AMBARI_USER>-p<AMBARI_PW>-port<AMBARI_PORT>get localhost<CLUSTER_NAME>hbase-siteThe
hbase.rootdirproperty should now be set to the NameNode hostname, not the NameService ID.
Delete ZooKeeper Failover Controllers
You may need to delete ZooKeeper (ZK) Failover Controllers.
-
To check if you need to delete ZK Failover Controllers, on the Ambari Server host:
curl -u<AMBARI_USER>:<AMBARI_PW>-H "X-Requested-By: ambari" -i<AMBARI_PROTO>://localhost:<AMBARI_PORT>/api/v1/clusters/<CLUSTER_NAME>/host_components?HostRoles/component_name=ZKFCIf this returns an empty
itemsarray, you may proceed to Modify HDFS Configuration. Otherwise you must use the following DELETE commands: -
To delete all ZK Failover Controllers, on the Ambari Server host:
curl -u<AMBARI_USER>:<AMBARI_PW>-H "X-Requested-By: ambari" -i -X DELETE<AMBARI_PROTO>://localhost:<AMBARI_PORT>/api/v1/clusters/<CLUSTER_NAME>/hosts/<NAMENODE_HOSTNAME>/host_components/ZKFC curl -u<AMBARI_USER>:<AMBARI_PW>-H "X-Requested-By: ambari" -i -X DELETE<AMBARI_PROTO>://localhost:<AMBARI_PORT>/api/v1/clusters/<CLUSTER_NAME>/hosts/<ADDITIONAL_NAMENODE_HOSTNAME>/host_components/ZKFC -
Verify that the ZK Failover Controllers have been deleted. On the Ambari Server host:
curl -u<AMBARI_USER>:<AMBARI_PW>-H "X-Requested-By: ambari" -i<AMBARI_PROTO>://localhost:<AMBARI_PORT>/api/v1/clusters/<CLUSTER_NAME>/host_components?HostRoles/component_name=ZKFCThis command should return an empty
itemsarray.
Modify HDFS Configurations
You may need to modify your hdfs-site configuration and/or your core-site configuration.
-
To check if you need to modify your
hdfs-siteconfiguration, on the Ambari Server host:/var/lib/ambari-server/resources/scripts/configs.sh -u<AMBARI_USER>-p<AMBARI_PW>-port<AMBARI_PORT>get localhost<CLUSTER_NAME>hdfs-siteIf you see any of the following properties, you must delete them from your configuration.
-
dfs.nameservices -
dfs.client.failover.proxy.provider.<NAMESERVICE_ID> -
dfs.ha.namenodes.<NAMESERVICE_ID> -
dfs.ha.fencing.methods -
dfs.ha.automatic-failover.enabled -
dfs.namenode.http-address.<NAMESERVICE_ID>.nn1 -
dfs.namenode.http-address.<NAMESERVICE_ID>.nn2 -
dfs.namenode.rpc-address.<NAMESERVICE_ID>.nn1 -
dfs.namenode.rpc-address.<NAMESERVICE_ID>.nn2 -
dfs.namenode.shared.edits.dir -
dfs.journalnode.edits.dir -
dfs.journalnode.http-address -
dfs.journalnode.kerberos.internal.spnego.principal -
dfs.journalnode.kerberos.principal -
dfs.journalnode.keytab.fileWhere
<NAMESERVICE_ID>is the NameService ID you created when you ran the Enable NameNode HA wizard.
-
-
To delete these properties, execute the following for each property you found. On the Ambari Server host:
/
var/lib/ambari-server/resources/scripts/configs.sh -u<AMBARI_USER>-p<AMBARI_PW>-port<AMBARI_PORT>delete localhost<CLUSTER_NAME>hdfs-site property_nameWhere you replace
property_namewith the name of each of the properties to be deleted. -
Verify that all of the properties have been deleted. On the Ambari Server host:
/var/lib/ambari-server/resources/scripts/configs.sh -u<AMBARI_USER>-p<AMBARI_PW>-port<AMBARI_PORT>get localhost<CLUSTER_NAME>hdfs-siteNone of the properties listed above should be present.
-
To check if you need to modify your
core-siteconfiguration, on the Ambari Server host:/var/lib/ambari-server/resources/scripts/configs.sh -u<AMBARI_USER>-p<AMBARI_PW>-port<AMBARI_PORT>get localhost<CLUSTER_NAME>core-site -
If you see the property
ha.zookeeper.quorum, it must be deleted. On the Ambari Server host:/var/lib/ambari-server/resources/scripts/configs.sh -u<AMBARI_USER>-p<AMBARI_PW>-port<AMBARI_PORT>delete localhost<CLUSTER_NAME>core-site ha.zookeeper.quorum -
If the property
fs.defaultFSis set to the NameService ID, it must be reverted back to its non-HA value. For example:"fs.defaultFS":"hdfs://<name-service-id>" The property fs.defaultFS needs to be modified as it points to a NameService ID "fs.defaultFS":"hdfs://<nn01.mycompany.com>"The propertyfs.defaultFSdoes not need to be changed as it points to a specific NameNode, not to a NameService ID -
To revert the property
fs.defaultFSto the NameNode host value, on the Ambari Server host:/var/lib/ambari-server/resources/scripts/configs.sh -u<AMBARI_USER>-p<AMBARI_PW>-port<AMBARI_PORT>set localhost<CLUSTER_NAME>core-site fs.defaultFS hdfs://<NAMENODE_HOSTNAME> -
Verify that the
core-siteproperties are now properly set. On the Ambari Server host:/var/lib/ambari-server/resources/scripts/configs.sh -u<AMBARI_USER>-p<AMBARI_PW>-port<AMBARI_PORT>get localhost<CLUSTER_NAME>core-siteThe property
fs.defaultFSshould be set to point to the NameNode host and the propertyha.zookeeper.quorumshould not be there.
Recreate the Standby NameNode
You may need to recreate your standby NameNode.
-
To check to see if you need to recreate the standby NameNode, on the Ambari Server host:
curl -u<AMBARI_USER>:<AMBARI_PW>-H "X-Requested-By: ambari" -i -X GET<AMBARI_PROTO>://localhost:<AMBARI_PORT>/api/v1/clusters/<CLUSTER_NAME>/host_components?HostRoles/component_name=SECONDARY_NAMENODEIf this returns an empty
itemsarray, you must recreate your standby NameNode. Otherwise you can go on to Re-enable Standby NameNode. -
Recreate your standby NameNode. On the Ambari Server host:
curl -u<AMBARI_USER>:<AMBARI_PW>-H "X-Requested-By: ambari" -i -X POST -d '{"host_components" : [{"HostRoles":{"component_name":"SECONDARY_NAMENODE"}] }'<AMBARI_PROTO>://localhost:<AMBARI_PORT>/api/v1/clusters/<CLUSTER_NAME>/hosts?Hosts/host_name=<SECONDARY_NAMENODE_HOSTNAME> -
Verify that the standby NameNode now exists. On the Ambari Server host:
curl -u<AMBARI_USER>:<AMBARI_PW>-H "X-Requested-By: ambari" -i -X GET<AMBARI_PROTO>://localhost:<AMBARI_PORT>/api/v1/clusters/<CLUSTER_NAME>/host_components?HostRoles/component_name=SECONDARY_NAMENODEThis should return a non-empty
itemsarray containing the standby NameNode.
Re-enable the Standby NameNode
To re-enable the standby NameNode, on the Ambari Server host:
curl -u <AMBARI_USER>:<AMBARI_PW> -H "X-Requested-By: ambari" -i -X '{"RequestInfo":{"context":"Enable Secondary NameNode"},"Body":{"HostRoles":{"state":"INSTALLED"}}}'<AMBARI_PROTO>://localhost:<AMBARI_PORT>/api/v1/clusters/<CLUSTER_NAME>/hosts/<SECONDARY_NAMENODE_HOSTNAME}/host_components/SECONDARY_NAMENODE
-
If this returns 200, go to Delete All JournalNodes.
-
If this returns 202, wait a few minutes and run the following on the Ambari Server host:
curl -u<AMBARI_USER>:${AMBARI_PW -H "X-Requested-By: ambari" -i -X "<AMBARI_PROTO>://localhost:<AMBARI_PORT>/api/v1/clusters/<CLUSTER_NAME>/host_components?HostRoles/component_name=SECONDARY_NAMENODE&fields=HostRoles/state"When
"state" : "INSTALLED"is in the response, go on to the next step.
Delete All JournalNodes
You may need to delete any JournalNodes.
-
To check to see if you need to delete JournalNodes, on the Ambari Server host:
curl -u<AMBARI_USER>:<AMBARI_PW>-H "X-Requested-By: ambari" -i -X GET<AMBARI_PROTO>://localhost:<AMBARI_PORT>/api/v1/clusters/<CLUSTER_NAME>/host_components?HostRoles/component_name=JOURNALNODEIf this returns an empty
itemsarray, you can go on to Delete the Additional NameNode. Otherwise you must delete the JournalNodes. -
To delete the JournalNodes, on the Ambari Server host:
curl -u<AMBARI_USER>:<AMBARI_PW>-H "X-Requested-By: ambari" -i -X DELETE<AMBARI_PROTO>://localhost:<AMBARI_PORT>/api/v1/clusters/<CLUSTER_NAME>/hosts/<JOURNALNODE1_HOSTNAME>/host_components/JOURNALNODE curl -u<AMBARI_USER>:<AMBARI_PW>-H "X-Requested-By: ambari" -i -X DELETE<AMBARI_PROTO>://localhost:<AMBARI_PORT>/api/v1/clusters/<CLUSTER_NAME>/hosts/<JOURNALNODE2_HOSTNAME>/host_components/JOURNALNODE curl -u<AMBARI_USER>:<AMBARI_PW>-H "X-Requested-By: ambari" -i -X DELETE<AMBARI_PROTO>://localhost:<AMBARI_PORT>/api/v1/clusters/<CLUSTER_NAME>/hosts/<JOURNALNODE3_HOSTNAME>/host_components/JOURNALNODE -
Verify that all the JournalNodes have been deleted. On the Ambari Server host:
curl -u<AMBARI_USER>:<AMBARI_PW>-H "X-Requested-By: ambari" -i -X GET<AMBARI_PROTO>://localhost:<AMBARI_PORT>/api/v1/clusters/<CLUSTER_NAME>/host_components?HostRoles/component_name=JOURNALNODEThis should return an empty
itemsarray.
Delete the Additional NameNode
You may need to delete your Additional NameNode.
-
To check to see if you need to delete your Additional NameNode, on the Ambari Server host:
curl -u<AMBARI_USER>:<AMBARI_PW>-H "X-Requested-By: ambari" -i -X GET<AMBARI_PROTO>://localhost:<AMBARI_PORT>/api/v1/clusters/<CLUSTER_NAME>/host_components?HostRoles/component_name=NAMENODEIf the
itemsarray contains two NameNodes, the Additional NameNode must be deleted. -
To delete the Additional NameNode that was set up for HA, on the Ambari Server host:
curl -u<AMBARI_USER>:<AMBARI_PW>-H "X-Requested-By: ambari" -i -X DELETE<AMBARI_PROTO>://localhost:<AMBARI_PORT>/api/v1/clusters/<CLUSTER_NAME>/hosts/<ADDITIONAL_NAMENODE_HOSTNAME>/host_components/NAMENODE -
Verify that the Additional NameNode has been deleted:
curl -u<AMBARI_USER>:<AMBARI_PW>-H "X-Requested-By: ambari" -i -X GET<AMBARI_PROTO>://localhost:<AMBARI_PORT>/api/v1/clusters/<CLUSTER_NAME>/host_components?HostRoles/component_name=NAMENODEThis should return an
itemsarray that shows only one NameNode.
Verify the HDFS Components
Make sure you have the correct components showing in HDFS.
-
Go to
Ambari Web UI > Services, then selectHDFS. -
Check the Summary panel and make sure that the first three lines look like this:
-
NameNode
-
SNameNode
-
DataNodes
You should not see any line for JournalNodes.
-
Start HDFS
-
In the
Ambari Web UI, selectService Actions, then chooseStart.Wait until the progress bar shows that the service has completely started and has passed the service checks.
If HDFS does not start, you may need to repeat the previous step. -
To start all of the other services, select
Actions > Start Allin theServicesnavigation panel.
Configuring ResourceManager High Availability
The following topic explains How to set up ResourceManager High Availability.
How to Set Up ResourceManager High Availability
-
Check to make sure you have at least three hosts in your cluster and are running at least three ZooKeeper servers.
-
In Ambari Web, browse to
Services > YARN > Summary. SelectService Actionsand chooseEnable ResourceManager HA. -
The Enable ResourceManager HA Wizard launches. The wizard describes a set of automated and manual steps you must take to set up ResourceManager High Availability.
-
Get Started: This step gives you an overview of enabling ResourceManager HA. Click
Nextto proceed.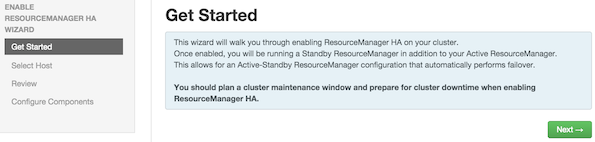
-
Select Host: The wizard shows you the host on which the current ResourceManager is installed and suggests a default host on which to install an additional ResourceManager. Accept the default selection, or choose an available host. Click
Nextto proceed.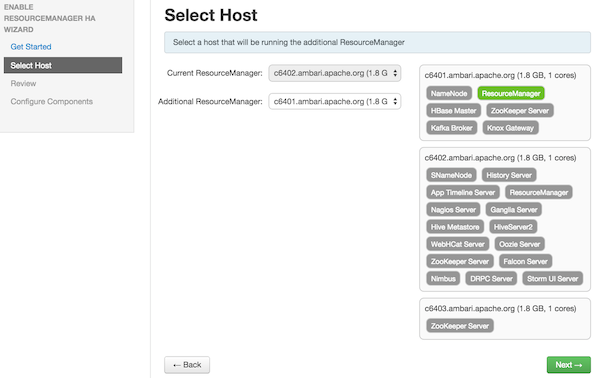
-
Review Selections: The wizard shows you the host selections and configuration changes that will occur to enable ResourceManager HA. Expand YARN, if necessary, to review all the YARN configuration changes. Click
Nextto approve the changes and start automatically configuring ResourceManager HA.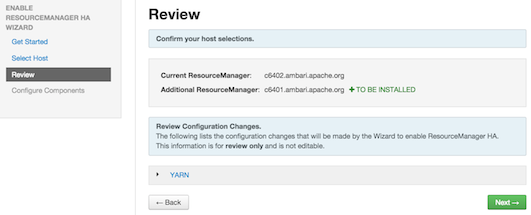
-
Configure Components: The wizard configures your components automatically, displaying progress bars to let you track the steps. After all progress bars complete, click
Completeto finish the wizard.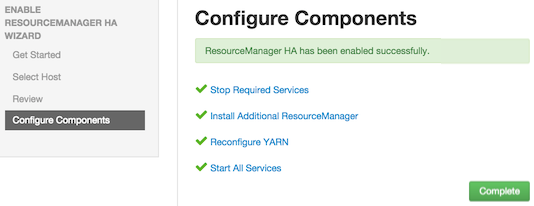
Configuring RHEL HA for Hadoop 1.x
Ambari supports High Availability of components such as NameNode or JobTracker in a HDP 1.x cluster running RHEL HA. After installing NameNode monitoring components on hosts in an HA cluster, as described in HDP System Administration, configure Ambari to reassign any component on a failover host in the cluster, using the host_relocate_component.py script.
For example, if the host for the primary NameNode or JobTracker component fails, Ambari
reassigns the primary NameNode or JobTracker component to the configured failover
host, when you start or restart Ambari server.
To configure RHEL HA for an Hadoop 1.x, do the following tasks:
-
Troublshoot RHEL HA, if necessary
Deploy the scripts
While the Ambari server and ambari agents are running on each host:
-
Download relocate_host_component.py from
/var/lib/ambari-server/resources/scriptson the Ambari server to/usr/bin/on each failover host. -
Download
hadoop.shfrom/var/lib/ambari-server/resources/scriptson the Ambari server and replace hadoop.sh in /usr/share/cluster/ on each failover host.
Configure Ambari properties across the HA cluster
To enable Ambari to run relocate_host_component.py, use a text editor to edit the cluster configuration file on each failover host in
the HA cluster.
In /etc/cluster/cluster.conf, set values for each of the following properties:
-
<server>=<ambari-hostname / ip> -
<port>=<8080> -
<protocol>=<http / https> -
<user>=<admin> -
<password>=<admin> -
<cluster>=<cluster-name> -
<output>=</var/log/ambari_relocate.log>
For example, the Hadoop daemon section of cluster.conf on the NameNode localhost in an HA cluster will look like:
<hadoop__independent_subtree="1" __max_restarts="10" __restart_expire_time="600" name="NameNode
Process"
daemon="namenode" boottime="10000" probetime="10000" stoptime="10000" url="http://10.0.0.30:50070/dfshealth.jsp"
pid="/var/run/hadoop/hdfs/hadoop-hdfs-namenode.pid" path="/"
ambariproperties="server=localhost,port=8080,protocol=http,user=admin,password=admin,cluster=c1,output=/var/log/ambari_relocate.log"/>
The relocate_host_component.py script reassigns components on failover of any host in the HA cluster, when you start
or restart Ambari server.
Troubleshooting RHEL HA
-
Review errors in
/var/log/messages/. -
If the following error message appears:
abrtd: Executable '/usr/bin/relocate_resources.py' doesn't belong to any package and ProcessUnpackaged is set to 'no'Set the following property, in
/etc/abrt/abrt-action-save-package-data.conf,set ProcessUnpackaged=Yes -
If the scripts return Error status=exit code 3, make sure the following are true:
-
The ambari agent on the failover host is running.
-
Failover did not result from STOP HDFS or STOP NN/JT, using Ambari.
-
The following table lists and describes parameters for relocate_host_components.py.
|
Parameter |
Value |
Example |
Description |
|---|---|---|---|
|
-h, |
na |
--help |
Display all parameter options. |
|
-v, |
na |
--verbose |
Increases output verbosity. |
|
-s, |
SERVER_HOSTNAME, |
--host=SERVER_HOSTNAME |
Ambari server host name (FQDN) |
|
-p, |
SERVER_PORT, |
--port=SERVER_PORT |
Ambari server port. [default: 8080] |
|
-r, |
PROTOCOL, |
--protocol=PROTOCOL |
Protocol for communicating with Ambari server (http/https) [default: http] |
|
-c, |
CLUSTER_NAME, |
--cluster-name=CLUSTER_NAME |
Ambari cluster to operate on. |
|
-e, |
SERVICE_NAME, |
--service-name=SERVICE_NAME |
Ambari Service to which the component belongs. |
|
-m, |
COMPONENT_NAME, |
--component-name=COMPONENT_NAME |
Ambari Service Component to operate on. |
|
-n, |
NEW_HOSTNAME, |
--new-host=NEW_HOSTNAME |
New host to relocate the component to. |
|
-a, |
ACTION, |
--action=ACTION |
Script action. [default: relocate] |
|
-o, |
FILE, |
--output-file=FILE |
Output file. [default: /temp/ambari_reinstall_probe.out] |
|
-u, |
USERNAME, |
--username=USERNAME |
Ambari server admin user. [default: admin] |
|
-w, |
PASSWORD, |
--password=PASSWORD |
Ambari server admin password. |
|
-d, |
COMPONENT_NAME, |
--start-component |
Start the component after reassignment. |
Using Ambari Blueprints
Ambari Blueprints provide an API to perform cluster installations. You can build a reusable “blueprint” that defines which Stack to use, how Service Components should be laid-out across a cluster, and what configurations to set.
Overview: Ambari Blueprints
Ambari Blueprints provide an API to perform cluster installations. You can build a reusable “blueprint” that defines which Stack to use, how Service Components should be laid-out across a cluster and what configurations to set.
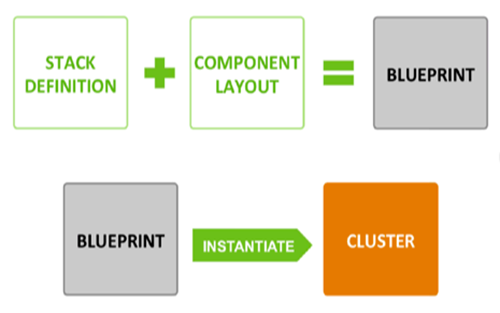
After setting up a blueprint, you can call the API to instantiate the cluster by providing the list of hosts to use. The Ambari Blueprint framework promotes reusability and facilitates automating cluster installations without UI interaction.
Learn more about Ambari Blueprints API on the Ambari Wiki.
Configuring HDP Stack Repositories for Red Hat Satellite
As part of installing HDP Stack with Ambari, HDP.repo and HDP-UTILS.repo files are generated and distributed to the cluster hosts based on the Base URL user
input from the Cluster Install Wizard during the Select Stack step. In cases where
you are using Red Hat Satellite to manage your Linux infrastructure, you can disable
the repositories defined in the HDP Stack .repo files and instead leverage Red Hat
Satellite.
How To Configure HDP Stack Repositories for Red Hat Satellite
How To Configure HDP Stack Repositories for Red Hat Satellite
To disable the repositories defined in the HDP Stack.repo files:
-
Before starting the Ambari Server and installing a cluster, on the Ambari Server browse to the Stacks definition directory.
cd /var/lib/ambari-server/resources/stacks/ -
Browse the install hook directory:
For HDP 2.0 or HDP 2.1 Stack
cd HDP/2.0.6/hooks/before-INSTALL/templatesFor HDP 1.3 Stack
cd HDP/1.3.2/hooks/before-INSTALL/templates -
Modify the.repo template file
vi repo_suse_rhel.j2 -
Set the enabled property to 0 to disable the repository.
enabled=0 -
Save and exit.
-
Start the Ambari Server and proceed with your install.
The .repo files will still be generated and distributed during cluster install but the repositories defined in the .repo files will not be enabled.
Configuring Storm for Supervision
Ambari administrators should install and configure a process controller to monitor
and run Apache Storm under supervision. Storm is fail-fast application, meaning that
it is designed to fail under certain circumstances, such as a runtime exception or
a break in network connectivity. Without a watchdog process, these events can quickly
take down an entire Storm cluster in production. A watchdog process prevents this
by monitoring for failed Storm processes and restarting them when necessary. This
topic describes how to configure supervisord to manage the Storm processes, but you may choose to use another process controller,
such as monit or daemontools.
How To Configure Storm for Supervision
How To Configure Storm for Supervision
To configure Storm for operating under supervision:
-
Stop all Storm components.
Using
Ambari Web Services > Storm > Service Actions, chooseStop, then wait until stop completes. -
Stop Ambari Server.
ambari-server stop -
Change Supervisor and Nimbus command scripts in the Stack definition.
On Ambari Server host, run:
sed -ir "s/scripts\/supervisor.py/scripts\/supervisor_prod.py/g"/var/lib/ambari-server/resources/stacks/HDP/2.1/services/STORM/metainfo.xml sed -ir "s/scripts\/nimbus.py/scripts\/nimbus_prod.py/g" /var/lib/ambari-server/resources/stacks/HDP/2.1/services/STORM/metainfo.xml -
Install
supervisordon all Nimbus and Supervisor hosts.-
Install EPEL repository.
yum install epel-release -y -
Install supervisor package for
supervisord.yum install supervisor -y -
Enable
supervisordon autostart.chkconfig supervisord on -
Change
supervisordconfiguration file permissions.chmod 600 /etc/supervisord.conf
-
-
Configure
supervisordto supervise Nimbus Server and Supervisors.Append the following to
/etc/supervisord.confon all Supervisor host and Nimbus hosts accordingly.[program:storm-nimbus] command=env PATH=$PATH:/bin:/usr/bin/:/usr/jdk64/jdk1.7.0_45/bin/ JAVA_HOME=/usr/jdk64/jdk1.7.0_45 /usr/hdp/current/storm-nimbus/bin/storm nimbus user=storm autostart=true autorestart=true startsecs=10 startretries=999 log_stdout=true log_stderr=true logfile=/var/log/storm/nimbus.out logfile_maxbytes=20MB logfile_backups=10[program:storm-supervisor] command=env PATH=$PATH:/bin:/usr/bin/:/usr/jdk64/jdk1.7.0_45/bin/ JAVA_HOME=/usr/jdk64/jdk1.7.0_45 /usr/hdp/current/storm-supervisor/bin/storm supervisor user=storm autostart=true autorestart=true startsecs=10 startretries=999 log_stdout=true log_stderr=true logfile=/var/log/storm/supervisor.out logfile_maxbytes=20MB logfile_backups=10 -
Start Ambari Server.
ambari-server start
Tuning Ambari Performance
For clusters larger than 200 nodes, calculate and set a larger task cache size on the Ambari server. Also, enable Nagios macros appropriate for the HDP Stack version.
How To Tune Ambari Performance
For clusters larger than 200 nodes:
-
Calculate the new, larger cache size, using the following relationship:
ecCacheSizeValue=60*<cluster_size> where <cluster_size> is the number of nodes in the cluster. -
On the Ambari Server host, in
etc/ambari-server/conf/ambari-properties, add the following property and value:server.ecCacheSize=<ecCacheSizeValue>where <ecCacheSizeValue> is the value calculated previously, based on the number of nodes in the cluster. -
On Ambari Server host, make the following changes:
-enable_environment_macros=1 +enable_environment_macros=0-
For HDP2, make this change in
/var/lib/ambari-server/resources/stacks/HDP/2.0.6/services/NAGIOS/package/templates/nagios.cfg.j2 -
For HDP1, make this change in
/var/lib/ambari-server/resources/stacks/HDP/1.3.2/services/NAGIOS/package/templates/nagios.cfg.j2
-
-
Restart Ambari Server.
ambari-server restart -
Restart Nagios.
Using
Ambari Web > Services > Nagios > Service Actions, chooseRestart All.
Refreshing YARN Capacity Scheduler
After you modify the Capacity Scheduler configuration, YARN supports refreshing the queues without requiring you to restart your ResourceManager. The “refresh” operation is valid if you have made no destructive changes to your configuration. Removing a queue is an example of a destructive change.
How to refresh the YARN Capacity Scheduler
This topic describes how to refresh the Capacity Scheduler in cases where you have added or modified existing queues.
-
In Ambari Web, browse to
Services > YARN > Summary. -
Select
Service Actions, then chooseRefresh YARN Capacity Scheduler. -
Confirm you would like to perform this operation.
The refresh operation is submitted to the YARN ResourceManager.
Rebalancing HDFS
HDFS provides a “balancer” utility to help balance the blocks across DataNodes in the cluster.
How to rebalance HDFS
This topic describes how you can initiate an HDFS rebalance from Ambari.
-
. In Ambari Web, browse to
Services > HDFS > Summary. -
Select
Service Actions, then chooseRebalance HDFS. -
Enter the Balance Threshold value as a percentage of disk capacity.
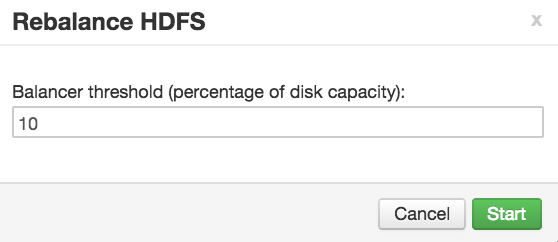
-
Click
Startto begin the rebalance. -
You can check rebalance progress or cancel a rebalance in process by opening the Background Operations dialog.